

Dinosaur Granny Square
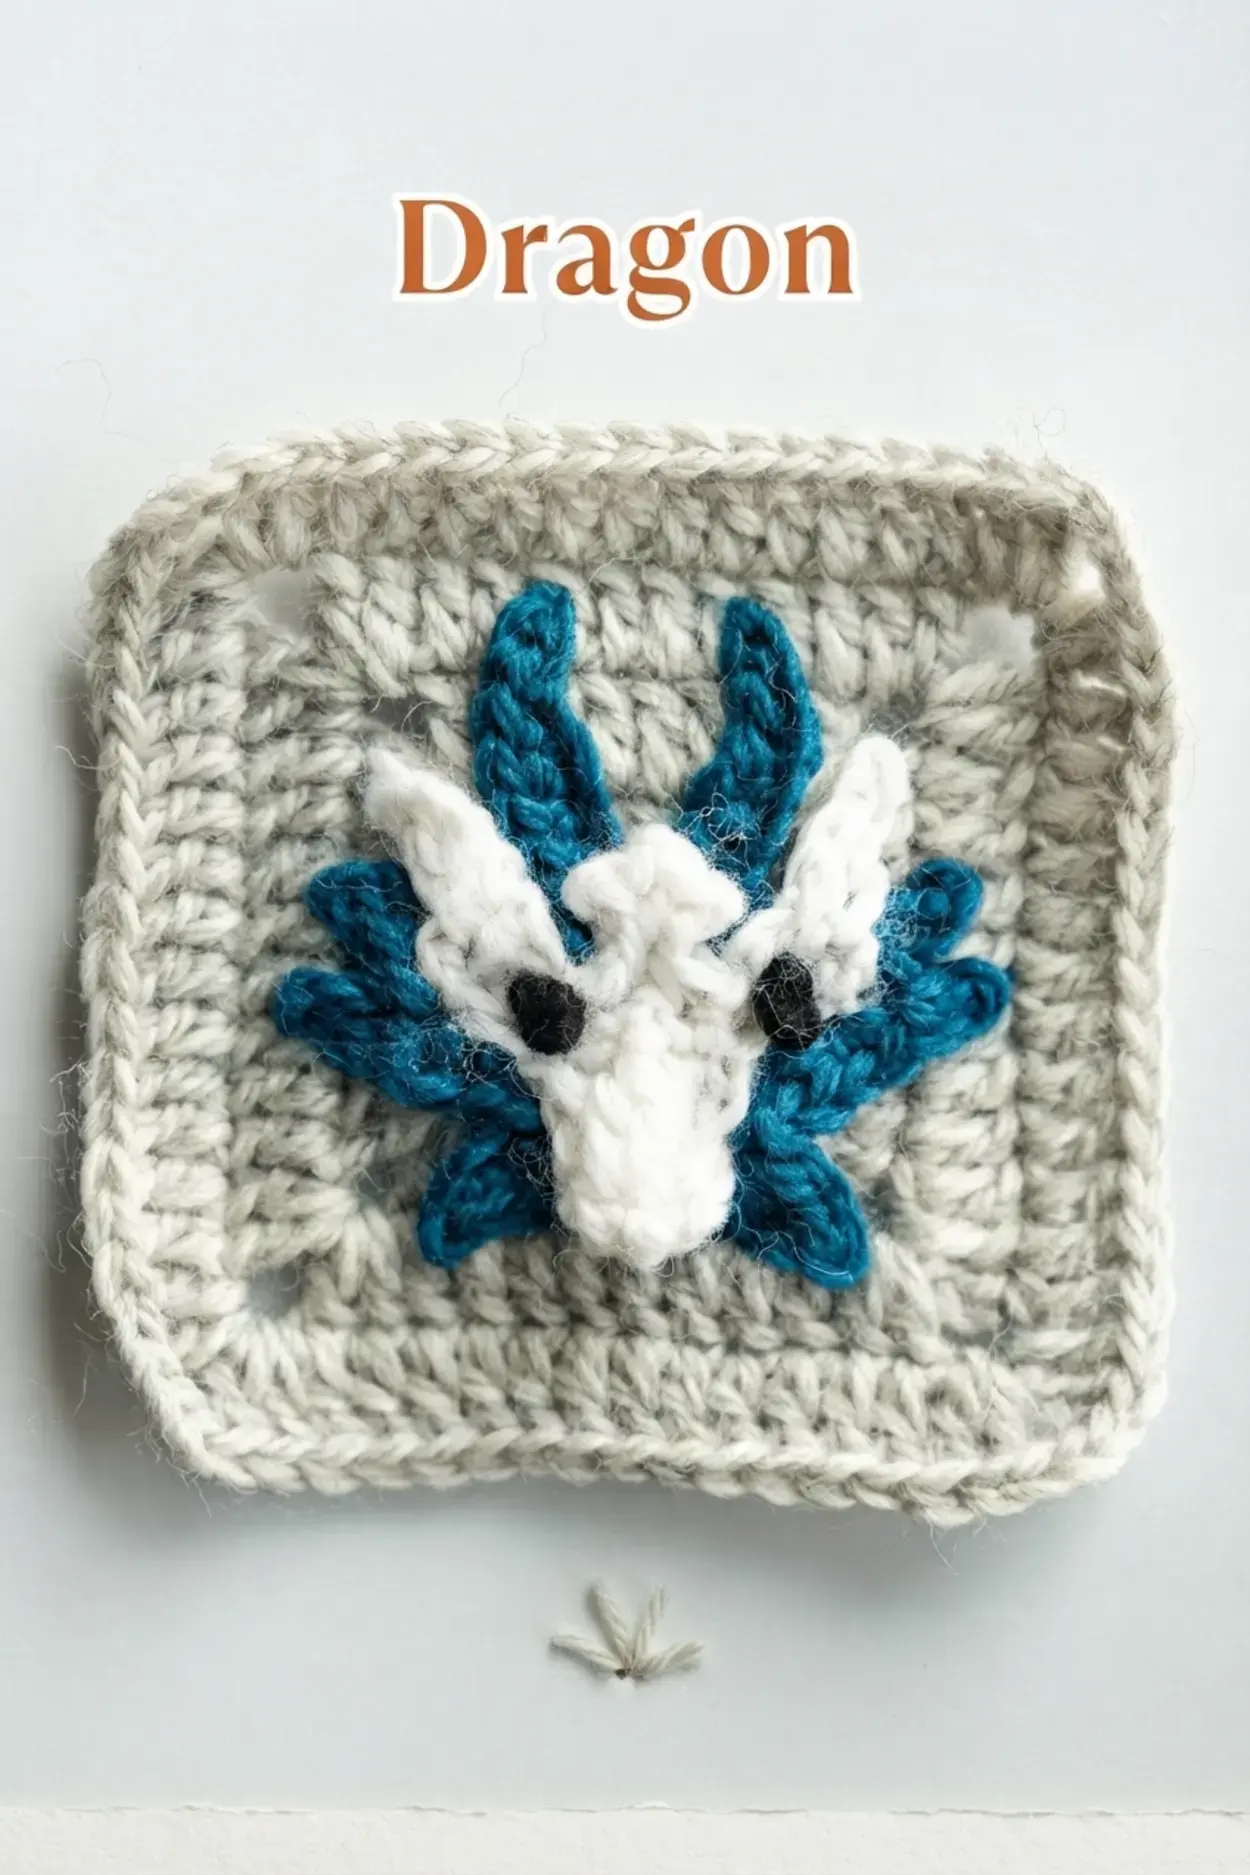
The dinosaur granny square is rated easy, which makes it a comfortable starting point for crocheters who enjoy mythical and prehistoric themes. The shaping is simple: one small face, a few accents, and a solid square behind it.
If animal squares are new to you, practise here first, because the rhythm is the same one you will use for a dragon head with horns, ears and whiskers.
Designers have published their own versions of the same idea, including this dragon granny square crochet pattern, which is handy if you want to compare how different makers shape an animal motif on a flat square.

Jump To
Lion Granny Square
The lion granny square is rated moderate difficulty.
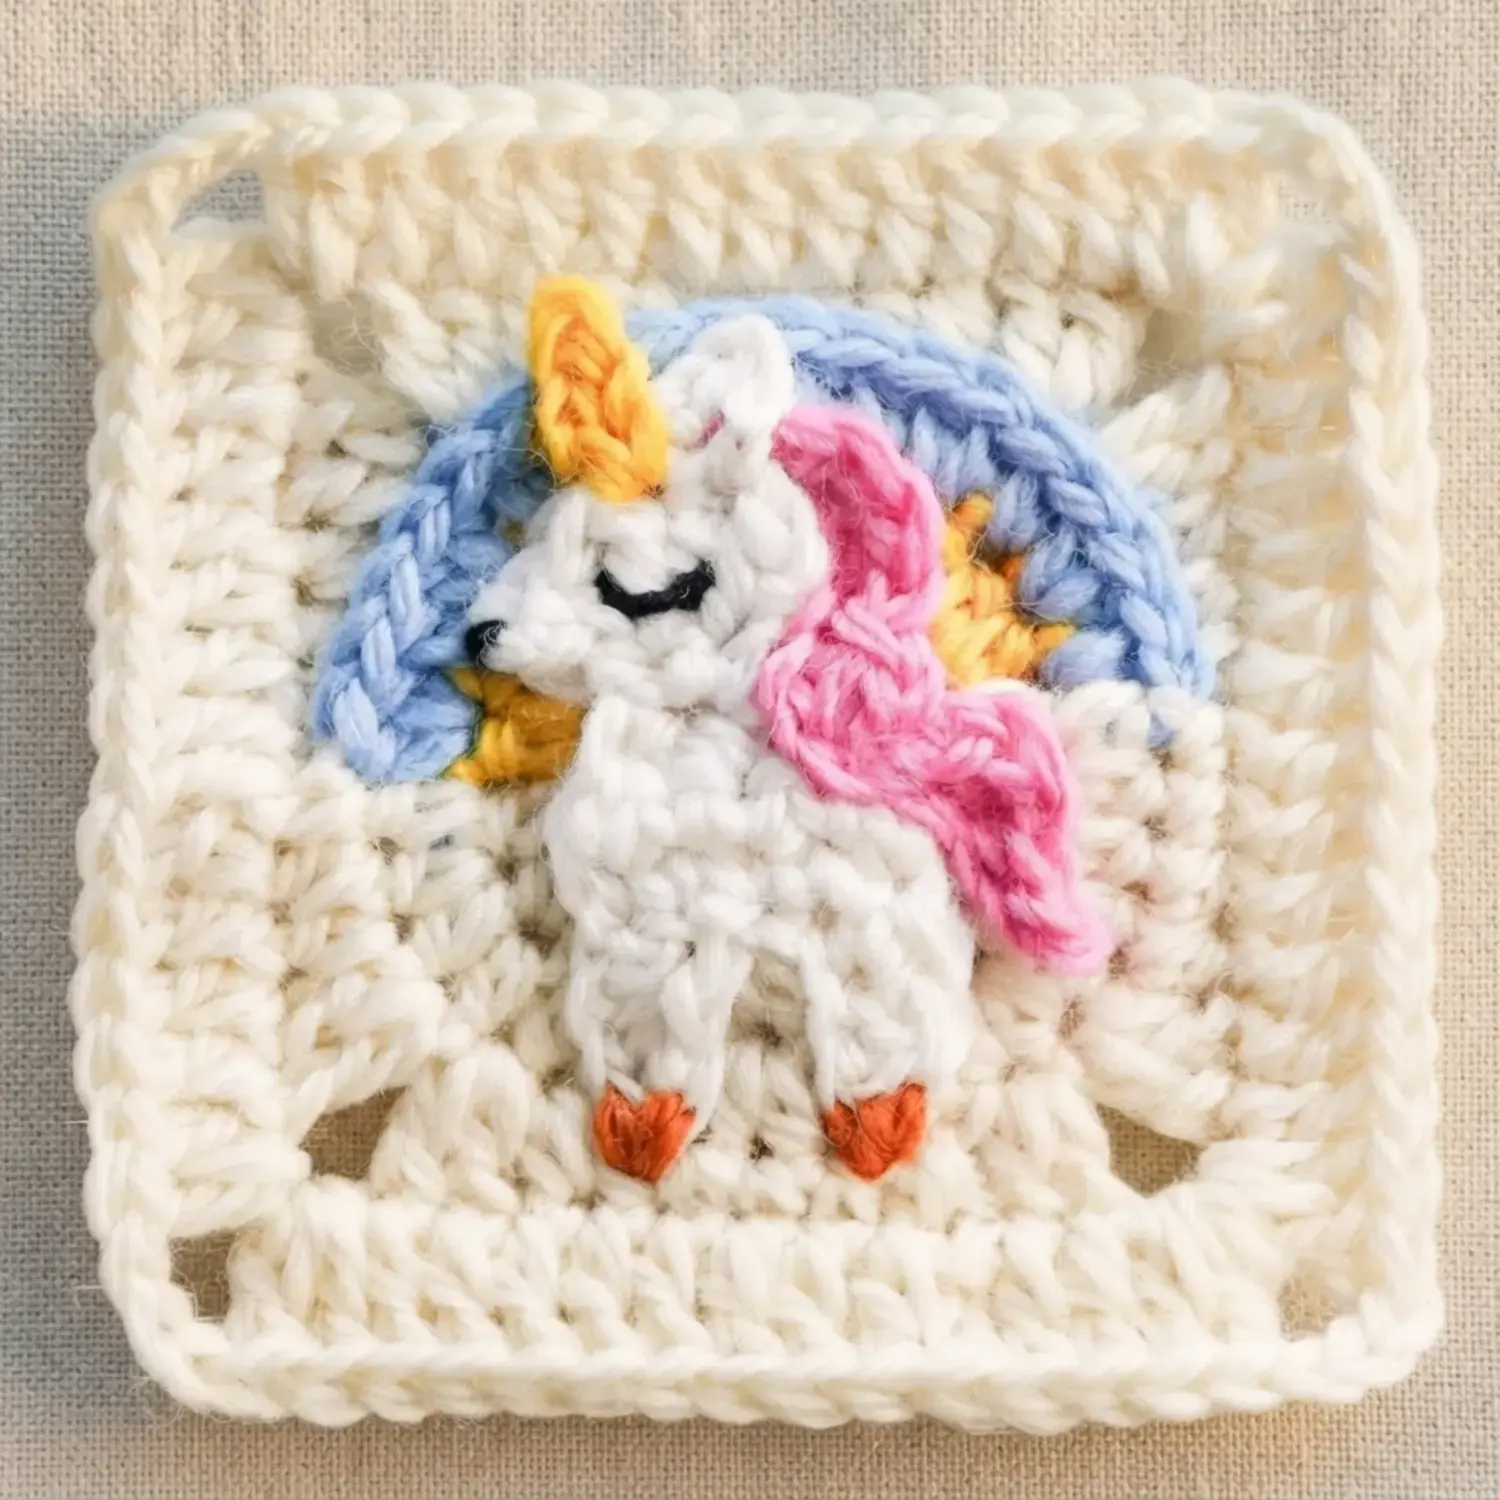
Its ring of mane around the face gives it the same majestic look that a dragon gets from its crest and whiskers, so the two designs share a similar approach: build the face, then add texture around the outside. Plan on a little more attention when you place the mane evenly.
Unicorn Granny Square
The unicorn granny square is rated advanced and adds a magical touch with its cute, dimensional horn and ears.

Small three dimensional details like these are where the extra care goes, because each piece is shaped separately and then joined to the square. Treat it as a project for after you have practised the dragon’s ears and horns.
Bird Granny Square
The bird granny square is rated easy.
It is a short, friendly project if you want another small animal face on a solid background before you commit to a full dragon square.
Materials
Gather everything before you make the first loop, so you are not hunting for a needle halfway through the face.
| Item | Details |
|---|---|
| Yarn | 4 colors of your choice. The sample is made with DK sports weight yarn. |
| Crochet hook | 3.00mm |
| Darning needle | For sewing the applique onto the square and for the French knot eyes |
| Scissors | For trimming tails and fastening off |
The finished granny square measures about 3.54 inches by 3.54 inches, and the pattern yields 1 finished granny square. That size slots neatly into blankets, bags and small decorative projects where a single motif is enough.
Abbreviations
The pattern uses standard crochet shorthand. Read the list once before you start, then keep it nearby while you work the rounds.
| Abbreviation | Meaning |
|---|---|
| ch | chain stitch |
| ch sp | chain space |
| sc | single crochet |
| dc | double crochet |
| hdc | half double crochet |
| inc | increase |
| rep | repeat |
| st | stitch |
| slst or sl st | slip stitch, used to join rounds |
| sk | skip |
| yo | yarn over |
| bo | bobble stitch |
| pic | picot stitch |
| sc2tog | single crochet two stitches together |
| BL | back loop |
Step by Step Tutorial
The instructions below follow the original Dragon Granny Square pattern, published at Granny Square Me. The dragon is worked first as a separate applique, then sewn onto a solid granny square background. Keep the yarn tails long until the very end, because you will need them for the ears, horns and whiskers.
If you enjoy working small dragon shapes, the same construction habits carry over into other pieces in the Free Dragon Amigurumi Designs collection, where faces, horns and small joined parts are built one piece at a time.
Crochet the Dragon Face
The face is built in a small oval shape, with a puffy nose and a shaped top edge. Work the rounds and rows in order, and turn the work where the pattern says to turn.
Round 1
Begin with a magic ring, ch1, then work 5 single crochet into the ring.
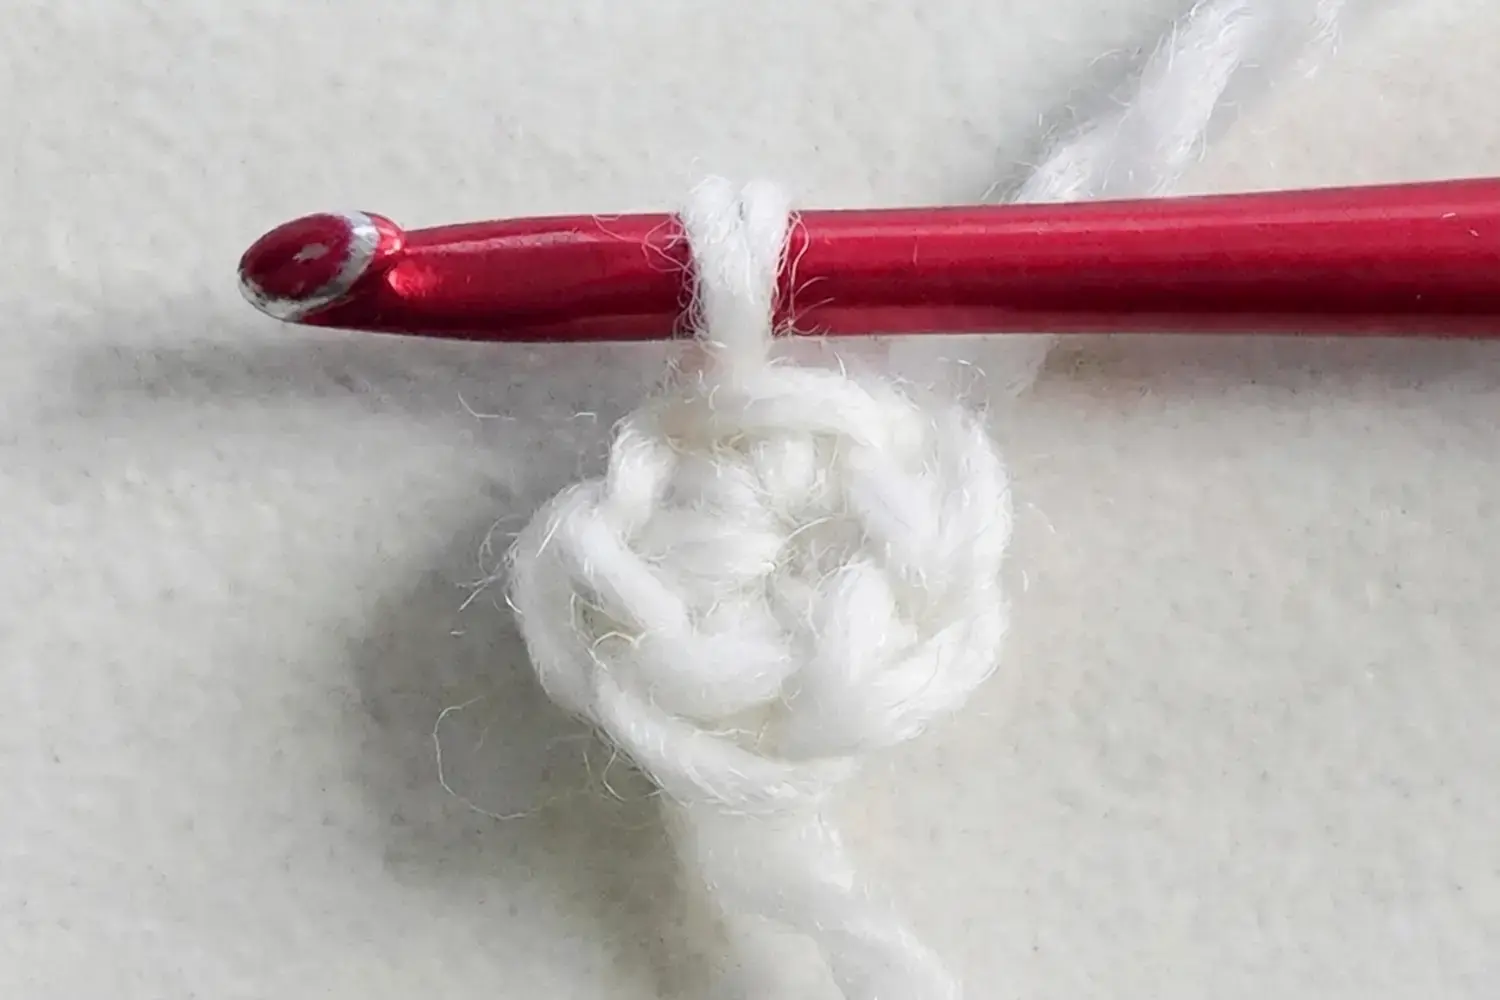
Join with a slip stitch to the first single crochet, then pull the tail tightly to close the center of the ring.
Round 2
Start the round with ch1, then work (sc inc) twice, followed by 3 sc, and finish with a slip stitch.
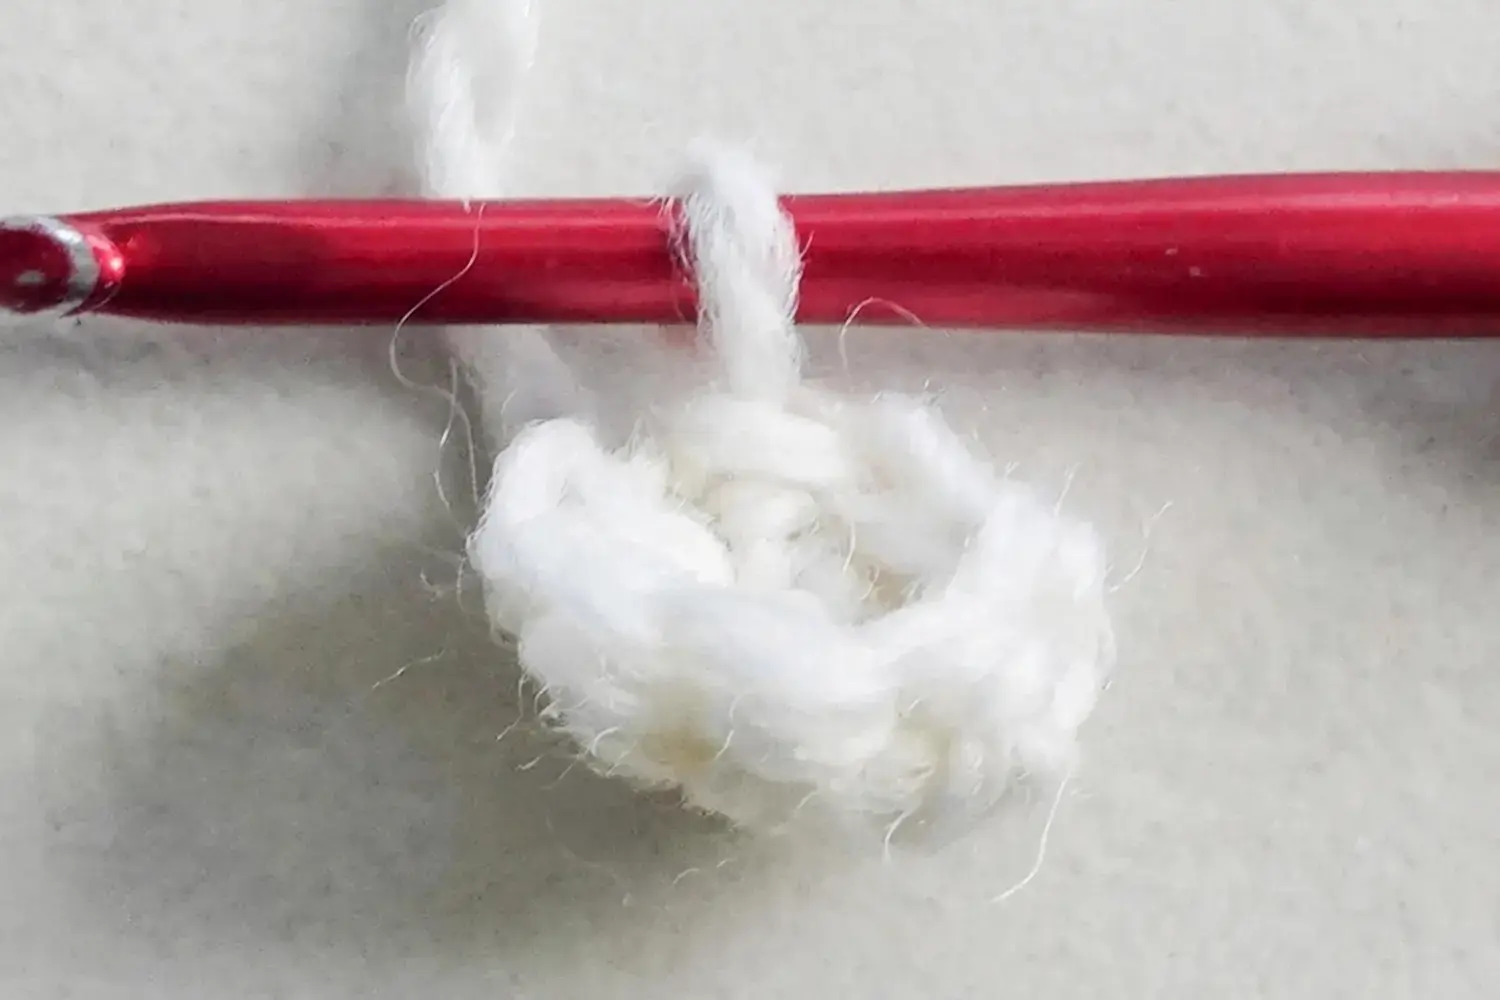
This widens the base of the face and starts the rounded muzzle.
Row 3
Chain 2, which counts as a half double crochet, then work 1 hdc. Skip 3 stitches and make a two double crochet bobble.
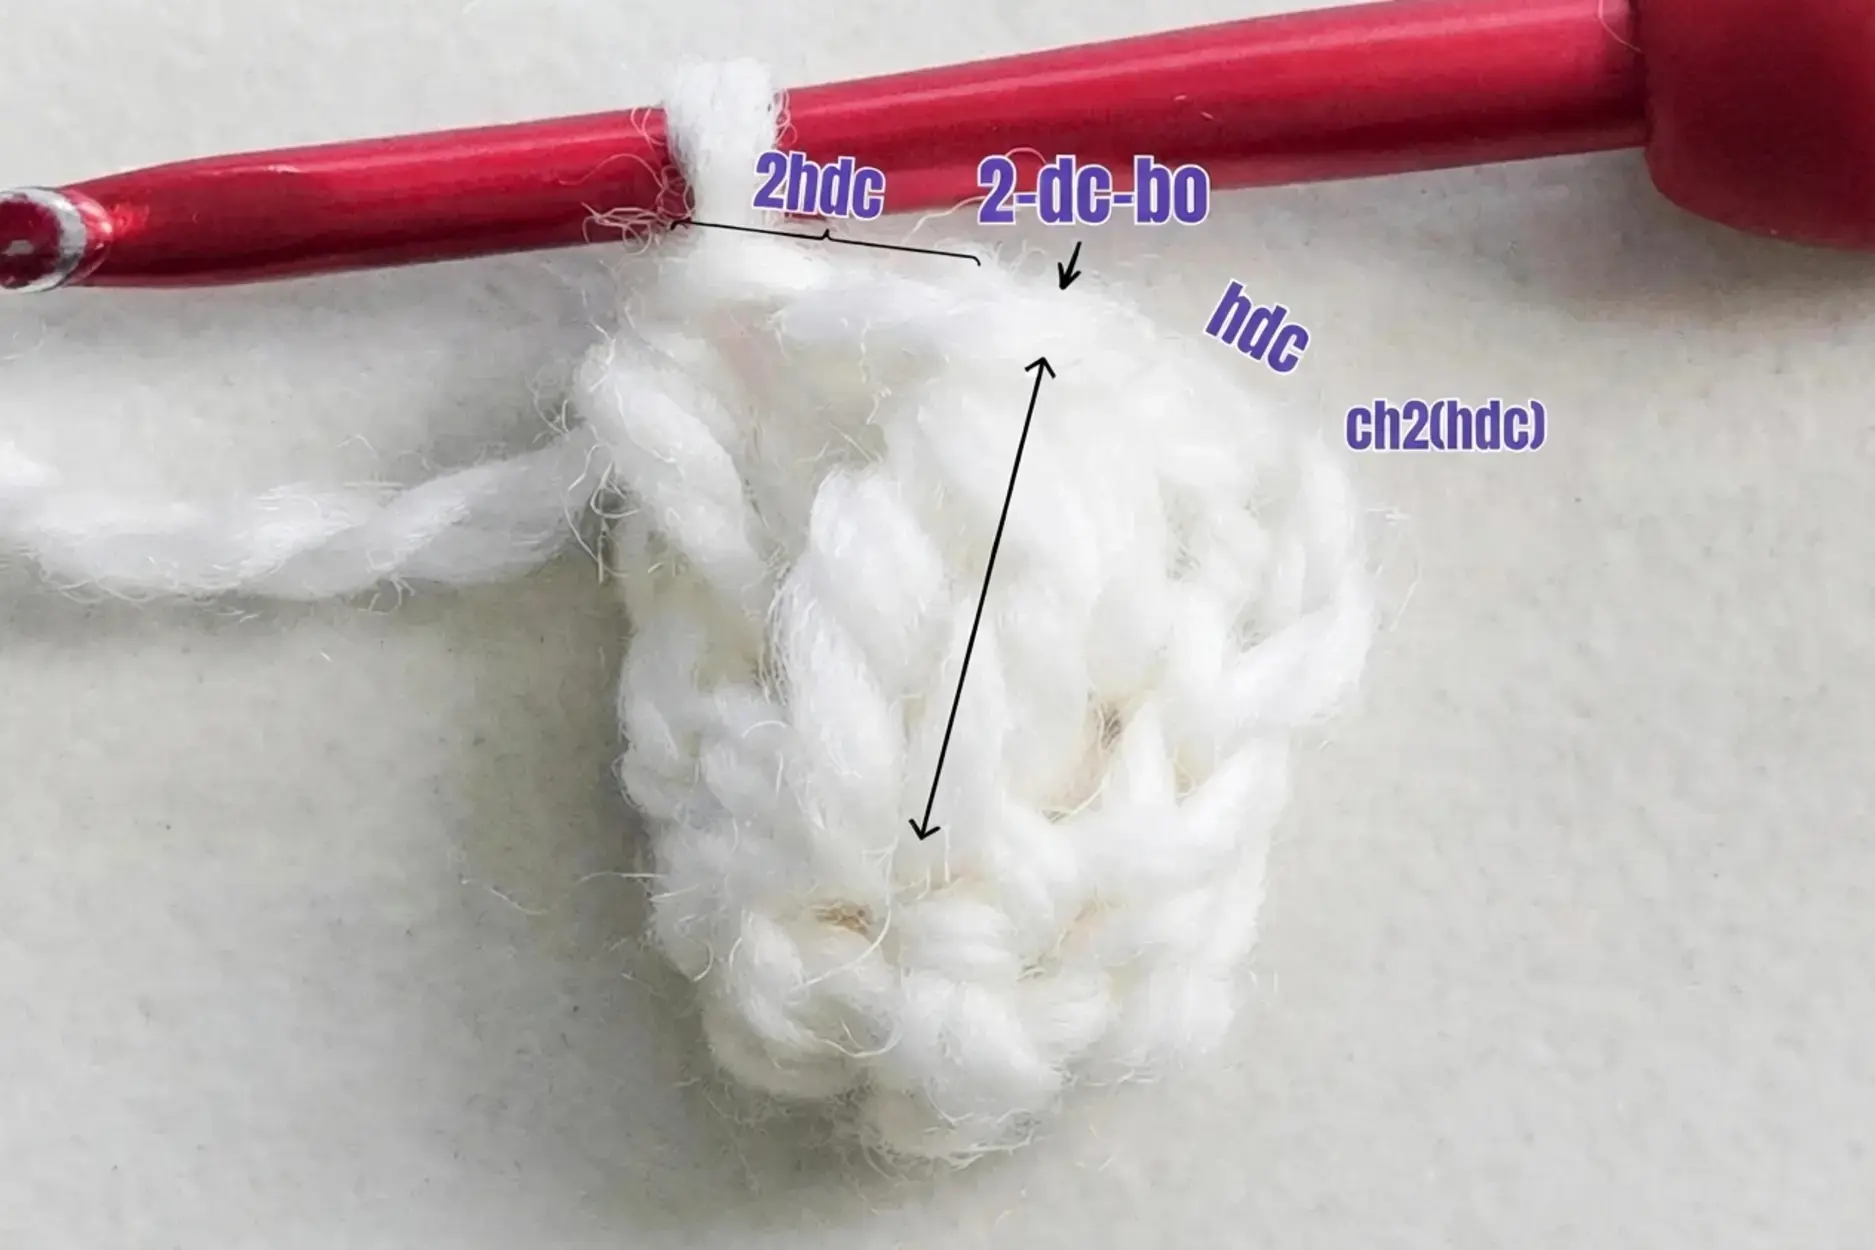
Go back to the first stitch you skipped and work 1 hdc, then 1 hdc again. That return step is what keeps the bobble sitting up as the puffy nose.
Row 4
Turn the work over.
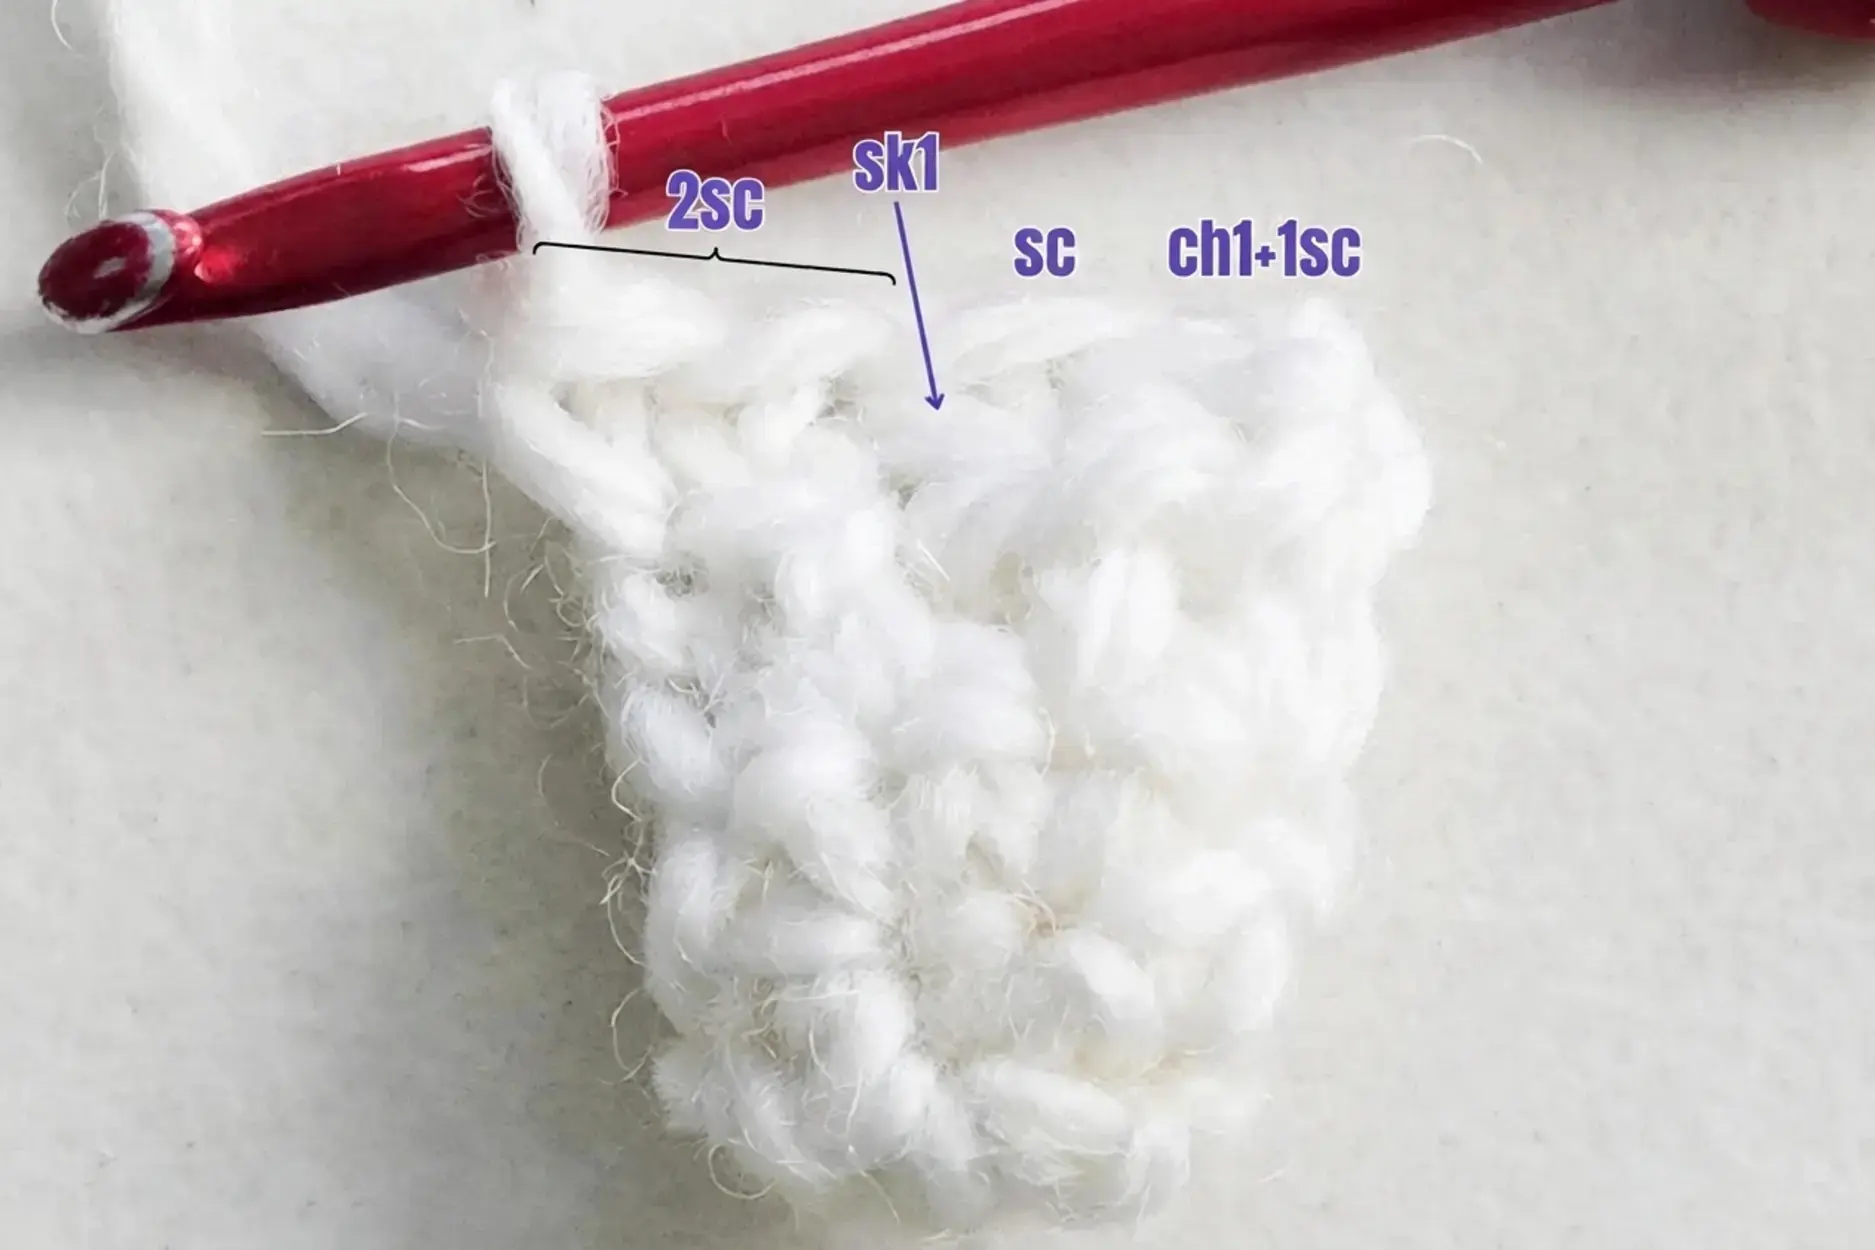
Work ch1 plus 1 sc, then 1 sc. Skip the bobble stitch, then work 2 sc to finish the row.
Row 5
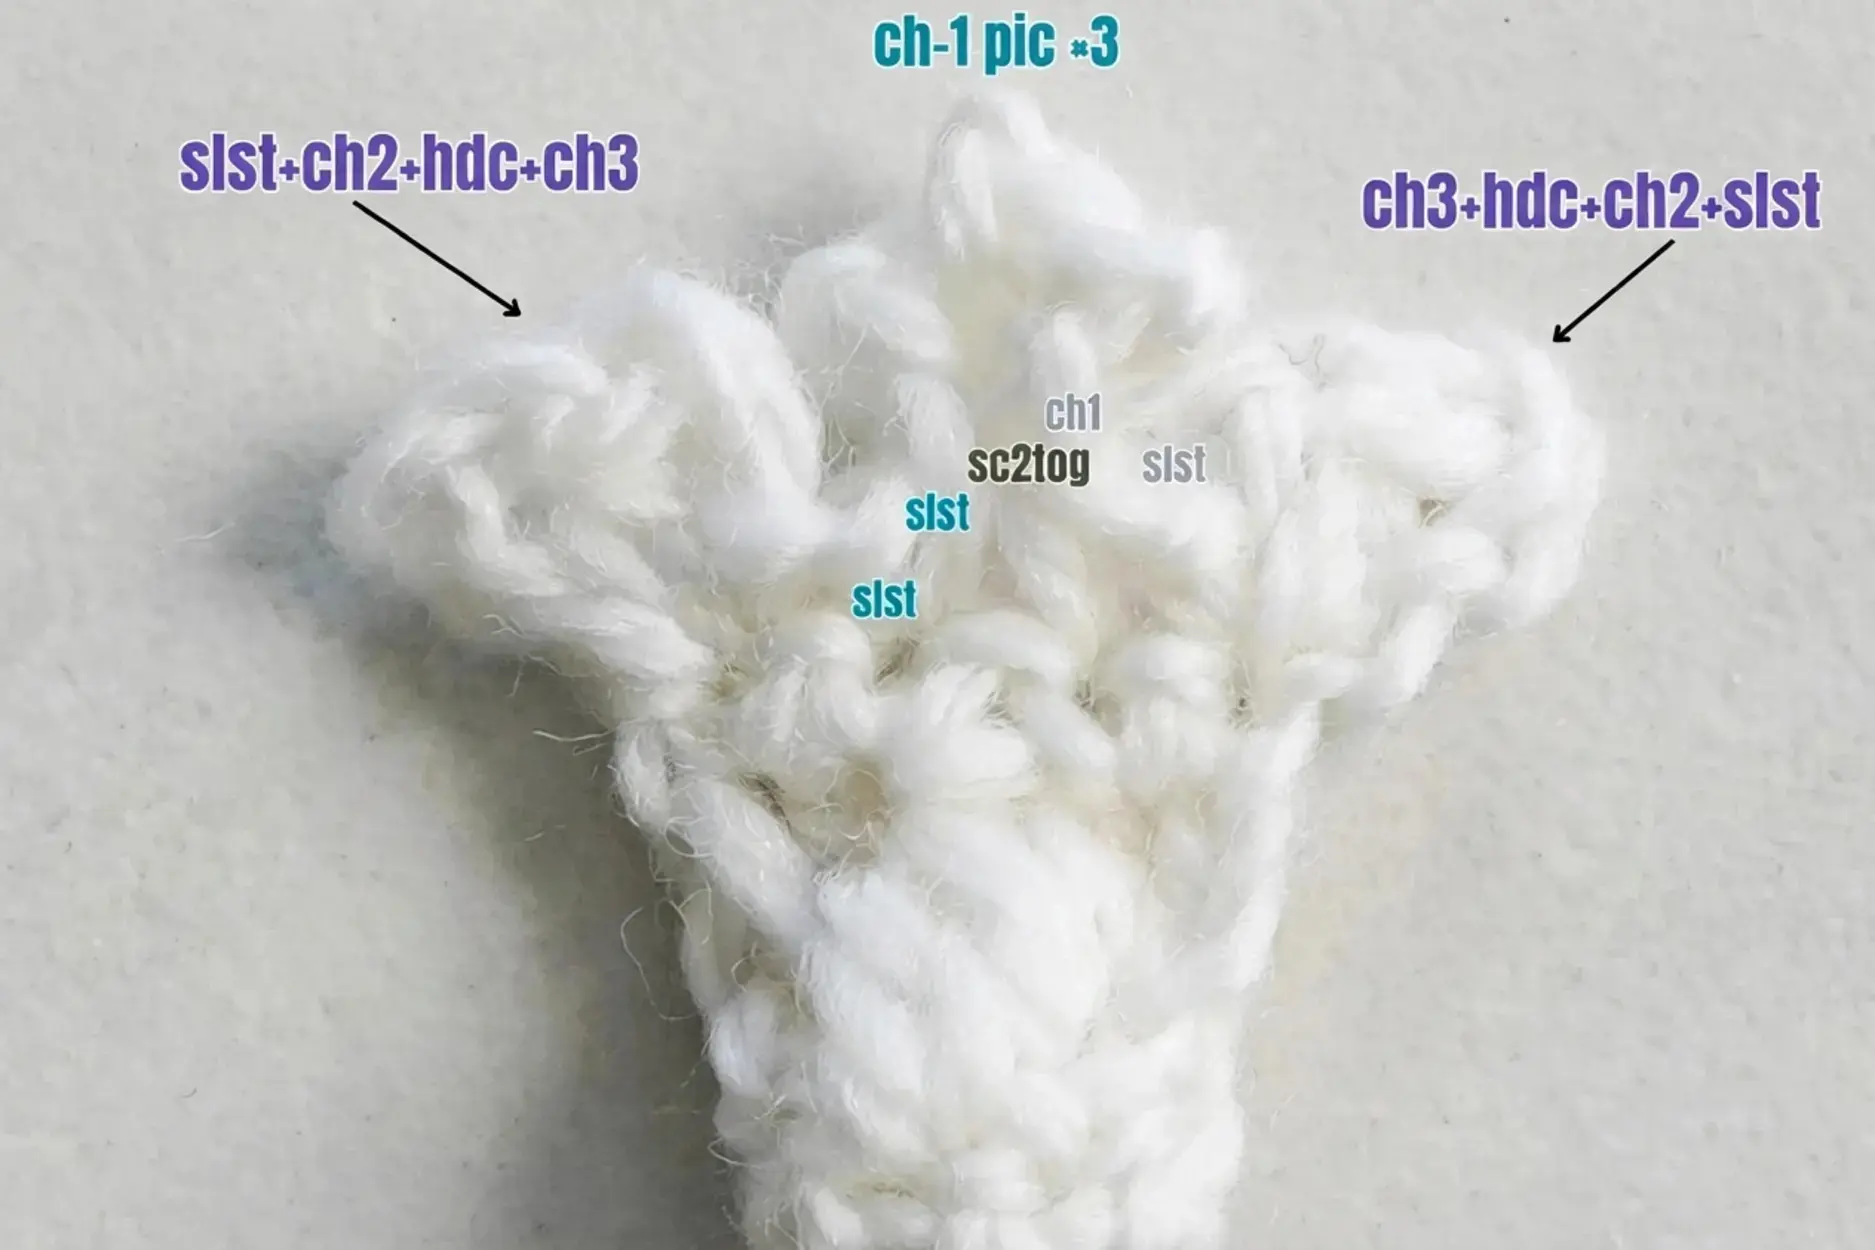
Turn the work over. In the first stitch work ch3, hdc, ch2 and a slip stitch. Slip stitch into the 2nd stitch.
Work sc2tog over the 2nd and 3rd stitches, ch1, then make three chain 1 picots. Slip stitch into the top loop of the sc2tog, then slip stitch in the same stitch to the left of the sc2tog, which is the 3rd stitch.
In the 4th stitch work slst, ch2, hdc and ch3, then slip stitch and fasten off.
Two Ears
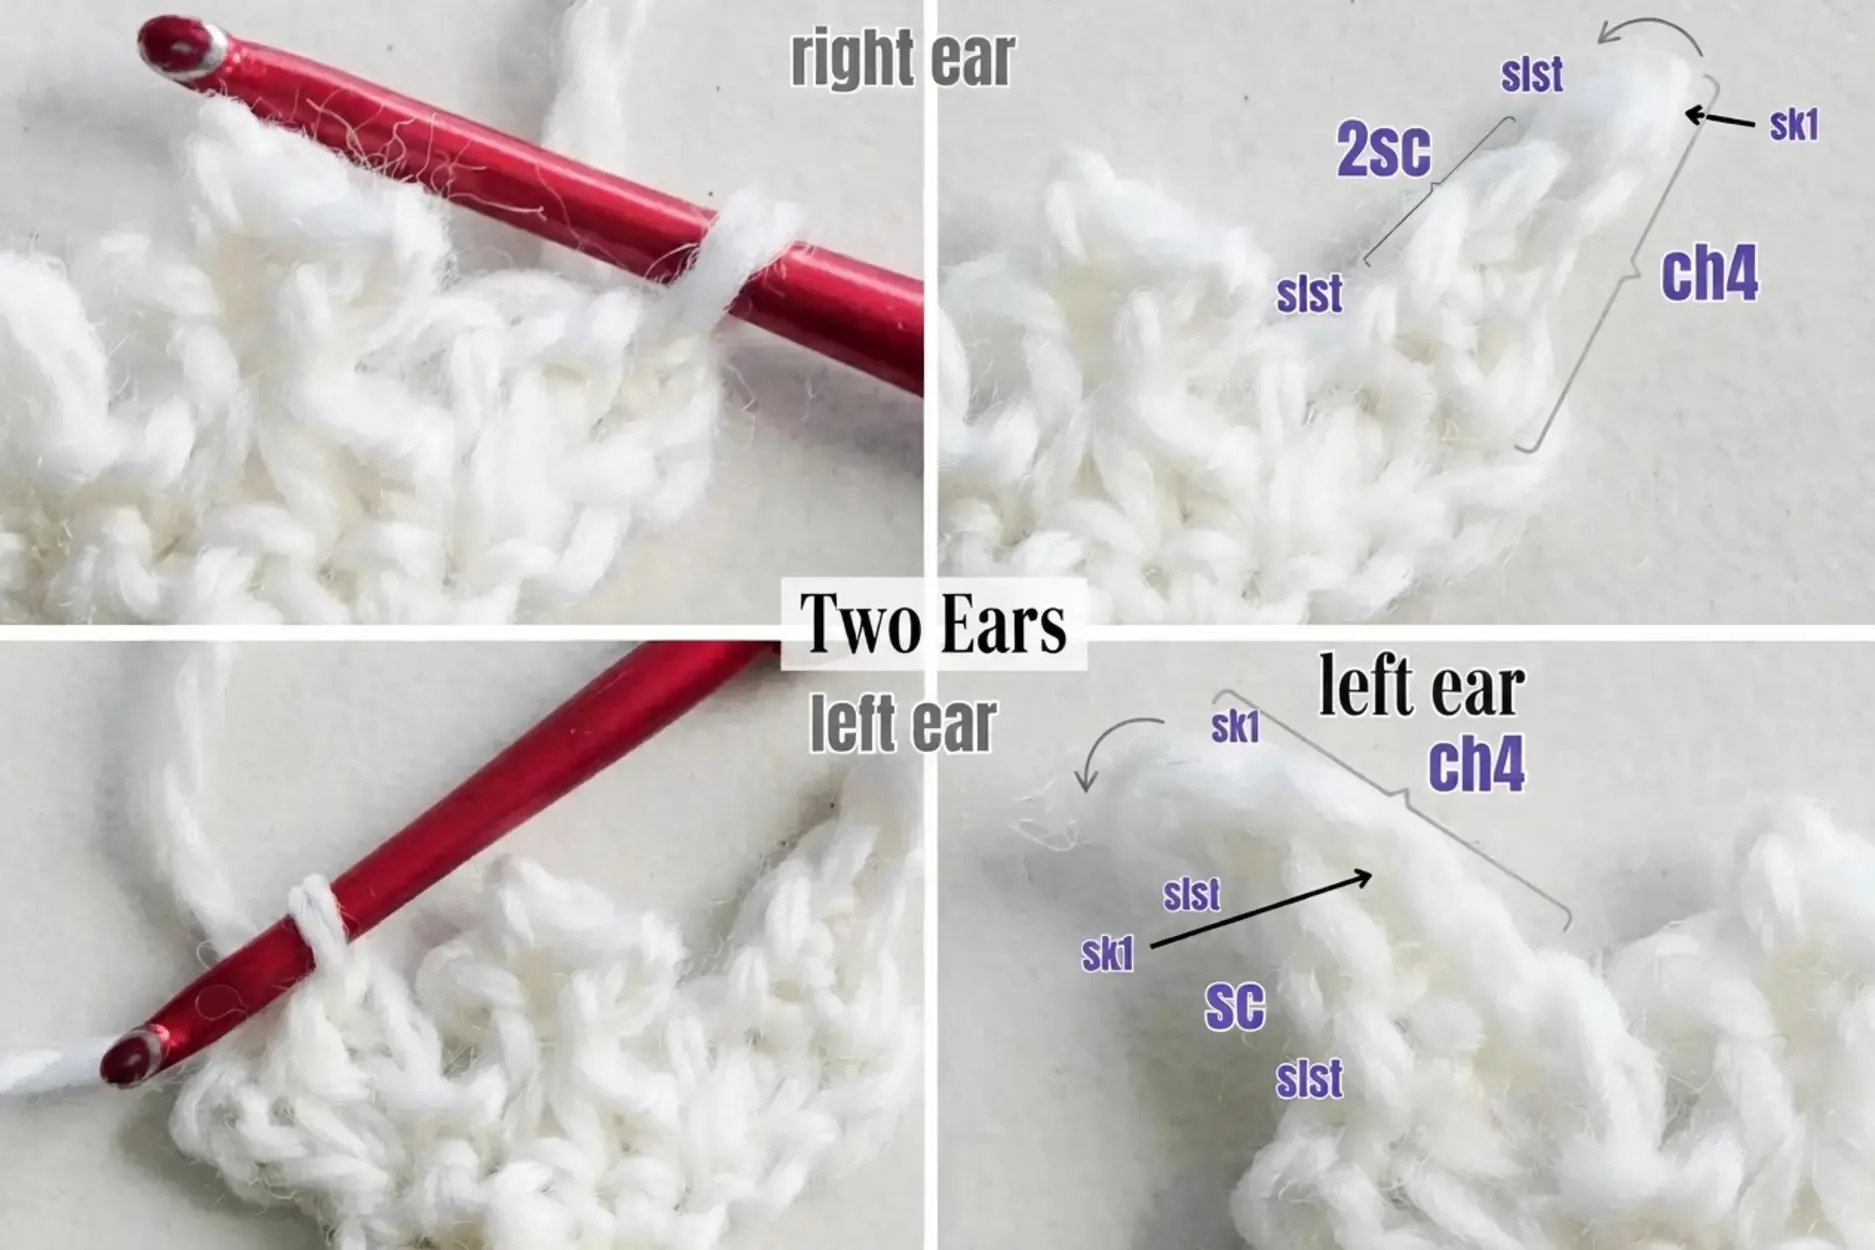
The ears sit at the top corners of the face and they are made one at a time, each with its own joining point.
Right ear. Join to the hdc on the right side. Ch4, then return along the chain. Skip 1 chain, and in the BL of the next 3 chains work slst, then 2 sc. Slip stitch to the next chain space and fasten off.
Left ear. Locate the ch2 on the left side and join new yarn to the top of this ch2. Ch4, then return. Skip 1 chain, and in the BL of the next 3 chains work slst, skip 1, then sc. Slip stitch to the next stitch and fasten off.
Top Two Horns
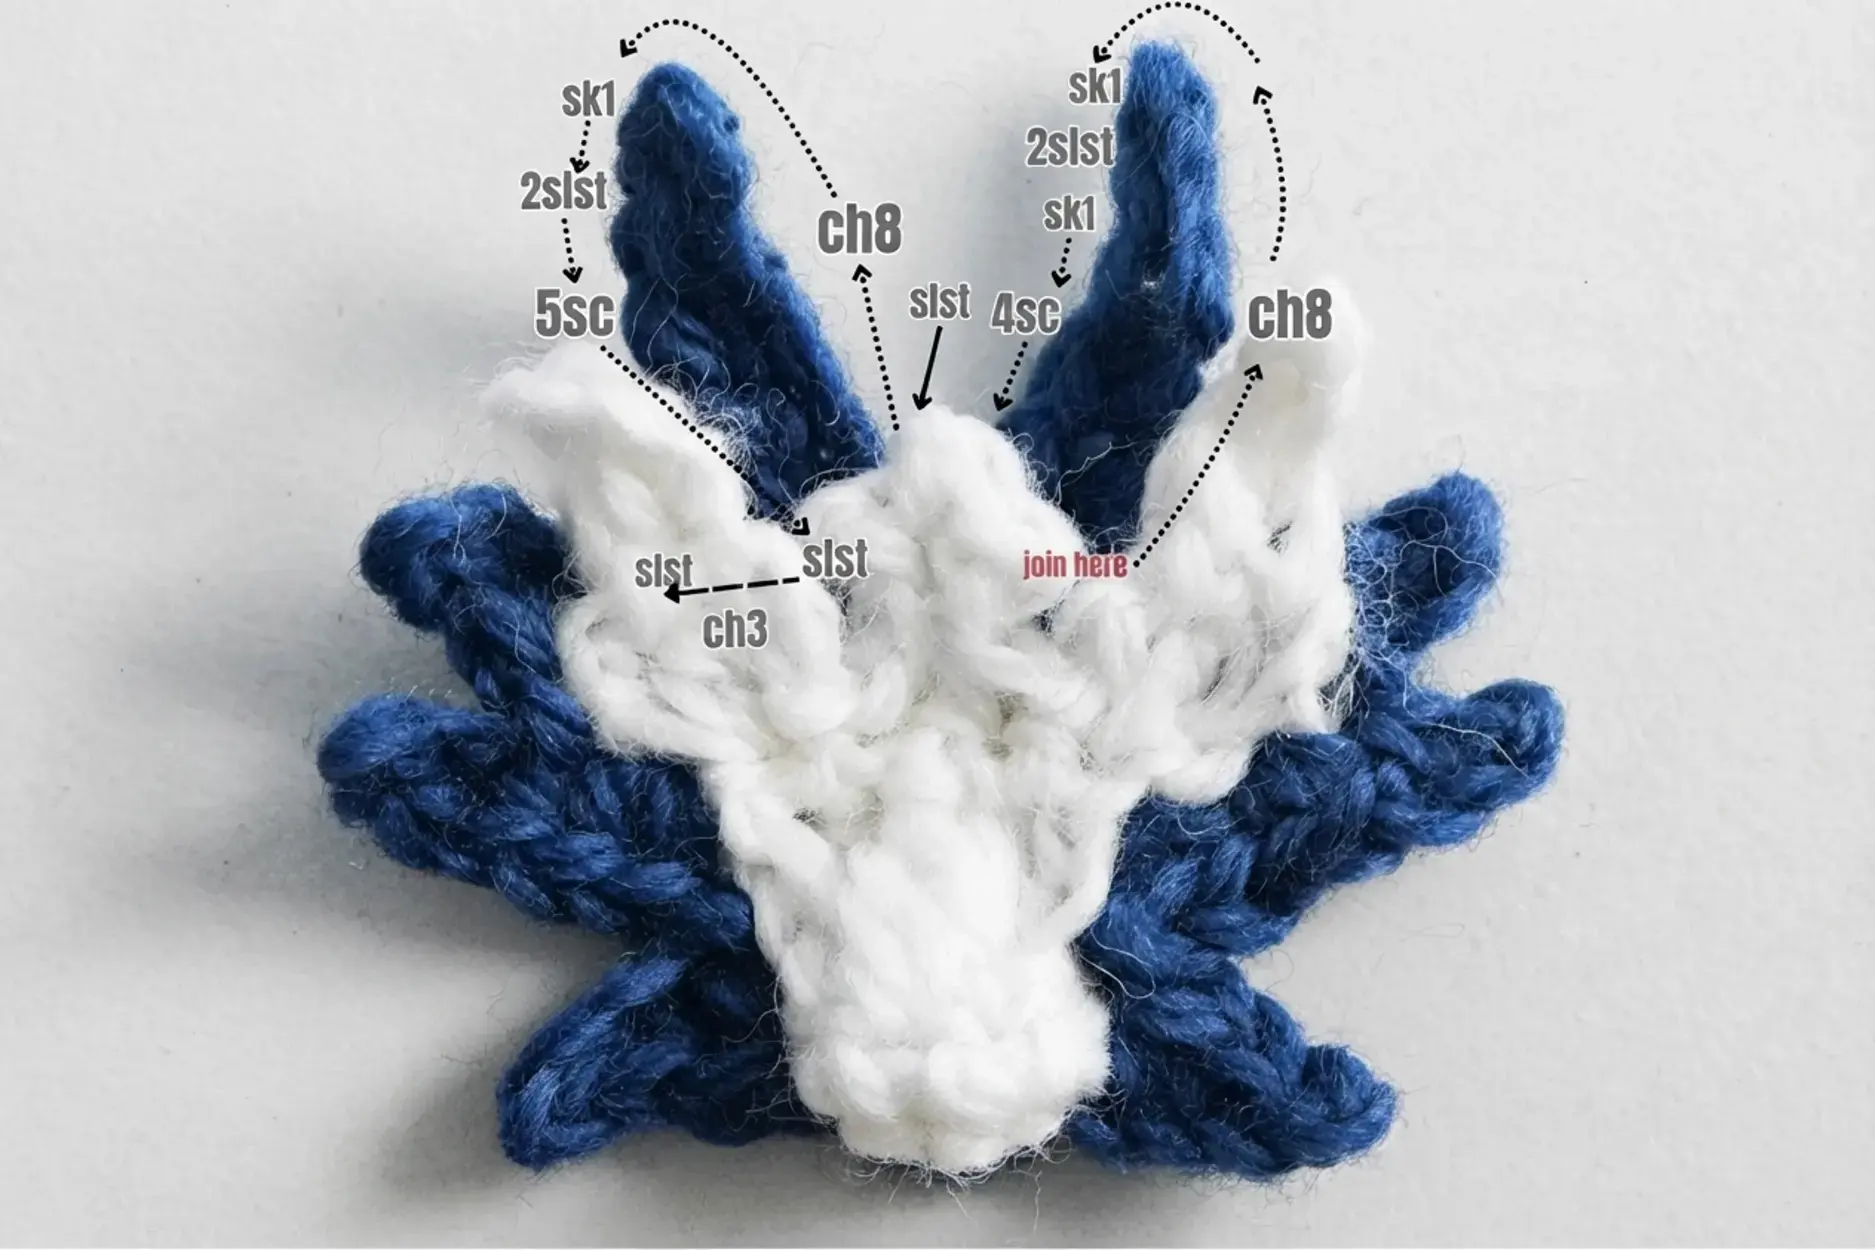
The ridge between the two ears forms the dragon’s crest, and it is anchored at the bottom center by the sc2tog you worked in row 5. The two long horns grow symmetrically from the back of the head, so note carefully where each horn starts and where it ends.
Join new yarn to the stitch below the sc2tog’s right stitch and ch8. Return, skip 1, and in the BL of the next 7 chains work 2 slst, skip 1, then 4 sc.
Slip stitch to the back side loop of the sc2tog, then ch8 again. On the return, skip 1 and in the BL of the next 7 chains work 2 slst, then 5 sc. Slip stitch to the stitch below the sc2tog’s left stitch.
Work ch3 so it hides under the left ear, then slip stitch in the bottom center stitch of that ear.
Whiskers around Dragon’s Face
The whiskers give the dragon its flowing, textured outline. Three rules keep them clean and symmetrical.
- Work only in the back loops or the underneath loops of the outer stitches and chains. Never work into the front loops, because that distorts the face shape.
- Make the whiskers on both sides mirror each other exactly.
- After you finish each whisker applique, skip along the outer edge a distance equal to the width of that whisker’s bottom, which keeps the spacing balanced.
Left side. Ch3, return, skip 1, then in the BL of the next 2 chains work slst, sc. Work along the edge: skip 1, slst. Ch3, return, skip 1, and in the BL of the next 2 chains work slst, sc inc.
Work along the edge: hdc inc, slst. Ch4, return, skip 1, and in the BL of the next 3 chains work slst, sc, hdc.
Bottom. Work along the edge: slst, ch2 hidden underneath, then slst to the opposite stitch.
Right side. Ch4, return, skip 1, and in the BL of the next 3 chains work slst, sc, hdc. Work along the edge: slst, hdc inc, sc inc, ch1, one chain 1 picot, then sc in the BL of the ch1 before this picot, slst.

Ch3, return, skip 1, and in the BL of the next 2 chains work slst, sc. Work along the edge: slst, ch3, slst in the joining loop, then fasten off.
Background
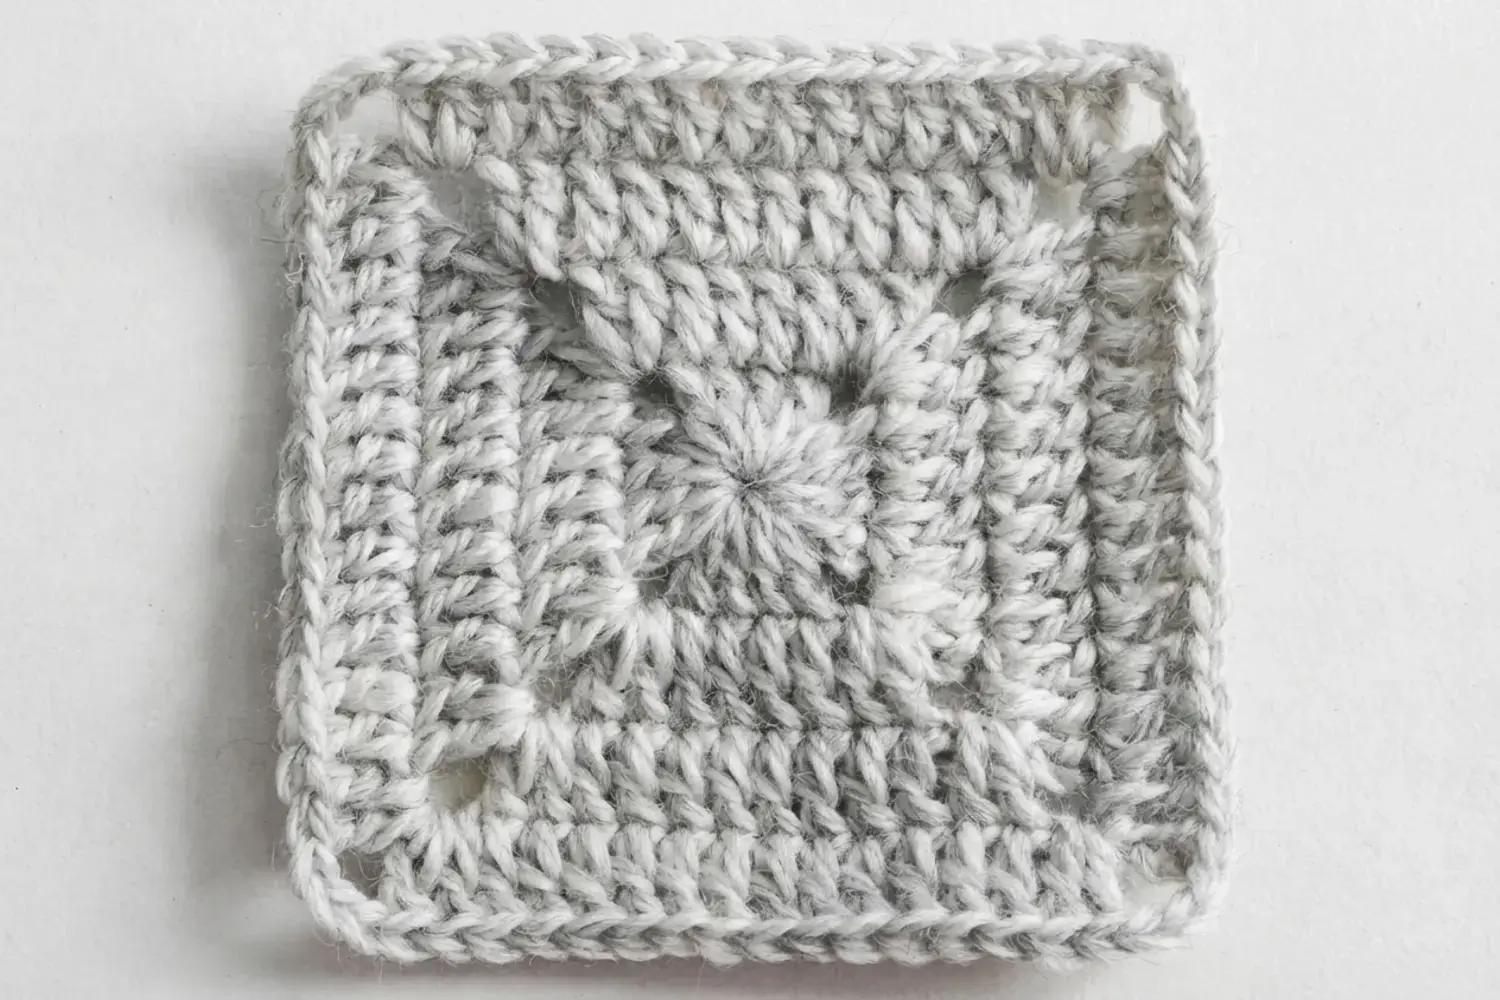
The dragon motif sits on a solid granny square that acts as its background. Work the square first so the applique has something firm to sit on, and keep the corners square as you go.
Round 1. Start with a magic loop. Ch3 as a standing stitch that counts as 1 dc. 3 dc, ch3. Repeat (4 dc, ch3) 3 times, omitting the final ch3, then ch1 and 1 hdc to connect back to your starting ch3.
Rounds 2 and 3. Ch3 that counts as dc, then 1 dc in this corner. Work (2 dc, ch3, 2 dc) in the remaining corners. Work 1 dc in the remaining stitches. Work 2 dc in the start corner, then ch1 and 1 hdc to connect back to the first ch3.
Round 4. Ch3 as a standing stitch that counts as 1 dc, then 1 dc in this corner space. Work (2 dc, ch3, 2 dc) in the remaining corners. Work 1 dc in the remaining stitches. Work 2 dc in the starting corner, ch3, then sl st to the true dc after the first ch3 and fasten off.
Assemble
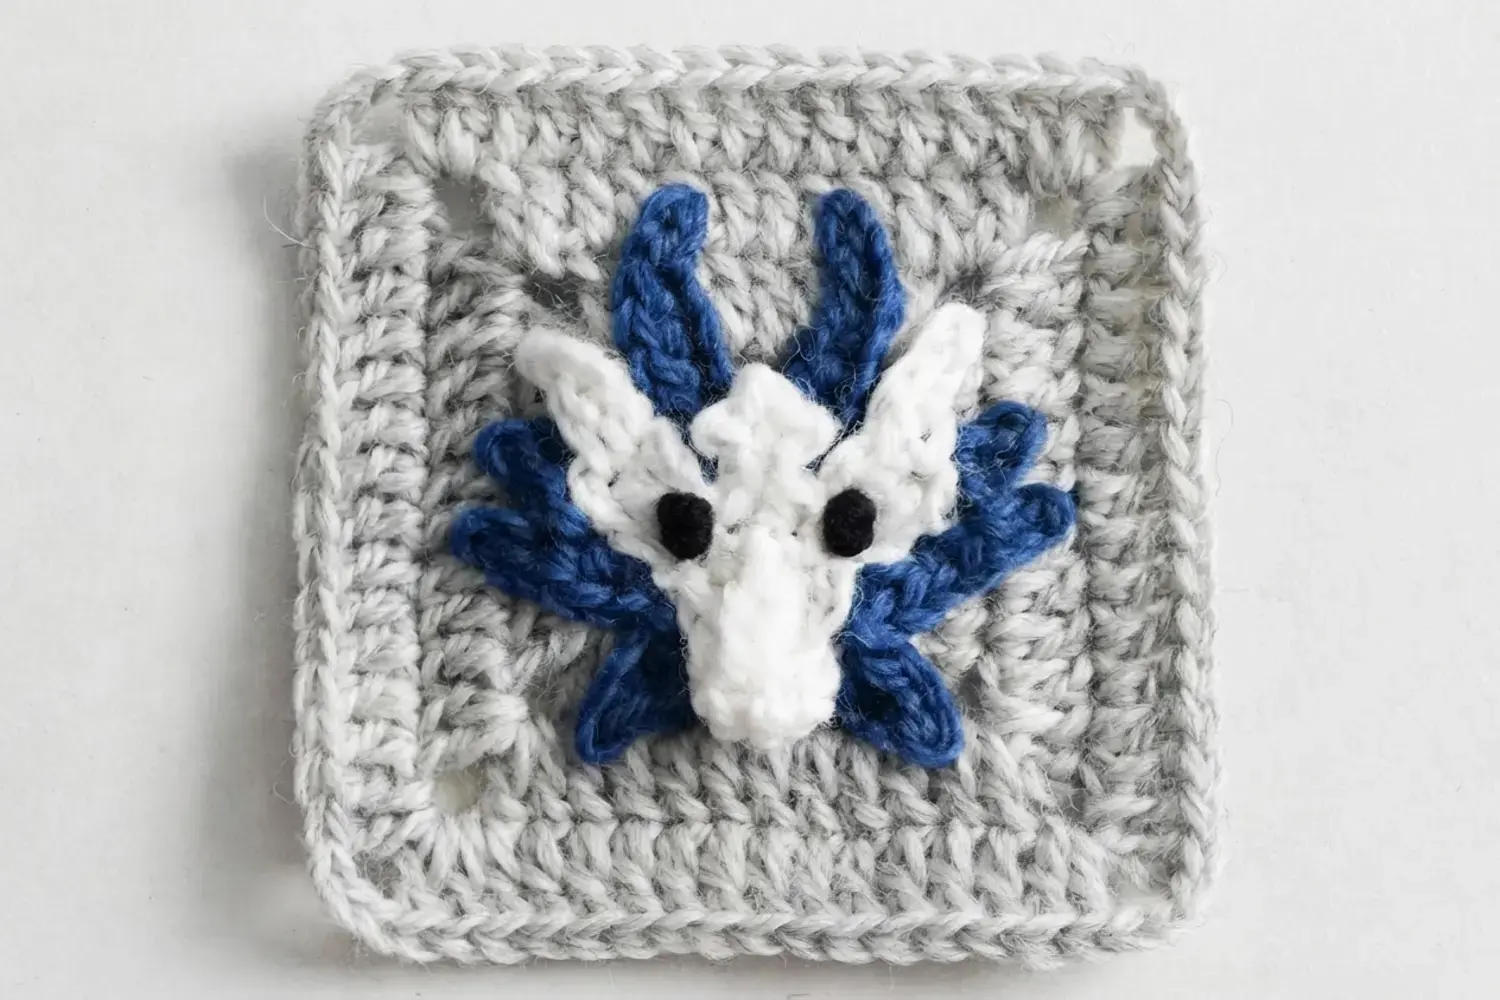
Sew the dragon applique to the center of the solid granny square. Thread matching yarn through the edge loops of both the applique and the base square, working in and out around the shape, and pull each stitch snug so the pieces stay firmly attached.
Finish with two French knots on either side of the center. Those two knots become the dragon’s eyes.
Keep the sewing yarn matched to the applique color. A contrasting thread shows through the open edge loops and breaks up the face.
The same careful finishing is what makes small crochet pieces look tidy, whether you are sewing a dragon onto a square or closing up something small like the Free Crochet Pearl Oyster Keychain Pattern.
FAQs
What yarn weight is best for crocheting a dragon granny square?
DK or worsted weight yarn works well for a dragon granny square, as shown in the pattern with DK sports yarn. Using a 3.00mm hook with DK weight creates a square about 3.54 inches by 3.54 inches. Popular acrylic options like Red Heart Super Saver or Lion Brand Vanna's Choice hold stitch definition nicely.
How do you make the bobble stitch for the dragon’s nose?
The dragon's puffy nose uses a 2-dc bobble stitch. To make it, yarn over, insert the hook into the stitch, yarn over and pull up a loop, yarn over and pull through two loops three times, then yarn over and pull through all loops on the hook. Practice this stitch on a swatch first for confidence.
How do you ensure the dragon’s horns and whiskers are symmetrical?
Symmetry is achieved by working in back loops only and following the mirroring instructions for left and right sides. Use stitch markers to count chain returns and mark whisker attachment points. Blocking the finished dragon face before sewing to the square helps the dimensional parts lie evenly.
How do you attach the dragon applique to the granny square background?
Sew the dragon applique to the center of a solid granny square using matching yarn threaded through edge loops, pulling each stitch snug. Use a darning needle and secure all ends tightly. Then add two French knots for eyes, or substitute small safety eyes for consistency.

Dragon Granny Square
- Yield: 1 finished granny square 1x
Description
Dinosaur Granny Square The dinosaur granny square is rated easy, which makes it a comfortable starting point for crocheters who enjoy mythical and prehistoric themes. The shaping is simple: one small face, a few accents, and a solid square behind it.
Ingredients
Materials
Yarn of your choice -4 colors, the sample is made with DK sports
1 Crochet hook, we are using a 3.00mm hook
1 Darning Needle
1 Scissors
Instructions
Crochet the Dragon Face
1-Magic ring, ch1, 5sc, slst to the: Magic ring, ch1, 5sc, slst to the first sc, pull the tail tightly.
2-ch1 to start, (sc inc)×2, 3sc, slst: ch1 to start, (sc inc)×2, 3sc, slst.
3-ch2(count as hdc), 1hdc: ch2(count as hdc), 1hdc. sk3, 2-dc-bo. back to the first st we sk: 1hdc, 1hdc.
4-Turn over: Turn over. ch1+1sc, 1sc, sk the bo, 2sc.
5-Turn Over: Turn Over. ch3+hdc+ch2+slst in first st. slst to 2nd st. sc2tog over 2nd and 3rd st, ch1, (ch-1 pic)×3, slst in the TL of sc2tog, slst in the same st from the left of the sc2tog(slst in the 3rd st). slst+ch2+hdc+ch3 in 4th st, slst, fasten off.
Two Ears
6-Right ear: Right ear: Join to the hdc on the right, ch4, return, sk1, BL of next 3 ch: slst, 2sc. slst to next ch-sp, fasten off.
7-Left ear: Left ear: Locate the ch2 on the left, join new yarn to the top of this ch2, ch4, return, sk1, BL of next 3 ch: slst, sk1, sc. slst to next st, fasten off.
Top Two Horns
8-Join the new yarn to the st: Join the new yarn to the st below the sc2tog’s right st, ch8. Return, sk1, BL of next 7 ch: 2slst, sk1, 4sc. slst to the back-side loop of the sc2tog, ch8. Return: sk1, BL of next 7 ch: 2slst, 5sc. slst to the st below the sc2tog’s left st. ch3(hide under the left ear), slst in the bottom-center st of this ear.
Whiskers around the Face
9-Left: Left: ch3, return, sk1, BL of the next 2ch: slst, sc. work along the edge: sk1, slst. ch3, return, sk1, BL of next 2 ch: slst, sc inc. work along the edge: hdc inc, slst. ch4, return, sk1, BL of next 3 ch: slst, sc, hdc. Bottom: Work along the edge: slst, ch2(hide underneath), slst to the opposite st. Right: ch4, return, sk1, BL of next 3 ch: slst, sc, hdc. work along the edge: slst, hdc inc, sc inc, ch1, ch-1 pic, sc in the BL of the ch1 before this pic, slst. ch3, return, sk1, BL of next 2ch: slst, sc. work along the edge, slst, ch3, slst in the joining loop, fasten off.
The Background- Solid Granny Square
10-Round 1: Round 1: Start with a magic loop. ch3 as a standing st(count as 1dc). 3dc, ch3. *(4dc, ch3) * rep 3 times omitting final ch3, ch1, 1hdc connects back to your starting ch3.
11-Round 2-3: Round 2-3: ch3(counts as dc), 1dc in this corner. (2dc+ch3+2dc) in remaining corners. 1dc in remaining sts. 2dc in the start corner. ch1, 1hdc connect back to the first ch3.
12-Round 4: Round 4: ch3 as a standing st(count as 1dc), 1dc in this corner sp. (2dc+ch3+2dc) in remaining corners. 1dc in remaining sts. 2dc in the starting corner, ch3, sl st to the true dc after first ch3, fasten off.
Assemble
13-Sew this dragon appliqué to the center: Sew this dragon appliqué to the center of the solid granny square. And, make two French knots on either side of the center for eyes!
- Method: crochet
Keywords: Dragon Granny Square