

Free Crochet Pearl Oyster Keychain Pattern With A Cute Surprise Inside
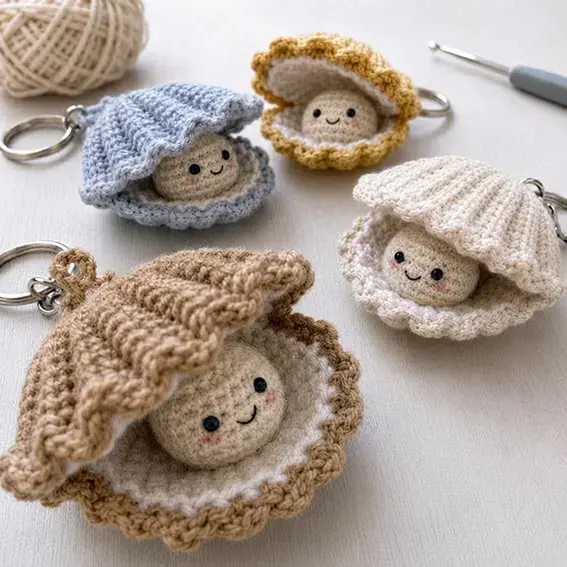
This free pattern creates a small crochet oyster keychain with a smiling pearl tucked inside a soft shell. The design has a beach inspired look, with scalloped shell edges, a white crochet lining, raised shell ribs, and realistic keychain hardware.
Finished pieces work well as bag charms, small handmade gifts, craft fair items, or crochet accessories you can use every day.

Jump To
Make A Tiny Crochet Oyster Charm With A Smiling Pearl Inside
The oyster charm is built from two separate crochet shell halves, soft white inner linings, a round pearl character, raised shell ribs, a scalloped edge, and a reinforced crochet loop that holds the metal key ring.
Outer shell color options include beige, cream, soft blue, mustard, or light brown, so you can work a small set of matching charms in one sitting.
If you enjoy small crochet projects, you may also like these crochet pothos vine free patterns and these cute crochet cow patterns.
Crochet Pattern: Pearl Oyster Keychain Amigurumi
This Pearl Oyster Keychain Amigurumi pattern is rated at an intermediate difficulty level. It combines flat panels worked in rows with a small sphere worked in the round, then brings everything together with careful hand sewing.
Materials and Tools
Gather these supplies before you begin.
- Sport or DK cotton yarn: Outer Shell Color in beige, cream, soft blue, mustard, or light brown; White for the inner crochet lining; Ivory for the pearl; a small amount of Pink for blush; Black for the face.
- 2.00 to 2.25 mm crochet hook.
- Fiberfill stuffing.
- 3 to 4 mm black safety eyes, black beads, or black embroidery thread for the pearl face.
- 25 to 30 mm metal key ring.
- 4 to 5 cm metal chain.
- 5 to 6 mm jump ring.
- Strong sewing thread or matching yarn for reinforced assembly.
- Yarn needle, stitch marker, pins, and scissors.
- Optional: fabric stiffener for the upper shell edge only.
Finished Size
Without the metal hardware, the completed oyster keychain measures about 5 to 6 cm wide and 4 to 5 cm tall. The final size can differ depending on the yarn, hook, and tension you use.
Abbreviations
The pattern uses these abbreviations.
- MR: magic ring
- ch: chain
- sl st: slip stitch
- sc: single crochet
- hdc: half double crochet
- inc: increase
- dec: decrease
- st or sts: stitch or stitches
- FO: fasten off
Instructions inside parentheses followed by “x n” mean you repeat that sequence n times.
Pattern Notes
Work the oyster as two separate shell halves, one lower shell and one upper shell. Each half has a colored outer crochet shell plus its own white inner crochet lining. The lining is crocheted separately, not cut from fabric, and it is sewn inside the colored shell to create the soft white interior.
Join the two halves only at the back hinge area. Do not sew the front closed. Lightly anchor the upper shell at the sides so the oyster stays open, then sew the pearl inside the lower shell, centered on the white crochet lining.
Make the small crochet keychain loop at the back hinge area of the lower shell before final assembly. Attach the metal jump ring to that crochet loop rather than directly to the shell edge.
Outer Shell Panel
Make 2 with the Outer Shell Color. Work in rows and keep the stitch counts even.
- Row 1: Ch 2, 5 sc in the 2nd ch from the hook, ch 1, turn (5).
- Row 2: inc x 5, ch 1, turn (10).
- Row 3: (1 sc, inc) x 5, ch 1, turn (15).
- Row 4: (2 sc, inc) x 5, ch 1, turn (20).
- Row 5: (3 sc, inc) x 5, ch 1, turn (25).
- Row 6: (4 sc, inc) x 5, ch 1, turn (30).
- Row 7: (5 sc, inc) x 5, ch 1, turn (35).
- Row 8: (6 sc, inc) x 5 (40). Do not FO yet.
Border: Ch 1, sc across the wide front edge. Work 2 sc into each row end down the first side, 3 sc around the small hinge or base point, then 2 sc into each row end back up the second side. Join with a sl st to the first border stitch. FO and weave in the end.
Raised Shell Ribs
Use the same Outer Shell Color or a slightly darker matching shade. On the outside of each shell panel, embroider or surface slip stitch 7 raised rib lines running from the small hinge or base point toward the wide front edge.
Place 1 rib in the center, then 3 ribs on each side. Keep the tension loose instead of pulling tight, so the shell stays gently curved rather than flattened.
White Inner Crochet Lining
Make 2 with White yarn.
- Row 1: Ch 2, 5 sc in the 2nd ch from the hook, ch 1, turn (5).
- Row 2: inc x 5, ch 1, turn (10).
- Row 3: (1 sc, inc) x 5, ch 1, turn (15).
- Row 4: (2 sc, inc) x 5, ch 1, turn (20).
- Row 5: (3 sc, inc) x 5, ch 1, turn (25).
- Row 6: (4 sc, inc) x 5, ch 1, turn (30).
- Row 7: (5 sc, inc) x 5 (35).
FO and leave a long tail for sewing. The white lining is meant to be slightly smaller than the colored shell so the colored rim stays visible.
Attach White Crochet Linings
Place one White Inner Crochet Lining inside one colored Outer Shell Panel, with the lining sitting slightly inside the colored edge, and pin it in place. Sew around the lining with White yarn using small, neat stitches. Avoid sewing through the raised ribs on the outside more than necessary. Repeat for the second shell half.
Scalloped Shell Edge
Use the Outer Shell Color. Join yarn at one corner of the wide front edge of one shell and work across the wide front edge only: sl st in the next st, skip 1 st, 5 hdc in the next st, skip 1 st, then repeat across the front edge.
If the stitch count does not work out exactly, distribute the final scallop neatly over the last few stitches. FO and weave in the end, then repeat for the second shell half.
The scalloped edge should rest on the colored outer rim with the white crochet lining visible inside.
Pearl
Work the pearl in Ivory yarn.
- Rnd 1: 6 sc in a magic ring (6).
- Rnd 2: inc x 6 (12).
- Rnd 3: (1 sc, inc) x 6 (18).
- Rounds 4 and 5: 18 sc over 2 rounds.
- Insert safety eyes between Rnd 4 and Rnd 5, roughly 4 sts apart. If you use beads or embroidery, add the eyes after closing.
- Rnd 6: (1 sc, dec) x 6 (12). Stuff firmly into a round pearl shape.
- Rnd 7: dec x 6 (6). FO, close the opening, and weave in the end.
Embroider a small smiling mouth in Black yarn, then add tiny blush stitches in Pink yarn on both sides of the face.
Reinforced Crochet Keychain Loop
Use the Outer Shell Color. Join yarn at the back hinge area of the lower shell, slightly underneath so the metal hardware sits behind the oyster. Ch 8, then sl st into the same base area to form a small loop.
Ch 1 and work 10 to 12 sc around the chain loop, then sl st to finish. FO and leave a long tail. With that tail, sew through the base of the loop several times, passing through the lower shell and hinge area for strength. The jump ring goes through this crochet loop.
Oyster Assembly
Set the lower shell with its white crochet lining facing up, then sew the pearl to the center of that lining with the face looking toward the front opening. Place the upper shell above the lower shell with its white lining facing down toward the pearl, and align the small hinge or base points of both halves at the back.
Sew the halves together only across the back hinge area, about 8 to 10 sts wide, and leave the front edge unsewn.
Add 2 to 3 hidden anchor stitches on the left side and 2 to 3 on the right side to keep the oyster open, then shape the upper shell so it leans open above the pearl. Check that the white crochet lining is visible on both shells.
Attach the jump ring through the reinforced crochet loop, then attach the metal chain and key ring to the jump ring. Gently pull test the loop and hardware before use.
Optional Edge Stiffening
This step is optional and only applies when the upper shell feels too soft. Brush a very small amount of fabric stiffener along the inside edge of the upper shell only, shape the shell open, and let it dry completely.
Do not stiffen the pearl, and do not coat the whole lower shell, because the keychain can then feel too hard and lose its soft crochet look.
Color Placement Guide
| Part | Color |
|---|---|
| Outer shell panels | Beige, Cream, Soft Blue, Mustard, or Light Brown |
| Inner linings, both halves | White |
| Pearl | Ivory |
| Eyes and mouth, if embroidered | Black |
| Tiny blush | Pink |
| Reinforced keychain loop | Same color as the outer shell |
Keeping the loop in the outer shell color lets the hardware blend into the design, while the white lining frames the pearl and keeps the interior bright.
Copyright
The pattern is copyright 2026 PenguinHobbies.com and is intended for personal use. Finished items made from the pattern may be sold in small handmade quantities, but the pattern itself may not be copied, rewritten, redistributed, sold, or translated without permission. The original pattern is published as the Free Crochet Pearl Oyster Keychain Pattern.
FAQs
What materials do I need to crochet the pearl oyster keychain?
Use sport or DK cotton yarn in outer shell color, white for lining, ivory for pearl, and small amounts of black and pink for the face. You will also need a 2.00-2.25 mm crochet hook, fiberfill stuffing, 3-4 mm safety eyes, a 25-30 mm metal key ring, a 4-5 cm metal chain, a 5-6 mm jump ring, and basic sewing tools.
How do I crochet the scalloped edge on the oyster shell?
After attaching the white inner lining, join the outer shell color at one corner of the wide front edge. Work across the front edge only: slip stitch in the next stitch, skip one, then five half double crochet in the next stitch, skip one; repeat across. Adjust the final scallop spacing if needed.
How do I assemble the oyster shell halves to keep them open?
Sew the pearl to the center of the lower shell lining. Place the upper shell with lining facing down, align the hinge points at the back, and sew the two halves together only across the back hinge area about 8-10 stitches wide. Add hidden anchor stitches on both sides to keep the shell permanently open.
How do I make the crochet keychain loop durable?
Join yarn at the back hinge area of the lower shell, chain 8, and slip stitch to form a loop. Then work 10-12 single crochet around the chain. Fasten off, leaving a long tail, and sew through the base of the loop several times into the shell fabric to reinforce it. This loop will hold the jump ring.

Free Crochet Pearl Oyster Keychain Pattern
- Yield: 1 oyster keychain 1x
Description
Free Crochet Pearl Oyster Keychain Pattern With A Cute Surprise Inside This free pattern creates a small crochet oyster keychain with a smiling pearl tucked inside a soft shell. The design has a beach inspired look, with scalloped shell edges, a white crochet lining, raised shell ribs, and realistic keychain hardware.
Ingredients
Materials and Tools
Sport or DK cotton yarn (Outer Shell Color: Beige, Cream, Soft Blue, Mustard, or Light Brown; White for inner crochet lining; Ivory for pearl; Small Pink for blush; Black for face)
2.00–2.25 mm crochet hook
Fiberfill stuffing
3–4 mm black safety eyes, black beads, or black embroidery thread for the pearl face
25–30 mm metal key ring
4–5 cm metal chain
5–6 mm jump ring
Strong sewing thread or matching yarn for reinforced assembly
Yarn needle
Stitch marker
Pins
Scissors
Optional: fabric stiffener for the upper shell edge only
Instructions
Outer Shell Panel
1-Make 2 with Outer Shell Color: Make 2 with Outer Shell Color. Row 1: Ch 2, 5 sc in 2nd ch from hook, ch 1, turn (5). Row 2: inc x 5, ch 1, turn (10). Row 3: (1 sc, inc) x 5, ch 1, turn (15). Row 4: (2 sc, inc) x 5, ch 1, turn (20). Row 5: (3 sc, inc) x 5, ch 1, turn (25). Row 6: (4 sc, inc) x 5, ch 1, turn (30). Row 7: (5 sc, inc) x 5, ch 1, turn (35). Row 8: (6 sc, inc) x 5 (40). Do not FO yet.
2-Border: Border: Ch 1, sc across the wide front edge, work 2 sc into each row-end down the first side, 3 sc around the small hinge/base point, work 2 sc into each row-end up the other side, join with sl st to the first border st. FO and weave in the end.
Raised Shell Ribs
3-Use the same Outer Shell Color or: Use the same Outer Shell Color or a slightly darker matching shade. On the outside of each shell panel, embroider or surface sl st 7 raised rib lines from the small hinge/base point toward the wide front edge. Make 1 center rib, then 3 ribs on each side. Do not pull tightly. The shell should stay gently curved, not flattened.
White Inner Crochet Lining
4-Make 2 with White yarn: Make 2 with White yarn. Row 1: Ch 2, 5 sc in 2nd ch from hook, ch 1, turn (5). Row 2: inc x 5, ch 1, turn (10). Row 3: (1 sc, inc) x 5, ch 1, turn (15). Row 4: (2 sc, inc) x 5, ch 1, turn (20). Row 5: (3 sc, inc) x 5, ch 1, turn (25). Row 6: (4 sc, inc) x 5, ch 1, turn (30). Row 7: (5 sc, inc) x 5 (35). FO, leaving a long tail for sewing. The white lining is intentionally slightly smaller than the colored shell so the colored rim remains visible.
Attach White Crochet Linings
5-Place one White Inner Crochet Lining inside: Place one White Inner Crochet Lining inside one colored Outer Shell Panel. The white lining should sit slightly inside the colored edge. Pin in place. Using White yarn, sew around the lining with small neat stitches. Do not sew through the raised ribs on the outside more than necessary. Repeat for the second shell half.
Scalloped Shell Edge
6-Use Outer Shell Color: Use Outer Shell Color. Join yarn at one corner of the wide front edge of one shell. Work across the wide front edge only: *sl st in next st, sk 1 st, 5 hdc in next st, sk 1 st; rep across the front edge. If the stitch count does not end perfectly, space the final scallop neatly across the last few stitches. FO and weave in the end. Repeat for the second shell half. The scalloped edge should sit on the colored outer rim, with the white crochet lining visible inside.
Pearl
7-Use Ivory yarn: Use Ivory yarn. Rnd 1: 6 sc in MR (6). Rnd 2: inc x 6 (12). Rnd 3: (1 sc, inc) x 6 (18). Rnd 4-5: 18 sc (2 rounds). Insert safety eyes between Rnd 4 and Rnd 5, about 4 sts apart. If using beads or embroidery, add the eyes after closing. Rnd 6: (1 sc, dec) x 6 (12). Stuff firmly into a round pearl shape. Rnd 7: dec x 6 (6). FO, close the opening, and weave in the end. With Black yarn, embroider a small smiling mouth. With Pink yarn, add tiny blush stitches on both sides of the face.
Reinforced Crochet Keychain Loop
8-Use Outer Shell Color: Use Outer Shell Color. Join yarn at the back hinge area of the lower shell, slightly underneath the shell so the metal hardware will sit behind the oyster. Ch 8, sl st into the same base area to form a small loop. Ch 1, work 10-12 sc around the chain loop. Sl st to finish. FO, leaving a long tail. Using the tail, sew through the base of the loop several times, passing through the lower shell and hinge area for strength. The jump ring will go through this crochet loop.
Oyster Assembly
9-Place the lower shell with the white: Place the lower shell with the white crochet lining facing up.
10-Sew the Pearl to the center of: Sew the Pearl to the center of the lower shell lining. The face should look toward the front opening.
11-Place the upper shell above the lower: Place the upper shell above the lower shell with the white crochet lining facing down toward the pearl.
12-Align the small hinge/base points of both: Align the small hinge/base points of both shell halves at the back.
13-Sew the two shell halves together only: Sew the two shell halves together only across the back hinge area, about 8-10 sts wide.
14-Do not sew the front edge closed: Do not sew the front edge closed.
15-Add 2-3 hidden anchor stitches on the: Add 2-3 hidden anchor stitches on the left side and 2-3 hidden anchor stitches on the right side to keep the oyster open.
16-Shape the upper shell so it leans: Shape the upper shell so it leans open above the pearl.
17-Check that the white crochet lining is: Check that the white crochet lining is visible on both the upper and lower shell.
18-Attach the jump ring through the reinforced: Attach the jump ring through the reinforced crochet loop.
19-Attach the metal chain and key ring: Attach the metal chain and key ring to the jump ring.
20-Gently pull-test the crochet loop and hardware: Gently pull-test the crochet loop and hardware before use.
Optional Edge Stiffening
21-If the upper shell feels too soft,: If the upper shell feels too soft, brush a tiny amount of fabric stiffener along the inside edge of the upper shell only. Shape the shell open and let it dry completely. Do not stiffen the pearl. Do not stiffen the whole lower shell, or the keychain may feel too hard and lose its soft crochet look.
- Method: other
Keywords: Free Crochet Pearl Oyster Keychain Pattern