Why You’ll Love These Boston Cream Pie Bars
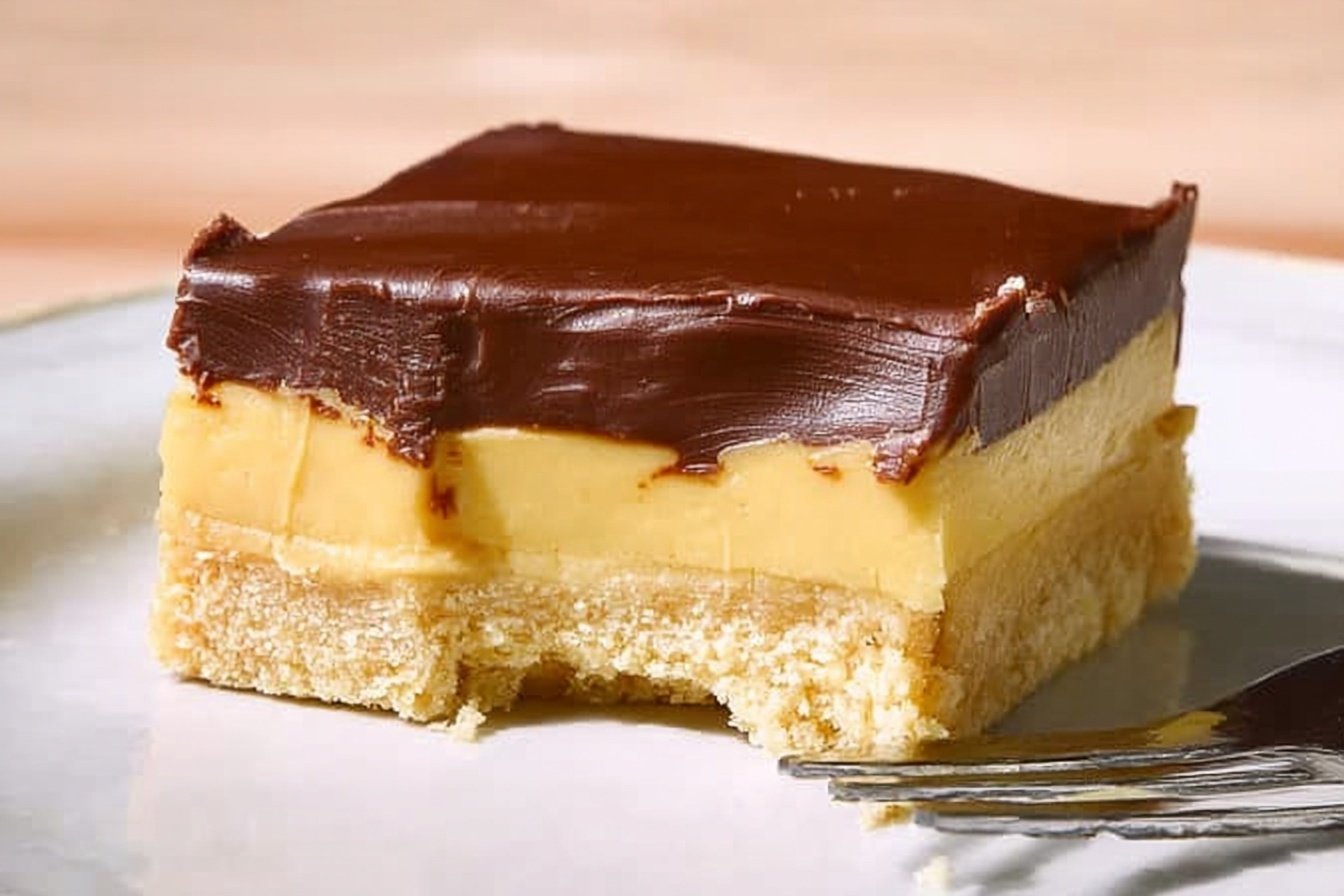
If you love classic Boston Cream Pie Bars but want something easier to make and simpler to serve, this recipe is going to be a favorite. You get all the fun of a creamy vanilla filling, buttery cookie crust, and glossy chocolate topping without the stress of a layer cake. These cream pie bars are perfect for busy weeknights, potlucks, bake sales, and anytime you want a dessert that feels special but does not take all day.
- Easy to make: These easy Boston cream pie bars come together with simple pantry ingredients and no cake layers to fuss over. The crust mixes up fast, the filling uses instant pudding, and the ganache is just chocolate chips and hot cream.
- Great for busy schedules: If you need a dessert that can be made ahead, these homemade Boston cream pie bars fit right in. They chill beautifully, slice cleanly, and hold up well for parties, school events, and family gatherings.
- Rich flavor in every bite: The combo of vanilla wafer crust, silky pudding filling, and chocolate ganache gives you that classic boston cream pie flavor people love. It tastes bakery-style, but it is still very approachable for home cooks.
- Flexible for different needs: These pie bars can be adapted with dairy-free or gluten-free swaps, and the filling is easy to tweak for your taste. That makes this boston cream pie bars recipe a solid choice for all kinds of eaters.
These bars give you that old-fashioned Boston cream pie taste with way less effort, which is exactly why they are so handy for real-life baking.
For more dessert ideas that are just as simple and crowd-friendly, you might also like this no-bake chocolate eclair cake or these rich and easy dessert bars.
Jump To
- 1. Why You’ll Love These Boston Cream Pie Bars
- 2. Essential Ingredients for Boston Cream Pie Bars
- 3. How to Prepare the Perfect Boston Cream Pie Bars: Step-by-Step Guide
- 4. Dietary Substitutions to Customize Your Boston Cream Pie Bars
- 5. Mastering Boston Cream Pie Bars: Advanced Tips and Variations
- 6. How to Store Boston Cream Pie Bars: Best Practices
- 7. FAQs: Frequently Asked Questions About Boston Cream Pie Bars
- 8. Boston Cream Pie Bars
Essential Ingredients for Boston Cream Pie Bars
Main ingredients
- 6 ounces vanilla wafer cookies about 50 regular cookies or 109 mini cookies, for the base that gives the bars a sweet, crisp crust.
- 2 tablespoons granulated or brown sugar, to add a little extra sweetness and help the crust taste more like a dessert shell.
- 6 tablespoons melted butter, which binds the crust together and gives it that rich, buttery bite.
- 2 packages 3.4-ounce boxes instant vanilla pudding mix, the key to the smooth, creamy filling.
- 2 1/2 cups cold cream, which helps the filling set up into a thick, spoonable layer.
- 1 teaspoon vanilla optional, for a little extra bakery-style flavor in the filling.
- 1 cup semi-sweet chocolate chips, for the topping that makes these bars taste like true Boston cream pie.
- 2/3 cup hot but not boiling heavy cream, which melts the chocolate into a smooth ganache.
Ingredient notes and easy swaps
The vanilla wafer base is one of the easiest parts of this recipe, and it gives you a familiar flavor that pairs well with the pudding and chocolate. If you only have brown sugar, use that for a deeper caramel note. If you prefer a sweeter crust, granulated sugar works just as well.
The filling is made with instant vanilla pudding, which keeps the recipe quick and low-stress. If you want a slightly richer flavor, French vanilla pudding can work too. The optional vanilla extract is helpful if you like a stronger vanilla taste, but the bars are still delicious without it.
The ganache is simple, but it makes the whole dessert look polished. Semi-sweet chocolate chips balance the sweetness of the pudding, while hot heavy cream creates a smooth topping. Make sure the cream is hot, not boiling, so the chocolate melts evenly without getting grainy.
Special dietary options
- Vegan: Use vegan vanilla wafers, plant-based butter, dairy-free instant pudding mix, and coconut cream or another thick plant milk for the filling. Swap in dairy-free chocolate chips and coconut cream for the ganache.
- Gluten-free: Choose certified gluten-free vanilla cookies or gluten-free graham-style cookies for the crust. Check the pudding mix label to make sure it is gluten-free.
- Lower-calorie: Use reduced-fat cookies, light whipped topping in place of some of the cream, and a thinner layer of ganache if you want a lighter version.
| Ingredient | Amount | Purpose |
|---|---|---|
| Vanilla wafer cookies | 6 ounces | Makes the sweet crust |
| Sugar | 2 tablespoons | Adds flavor and sweetness |
| Melted butter | 6 tablespoons | Binds the crust |
| Instant vanilla pudding mix | 2 packages 3.4-ounce boxes | Creates the creamy filling |
| Cold cream | 2 1/2 cups | Thickens the filling |
| Vanilla extract | 1 teaspoon optional | Boosts vanilla flavor |
| Semi-sweet chocolate chips | 1 cup | Forms the ganache topping |
| Hot heavy cream | 2/3 cup | Melts the chocolate smoothly |
How to Prepare the Perfect Boston Cream Pie Bars: Step-by-Step Guide
First step: Get your pan and crust ready
Start by lining a 9 by 13 inch baking dish with parchment paper or lightly greasing it. This makes it easier to lift the bars out later and slice them cleanly. Crush the vanilla wafer cookies until they look like fine crumbs, then place them in a medium bowl with the sugar. Stir in the melted butter until the mixture feels like wet sand. If it looks too dry, add a tiny splash more melted butter, but only if needed.
Press the crumb mixture firmly into the bottom of the pan. Use the bottom of a measuring cup or glass to pack it down so the crust stays together. This is the part that gives your Boston cream pie bars recipe a sturdy base, so do not rush it. Chill the crust while you make the filling, or bake it briefly if you want a firmer texture. A short chill works well for most home bakers and keeps this recipe nice and easy.
Second step: Mix the creamy filling
In a large bowl, whisk the instant vanilla pudding mix with the cold cream until it thickens. This usually takes about 2 minutes. If you are using the optional vanilla, stir that in now. The filling should be smooth, thick, and spreadable. If it seems a little loose at first, give it another minute or two to set before spreading it over the crust.
Spread the pudding evenly over the cooled crust with a spatula. Try to get the filling all the way to the edges so each bite has a good balance of crust and cream. This step is where the bars start to look like a true Boston cream pie dessert. For a lighter spin, you can use a lighter cream option, but the texture may be softer.
Third step: Make the easy ganache
Place the semi-sweet chocolate chips in a heat-safe bowl. Warm the heavy cream until it is hot but not boiling, then pour it over the chocolate chips. Let it sit for a minute so the chocolate starts to melt. After that, stir slowly until the mixture becomes smooth and shiny. If there are still a few lumps, let it sit another minute and stir again.
This ganache is what gives the bars their classic bakery look. It does not need complicated steps or special equipment. If you want a slightly sweeter topping, milk chocolate chips can work, but semi-sweet keeps the flavor balanced. Pour the ganache over the pudding layer and gently spread it into an even coat.
Fourth step: Chill until set
Once the ganache is spread on top, cover the pan and place it in the refrigerator. Chill for at least 2 hours, though 4 hours is even better if you want neat slices. The bars need time for the pudding and ganache to firm up. This is one of the biggest reasons homemade Boston cream pie bars are so practical for parties and gatherings. You can make them early in the day or even the night before.
If you are in a hurry, a shorter chill may still work, but the bars may be softer when sliced. For the cleanest cuts, patience pays off here. The longer rest also helps the flavors come together so every layer tastes more like one complete dessert.
Final step: Slice and serve
Lift the bars out of the pan if you used parchment, then slice them with a sharp knife. For the neatest edges, wipe the knife clean between cuts. You can serve the bars cold straight from the fridge or let them sit for 10 minutes at room temperature if you like a softer bite. Either way, these easy homemade Boston cream pie bars are creamy, rich, and easy to share.
If you want to dress them up, add a few cookie crumbs, a light dusting of cocoa, or a small drizzle of melted chocolate. For a party tray, cut them into smaller squares so people can grab one without needing a fork. That makes them especially nice for birthdays, potlucks, and family get-togethers.
For best results, chill long enough for the filling to set fully. Clean slices are worth the wait.

Dietary Substitutions to Customize Your Boston Cream Pie Bars
Protein and main component alternatives
While this recipe is naturally a dessert bar, you can still make smart swaps based on dietary needs. For a dairy-free version, use plant-based butter, dairy-free instant pudding, and coconut cream instead of heavy cream. Some brands of non-dairy pudding mix set well and still give you that creamy texture people expect from cream pie bars.
If you want a gluten-free version, look for certified gluten-free vanilla wafers or another crisp cookie that crumbles well. The filling and ganache are usually easy to adapt, but it is smart to read labels closely on the pudding mix and chocolate chips. A gluten-free version still tastes like a classic boston cream pie recipe and works well for guests who need a wheat-free dessert.
Vegetable, sauce, and seasoning modifications
Because this is a sweet bar recipe, there are not any vegetables to swap out, but you can still play with the sauce and flavoring. If you want a deeper vanilla taste, add a little extra vanilla extract or use French vanilla pudding. For a more chocolate-forward version, use a slightly thicker ganache layer or mix a spoonful of cocoa into the pudding layer.
To make the bars lighter, you can use less ganache on top or cut smaller portions. If you are making them for kids, a thinner chocolate layer often works best. No matter how you change it up, the goal is still the same: a creamy, chocolate-topped dessert that feels familiar and fun.
Mastering Boston Cream Pie Bars: Advanced Tips and Variations
Pro cooking techniques
One of the best tricks for better Boston cream pie bars is to press the crust firmly and evenly into the pan. A packed crust holds together better and makes the bars easier to serve. Another helpful trick is to let the crust cool completely before adding the pudding. That keeps the filling from softening and helps prevent a soggy bottom.
If you want very clean layers, chill the crust before adding the filling, then chill again after adding the pudding and ganache. That extra cold time helps everything set into neat slices. For the ganache, stir gently and stop as soon as it looks smooth. Overmixing can make it dull instead of shiny.
Flavor variations
You can change the flavor just a bit while keeping the spirit of the dessert. Try French vanilla pudding for a warmer flavor and slightly golden color. If you like a deeper dessert taste, swap the vanilla wafer crust for chocolate cookies. For a coffee lover twist, add a tiny spoonful of instant espresso powder to the ganache.
Another easy variation is to sprinkle crushed cookies on top of the ganache before it sets. That gives the bars a little crunch and makes them look more festive. You can also add a pinch of salt to the ganache if you want the chocolate flavor to stand out more.
Presentation tips
These bars already look nice when sliced cleanly, but a few small touches can make them even prettier. Serve them on a white platter so the layers stand out. Add a few cookie crumbs, a light cocoa dusting, or a tiny drizzle of melted chocolate on each square. If you are serving a crowd, cut them into bite-sized pieces and stack them in neat rows.
For more dessert inspiration with a similar easy-going feel, take a look at this chocolate peanut butter poke cake. It is another simple treat that works well for family gatherings and weekend baking.
Make-ahead options
These bars are a great make-ahead dessert because the flavor improves after chilling. You can make them the night before and keep them covered in the fridge. If you are serving them for a special event, slice them just before guests arrive so the edges stay neat. This is one of the reasons easy Boston cream pie bars are so popular with busy parents, students, and working professionals.
How to Store Boston Cream Pie Bars: Best Practices
Proper storage keeps your Boston cream pie bars tasting fresh and helps the layers stay firm. Since the filling uses cream and pudding, refrigeration is the best choice for short-term storage. Place the bars in an airtight container and keep them in the fridge for up to 3 days. If possible, separate layers with parchment paper so they do not stick together.
For freezing, wrap each bar tightly in plastic wrap and then place the wrapped pieces in a freezer-safe bag or container. They can stay frozen for up to 2 months. Thaw them overnight in the refrigerator before serving. Avoid microwaving, since that can make the pudding layer watery and the ganache uneven.
If you are making them for meal prep or a party, it helps to cut them after they are fully chilled. That way, you can store individual bars in the fridge for grab-and-go servings. This is especially handy when you want dessert ready for school lunches, weekend guests, or a sweet treat after dinner.

FAQs: Frequently Asked Questions About Boston Cream Pie Bars
What kind of pudding do I use for Boston cream pie bars?
For Boston cream pie bars, use a 3.4-ounce box of instant vanilla or French vanilla pudding mix—check the label closely for “instant,” as “cook & serve” varieties won’t set properly without stovetop cooking. Whisk it with 2 cups of cold milk until thickened, about 2 minutes, then spread over your cooled crust. French vanilla adds a subtle yellow tint that mimics classic pastry cream. This shortcut keeps the bars creamy and no-fuss. While homemade pudding or pastry cream might work, instant ensures the right texture after chilling. Avoid overmixing to prevent a runny filling. Pairs perfectly with a chocolate ganache top for that authentic Boston cream pie taste. (92 words)
Can Boston cream pie bars be made ahead of time?
Yes, Boston cream pie bars are perfect for making ahead. Prepare the crust, pudding layer, and ganache, then chill for at least 2 hours—or up to overnight—for clean slices and set flavors. Store covered in the fridge up to 3 days without texture changes; the pudding firms up nicely. This makes them ideal for parties or busy days—just slice and serve cold. Pro tip: Let the crust cool fully before adding pudding to avoid sogginess, and press plastic wrap directly on the ganache to prevent skinning. For best results, bring to room temp for 10 minutes before cutting. See our full recipe for step-by-step timing. (98 words)
How do you store Boston cream pie bars?
Store Boston cream pie bars in an airtight container in the refrigerator for up to 3 days. The chilled pudding and ganache hold their shape well, staying fresh without drying out or weeping. Cover tightly to block fridge odors, and keep away from strong-smelling foods. For longer storage, they freeze well: wrap individual bars in plastic then foil, and freeze up to 2 months. Thaw overnight in the fridge—avoid microwaving to preserve creaminess. Always slice with a sharp, hot knife (dip in hot water and wipe dry between cuts) for neat portions. Serve chilled or at cool room temp for 16-20 bars from a standard 9×13 pan. (102 words)
Can you freeze Boston cream pie bars?
Yes, you can freeze Boston cream pie bars for up to 2 months. After fully chilling and setting (at least 4 hours), cut into squares, wrap each tightly in plastic wrap, then place in a freezer bag to prevent freezer burn. The instant pudding holds up better than custard, though the ganache might soften slightly upon thawing. Defrost in the fridge overnight—takes 6-8 hours—and serve cold. Avoid refreezing. This is great for batch prep; one batch yields about 24 bars at roughly 250-300 calories each, depending on ingredients. Test a small batch first if using homemade pudding. Links to our freezing tips for desserts. (98 words)
How do you cut Boston cream pie bars cleanly?
To cut Boston cream pie bars cleanly, chill them fully—at least 4 hours or overnight—so the pudding sets firm. Use a sharp, long serrated knife; heat it under hot water for 10 seconds, wipe dry, and slice straight down without sawing to avoid squishing the filling. Wipe the blade clean between each cut. For 9×13 pans, aim for 20-24 bars (2×3-inch size). Line your pan with foil or parchment overhang for easy lifting if desired. This method gives professional edges every time. If ganache cracks, it’s from warmth—rechill briefly. Perfect for potlucks; store extras as noted above. (92 words)
Boston Cream Pie Bars
- Total Time: 3 hours 20 minutes
- Yield: 16 bars
- Diet: Vegetarian
Description
🍰 Savor the iconic Boston cream pie in easy bar form – buttery cookie crust, silky vanilla cream filling, and fudgy chocolate ganache for pure indulgence!
🥛 No-bake bliss ready in minutes plus chill time, perfect for effortless desserts that wow at parties or cravings.
Ingredients
– 6 ounces Vanilla wafer cookies Makes the sweet crust
– 2 tablespoons Sugar Adds flavor and sweetness
– 6 tablespoons Melted butter Binds the crust
– 2 packages 3.4-ounce boxes Instant vanilla pudding mix Creates the creamy filling
– 2 1/2 cups Cold cream Thickens the filling
– 1 teaspoon optional Vanilla extract Boosts vanilla flavor
– 1 cup Semi-sweet chocolate chips Forms the ganache topping
– 2/3 cup Hot heavy cream Melts the chocolate smoothly
Instructions
1-First step: Get your pan and crust ready Start by lining a 9 by 13 inch baking dish with parchment paper or lightly greasing it. This makes it easier to lift the bars out later and slice them cleanly. Crush the vanilla wafer cookies until they look like fine crumbs, then place them in a medium bowl with the sugar. Stir in the melted butter until the mixture feels like wet sand. If it looks too dry, add a tiny splash more melted butter, but only if needed. Press the crumb mixture firmly into the bottom of the pan. Use the bottom of a measuring cup or glass to pack it down so the crust stays together. This is the part that gives your Boston cream pie bars recipe a sturdy base, so do not rush it. Chill the crust while you make the filling, or bake it briefly if you want a firmer texture. A short chill works well for most home bakers and keeps this recipe nice and easy.
2-Second step: Mix the creamy filling In a large bowl, whisk the instant vanilla pudding mix with the cold cream until it thickens. This usually takes about 2 minutes. If you are using the optional vanilla, stir that in now. The filling should be smooth, thick, and spreadable. If it seems a little loose at first, give it another minute or two to set before spreading it over the crust. Spread the pudding evenly over the cooled crust with a spatula. Try to get the filling all the way to the edges so each bite has a good balance of crust and cream. This step is where the bars start to look like a true Boston cream pie dessert. For a lighter spin, you can use a lighter cream option, but the texture may be softer.
3-Third step: Make the easy ganache Place the semi-sweet chocolate chips in a heat-safe bowl. Warm the heavy cream until it is hot but not boiling, then pour it over the chocolate chips. Let it sit for a minute so the chocolate starts to melt. After that, stir slowly until the mixture becomes smooth and shiny. If there are still a few lumps, let it sit another minute and stir again. This ganache is what gives the bars their classic bakery look. It does not need complicated steps or special equipment. If you want a slightly sweeter topping, milk chocolate chips can work, but semi-sweet keeps the flavor balanced. Pour the ganache over the pudding layer and gently spread it into an even coat.
4-Fourth step: Chill until set Once the ganache is spread on top, cover the pan and place it in the refrigerator. Chill for at least 2 hours, though 4 hours is even better if you want neat slices. The bars need time for the pudding and ganache to firm up. This is one of the biggest reasons homemade Boston cream pie bars are so practical for parties and gatherings. You can make them early in the day or even the night before. If you are in a hurry, a shorter chill may still work, but the bars may be softer when sliced. For the cleanest cuts, patience pays off here. The longer rest also helps the flavors come together so every layer tastes more like one complete dessert.
5-Final step: Slice and serve Lift the bars out of the pan if you used parchment, then slice them with a sharp knife. For the neatest edges, wipe the knife clean between cuts. You can serve the bars cold straight from the fridge or let them sit for 10 minutes at room temperature if you like a softer bite. Either way, these easy homemade Boston cream pie bars are creamy, rich, and easy to share. If you want to dress them up, add a few cookie crumbs, a light dusting of cocoa, or a small drizzle of melted chocolate. For a party tray, cut them into smaller squares so people can grab one without needing a fork. That makes them especially nice for birthdays, potlucks, and family get-togethers.
Notes
🧈 Press crust firmly for sturdy base that holds creamy layers without crumbling.
⏳ Chill filling at least 1 hour before ganache to prevent melting.
🍫 Use room-temp tools for ganache to avoid seizing; stir gently for silky shine.
- Prep Time: 20 minutes
- Chill Time: 3 hours
- Category: Desserts
- Method: No Bake
- Cuisine: American
Nutrition
- Serving Size: 1 bar
- Calories: 350 kcal
- Sugar: 25g
- Sodium: 250mg
- Fat: 25g
- Saturated Fat: 14g
- Unsaturated Fat: 10g
- Trans Fat: 0g
- Carbohydrates: 30g
- Fiber: 1g
- Protein: 4g
- Cholesterol: 60mg
Keywords: boston cream pie bars, easy homemade bars, no bake dessert, chocolate pudding bars