Why You’ll Love This Cheesecake Water Bath Leak Prevention
Have you ever dreamed of making a cheesecake that comes out perfectly smooth and creamy every single time? This cheesecake water bath leak prevention method makes that dream a reality, turning even first-time bakers into pros without much hassle. It’s all about keeping things simple while getting those amazing results that make your dessert stand out at any gathering. Let’s dive into what makes this approach so special for home cooks and baking enthusiasts alike.
The cheesecake water bath leak prevention keeps your baking stress-free with its straightforward steps, using basic kitchen tools to ensure even cooking. This recipe focuses on wholesome ingredients that not only taste great but also fit into a balanced diet, making it a hit for busy parents and diet-conscious individuals. With options to tweak it for vegan or gluten-free needs, it’s versatile enough for students, newlyweds, and seniors looking for easy meals. You’ll love how the water bath helps prevent cracks, leading to a silky texture that enhances the flavor and makes each slice absolutely irresistible.
Imagine serving up 12 to 14 slices of this delightful dessert, perfect for family dinners or parties, with a total prep time of about 7 hours including 45 minutes for getting everything ready, 2 hours and 15 minutes for baking, and 4 hours for cooling. This method uses a springform pan wrapped carefully to avoid leaks, placed inside a larger pan like a roasting pan, and filled with hot water to create that even baking environment. It’s a simple trick that delivers professional results right in your kitchen, making it a go-to for anyone who loves baking without the fuss.
Jump To
- 1. Why You’ll Love This Cheesecake Water Bath Leak Prevention
- 2. Essential Ingredients for Cheesecake Water Bath Leak Prevention
- 3. How to Prepare the Perfect Cheesecake Water Bath Leak Prevention: Step-by-Step Guide
- 4. Dietary Substitutions to Customize Your Cheesecake Water Bath Leak Prevention
- 5. Mastering Cheesecake Water Bath Leak Prevention: Advanced Tips and Variations
- 6. How to Store Cheesecake Water Bath Leak Prevention: Best Practices
- 7. FAQs: Frequently Asked Questions About Cheesecake Water Bath Leak Prevention
- 8. Cheesecake Water Bath Leak Prevention
Essential Ingredients for Cheesecake Water Bath Leak Prevention
Gathering the right ingredients is the first step to a flawless cheesecake that stays leak-free during its water bath. This section breaks down everything you need, focusing on items that make your baking smooth and effective. By using these, you’ll create a creamy base that holds up perfectly in the oven.
Main Ingredients
- 24 oz cream cheese – Provides the rich, creamy base essential for texture and flavor.
- 4 large eggs – Acts as a binder and adds structure to the cheesecake.
- 1 cup sugar – Sweetens the dessert and balances the tanginess.
- 1 cup sour cream – Adds moisture and helps prevent cracking when used in the water bath.
- 2 tsp vanilla extract – Enhances overall flavor.
Special Dietary Options
For those with specific dietary preferences, adapting this recipe is straightforward and keeps the leak prevention intact. Here’s how to make substitutions that work well without changing the core method.
- Use plant-based cream cheese for vegan diets to maintain that creamy texture.
- Opt for flaxseed meal as an egg substitute in vegan versions for the same binding effect.
- Choose certified gluten-free ingredients to ensure the recipe fits gluten-free needs.
- Swap sugar with natural sweeteners like stevia for low-calorie adaptations.
This list covers all the essentials, ensuring your cheesecake turns out just right with the springform pan prepared using methods like wrapping in aluminum foil or using a slow cooker bag. Remember, the crust is made and pre-baked first to set a strong base, making the whole process even more reliable.
How to Prepare the Perfect Cheesecake Water Bath Leak Prevention: Step-by-Step Guide
Ready to bake a cheesecake that looks and tastes amazing every time? This step-by-step guide walks you through the process, focusing on leak prevention to get that creamy result you’re after. We’ll start with prepping your tools and end with cooling tips that keep everything intact.
Gathering Your Tools
Before you begin, make sure you have a springform pan and a larger pan, like a roasting pan or big cake pan, on hand. Optional items such as aluminum foil, slow cooker bags, or a silicone pan can help seal things up and prevent leaks. The crust needs to be made and pre-baked first for a solid foundation, so don’t skip that step.
Prepping the Pan
Once your oven is preheated to 325°F (160°C) and the rack is in the center, prepare your springform pan using one of these methods: wrap it in several layers of aluminum foil, place it inside a slow cooker bag and then wrap with foil, or set it inside a silicone pan. This step is key to avoiding water seepage during baking. Place the prepared pan inside the larger pan and add the cheesecake filling carefully.
| Step | Description |
|---|---|
| First Step | Preheat your oven to 325°F (160°C) and arrange the rack in the center position. Prepare your springform pan by wrapping it with double layers of heavy-duty aluminum foil to prevent water from seeping in. |
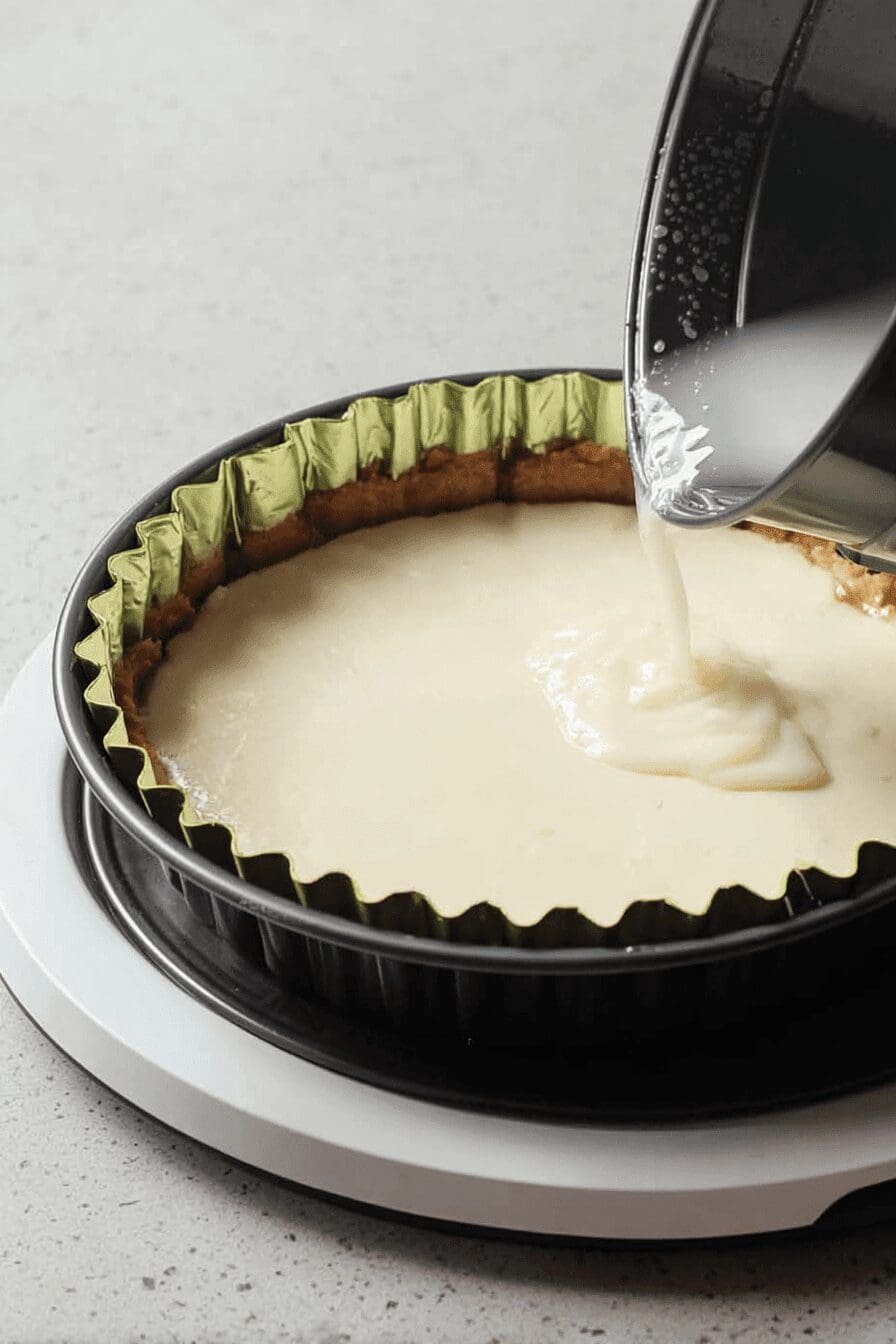
| Second Step | Prepare the cheesecake batter by blending cream cheese until smooth, then gradually add sugar, eggs, sour cream, and vanilla extract. Mix each ingredient thoroughly to avoid lumps. |
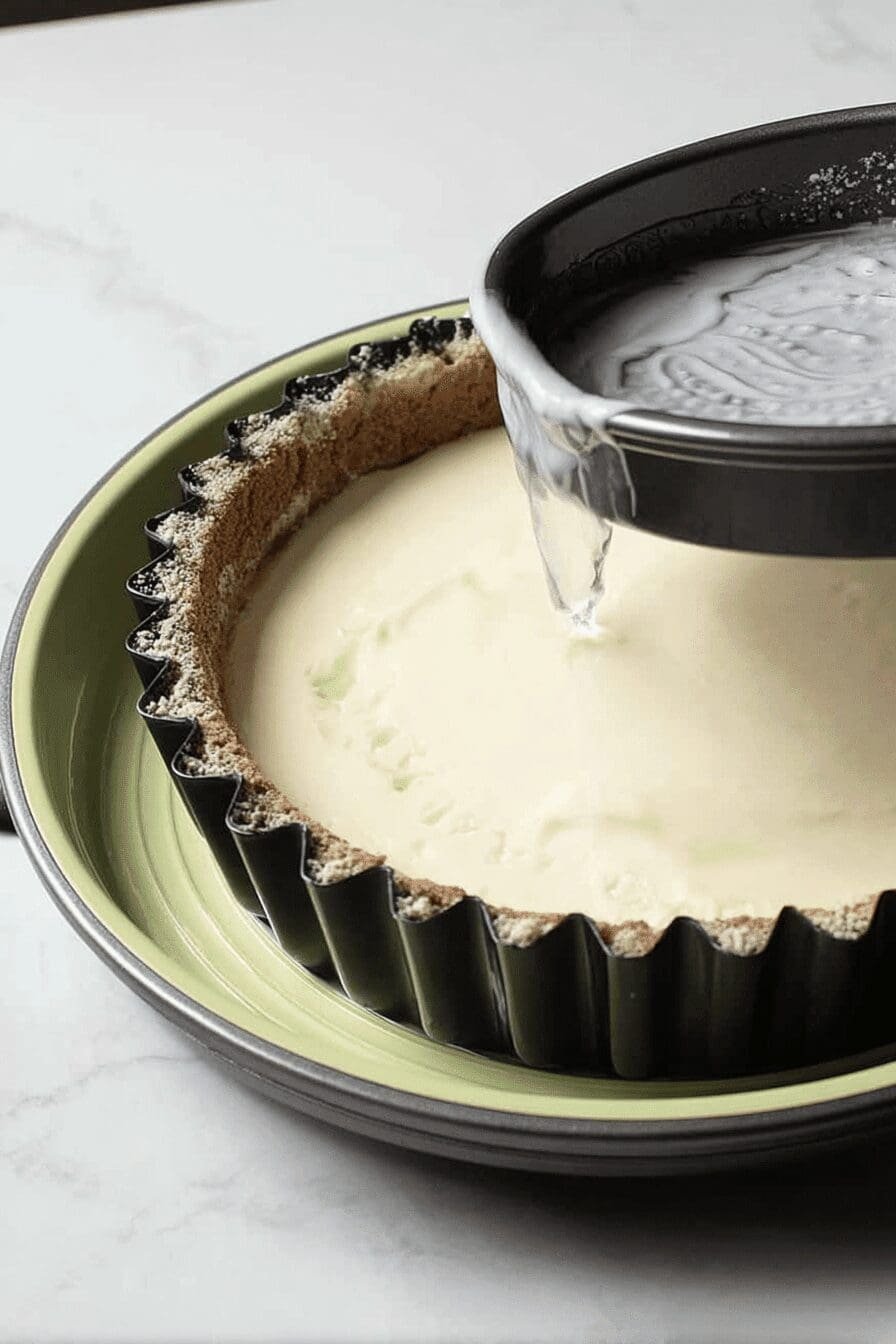
| Third Step | Pour the batter into the prepared pan and smooth the top. Place the pan in a larger roasting pan. |
| Fourth Step | Pour hot water into the roasting pan until it reaches halfway up the sides of the springform pan, creating a water bath that ensures even baking and prevents leaks. |
| Fifth Step | Bake for 60-70 minutes until the edges are set but the center is slightly jiggly. Avoid overbaking to prevent cracks. Remember tips like adding hot water close to the oven to avoid spills and carefully wrapping the pan. |
| Final Step | Turn off the oven and leave the cheesecake inside with the door slightly open for 1 hour. Then, remove and cool on a rack, and refrigerate for at least 4 hours before serving. Adjust for dietary needs, such as substituting ingredients. |
This method yields 12 to 14 slices of a delicious dessert, with the water bath helping to prevent cracks and ensure even baking. For smaller cheesecakes like bars, you can skip the water bath, but for this recipe, cooling slowly and fully chilling before removing from the pan is essential. For more ideas on variations, check out our recipe for cinnamon roll honeybun cheesecake that builds on these techniques.

Dietary Substitutions to Customize Your Cheesecake Water Bath Leak Prevention
Making this cheesecake work for your lifestyle is easier than you might think, especially with the leak prevention method in place. Whether you’re vegan or watching calories, these swaps keep the texture creamy and the baking process reliable. Let’s look at how to tweak the ingredients without messing up that water bath magic.
Protein and Main Component Alternatives
- Swap traditional cream cheese with vegan cream cheese or silken tofu for plant-based diets to maintain the rich base.
- Use flaxseed or chia seeds mixed with water as egg replacements for vegan options, ensuring the structure holds up in the water bath.
Vegetable, Sauce, and Seasoning Modifications
- Incorporate fruit purees such as pumpkin or sweet potato for natural flavor enhancements that pair well with the leak prevention technique.
- Adjust vanilla extract with almond or lemon zest to vary the flavor profile, keeping the water bath effective.
- For low-calorie adaptations, substitute sugar with stevia or erythritol to keep sweetness without affecting the baking process.
These changes ensure your cheesecake still benefits from the springform pan preparation and water bath for even results. Remember, cooling slowly after baking helps avoid cracks, no matter the substitutions.
Mastering Cheesecake Water Bath Leak Prevention: Advanced Tips and Variations
Once you’re comfortable with the basics, it’s time to level up your cheesecake game with some pro tips and fun twists. This section covers ways to refine your technique and add excitement to your dessert. The water bath remains key to keeping everything leak-free and perfectly baked.
Adding hot water carefully is a simple trick that makes all the difference it’s about precision for that flawless finish.
Pro Cooking Techniques
- Use a thermometer to keep the water below boiling, which helps prevent cracks and ensures even baking with the springform pan wrapped tightly.
- Avoid opening the oven door too often to maintain steady heat and reduce the risk of leaks.
Flavor Variations
Try adding citrus zest or spices like cinnamon to create unique flavors, all while sticking to the water bath method for the best results. For ideas, explore blueberry cream cheese crumb cake on our site, which complements this technique nicely.
How to Store Cheesecake Water Bath Leak Prevention: Best Practices
Keeping your cheesecake fresh after all that careful baking is just as important as the preparation. With the leak prevention method, your dessert will stay in great shape for days. Follow these tips to enjoy it longer without losing that creamy texture.
- Store cheesecake covered in plastic wrap or an airtight container in the refrigerator; it’s best within 3-4 days.
- Wrap tightly in plastic and aluminum foil for freezing, then defrost overnight to maintain texture.
- Serve chilled or at room temperature and avoid microwaving to keep quality intact.
For more on external insights, check out expert tips on cheesecake water baths.
FAQs: Frequently Asked Questions About Cheesecake Water Bath Leak Prevention
How do I prevent water from leaking into my cheesecake when using a water bath?
To stop water from leaking into your cheesecake, tightly wrap the outside of your springform pan with several layers of heavy-duty aluminum foil. Make sure to cover the bottom and sides completely to create a waterproof seal. Placing the wrapped pan inside a larger roasting pan filled with hot water helps the cheesecake cook evenly without water seeping in. Avoid using thin foil or loosely wrapping the pan, as this can lead to leaks and a soggy crust.
Can I bake a cheesecake in a water bath without a springform pan?
While a springform pan is ideal for cheesecakes, you can use a regular cake pan if it has high sides and you wrap it carefully with foil. However, removing the cheesecake can be more challenging. Whatever pan you use, ensure it is well-sealed with foil to prevent water leaks. If you don’t want to risk leaks, consider baking cheesecakes that do not require a water bath, like mini cheesecakes or no-bake varieties.
Is it okay to place a pan of water below the cheesecake instead of using a water bath?
Placing a pan of water on a lower rack can add moisture to your oven but won’t provide the gentle, even heat a true water bath offers. This method may cause the cheesecake edges to brown more and sometimes results in slight sinking or cracking. While it’s a simpler alternative, it’s less reliable for preventing cracks and uneven baking compared to wrapping your pan and using a water bath directly.
How much water should I use in a water bath for baking cheesecake?
Fill the roasting pan with about one to two inches of hot water—enough to reach halfway up the sides of your foil-wrapped springform pan. Using too little water defeats the purpose of the bath, while too much increases the risk of leaks. Check the water level during baking and carefully add more hot water if it starts to evaporate before the cake is done.
When can I skip using a water bath for cheesecake baking?
You can skip a water bath if your recipe explicitly states it’s not needed, or when baking small cheesecakes like mini cheesecakes or cheesecake bars, which cook evenly without one. Also, no-bake cheesecakes don’t require any baking or water bath. In these cases, omitting the water bath won’t impact texture or cracking.
Cheesecake Water Bath Leak Prevention
- Total Time: 6 hours 60 minutes
- Yield: 12 to 14 slices
Description
🧀 Baking cheesecake in a water bath ensures creamy, smooth texture by preventing cracks and promoting even cooking.
🔥 This method helps maintain moisture and delivers a perfect cheesecake every time, ideal for special occasions.
Ingredients
– 24 oz cream cheese Provides the rich, creamy base essential for texture and flavor.
– 4 large eggs Acts as a binder and adds structure to the cheesecake.
– 1 cup sugar Sweetens the dessert and balances the tanginess.
– 1 cup sour cream Adds moisture and helps prevent cracking when used in the water bath.
– 2 tsp vanilla extract Enhances overall flavor.
– plant-based cream cheese for vegan diets to maintain that creamy texture.
– flaxseed meal as an egg substitute in vegan versions for the same binding effect.
– certified gluten-free ingredients to ensure the recipe fits gluten-free needs.
– natural sweeteners like stevia for low-calorie adaptations.
Instructions
First Step: Preheat your oven to 325°F (160°C) and arrange the rack in the center position. Prepare your springform pan by wrapping it with double layers of heavy-duty aluminum foil to prevent water from seeping in.
Second Step: Prepare the cheesecake batter by blending cream cheese until smooth, then gradually add sugar, eggs, sour cream, and vanilla extract. Mix each ingredient thoroughly to avoid lumps.
Third Step: Pour the batter into the prepared pan and smooth the top. Place the pan in a larger roasting pan.
Fourth Step: Pour hot water into the roasting pan until it reaches halfway up the sides of the springform pan, creating a water bath that ensures even baking and prevents leaks.
Fifth Step: Bake for 60-70 minutes until the edges are set but the center is slightly jiggly. Avoid overbaking to prevent cracks. Remember tips like adding hot water close to the oven to avoid spills and carefully wrapping the pan.
Final Step: Turn off the oven and leave the cheesecake inside with the door slightly open for 1 hour. Then, remove and cool on a rack, and refrigerate for at least 4 hours before serving. Adjust for dietary needs, such as substituting ingredients.
Notes
💧 Add hot water to the water bath near the oven to avoid spills and burns.
🛡️ Ensure the pan is wrapped tightly to prevent water leaks into the crust.
❄️ Cool the cheesecake gradually and chill fully for best texture and to avoid cracking.
- Prep Time: 45 minutes
- Cooling time: 4 hours
- Cook Time: 2 hours 15 minutes
- Category: Dessert
- Method: Baking in a water bath
- Cuisine: Universal
Nutrition
- Serving Size: 1 slice
Keywords: Cheesecake, Water Bath, Baking, Creamy Results