Why You’ll Love This Vatrushka
Vatrushka is a cozy treat that’s easy to whip up, making it ideal for beginners or anyone with a packed schedule. You’ll appreciate how this recipe uses simple ingredients to deliver rich flavors that feel like a warm hug from the past. Plus, it’s adaptable for different needs, helping you stay healthy without skipping the fun.
One of the best parts is its quick prep time, which fits perfectly into busy days for people like working professionals or students. Whether you’re a baking enthusiast or a senior looking for comforting meals, this vatrushka adds a touch of nostalgia that brings everyone together. Give it a go and see how it becomes a favorite in your kitchen.
For those watching their diet, vatrushka offers solid nutrition without heavy calories, making it a smart choice for diet-conscious folks. The balance of carbs, protein, and fats keeps things satisfying and wholesome. It’s no wonder this recipe appeals to home cooks and food enthusiasts alike, blending tradition with everyday ease.
Jump To
- 1. Why You’ll Love This Vatrushka
- 2. Essential Ingredients for Vatrushka
- 3. How to Prepare the Perfect Vatrushka: Step-by-Step Guide
- 4. Dietary Substitutions to Customize Your Vatrushka
- 5. Mastering Vatrushka: Advanced Tips and Variations
- 6. How to Store Vatrushka: Best Practices
- 7. FAQs: Frequently Asked Questions About Vatrushka
- 8. Vatrushka
Essential Ingredients for Vatrushka
Getting the right ingredients is key to making perfect vatrushka, and you’ll find this recipe uses straightforward items you might already have. Start with high-quality basics to ensure great results every time. Here’s a clear breakdown of what you’ll need, pulled straight from this authentic approach.
For the Dough
- 1 1/2 tablespoons yeast
- 2 cups warm milk (110°F)
- 1/2 cup sugar, divided
- 3 eggs
- 2 tablespoons mayonnaise
- 1 teaspoon salt
- 5 cups all-purpose flour (may need more depending on brand)
- 3 tablespoons avocado or canola oil
For the Filling
- 16 ounces cream cheese at room temperature
- 16 ounces farmer’s cheese or cottage cheese
- 2 eggs
- 1/2 cup sugar
- 1 cup golden raisins (optional, soaked in boiled water for 10-15 minutes then drained)
These ingredients create a soft dough and creamy filling that’s true to tradition. For special tweaks, you can swap in options like gluten-free flour or plant-based cheese to match your preferences.
How to Prepare the Perfect Vatrushka: Step-by-Step Guide
First, gather all your ingredients and set up your workspace make sure any dairy items are at room temperature for smooth mixing. Combine yeast with warm milk and 1 tablespoon of sugar; let it rest for 10 minutes to activate, which helps the dough rise nicely. Then add eggs, mayonnaise, salt, and the remaining sugar, whisking everything together until it’s well blended.
Gradually mix in the flour, then stir in the oil to form a workable dough. Knead it with a stand mixer and dough hook for about 10 minutes until it’s elastic and soft but not sticky this step is crucial for the texture. Let the dough rise for 1 hour in a warm spot, giving it time to double in size for fluffy results. Check out this related recipe for more ideas on cheese fillings.
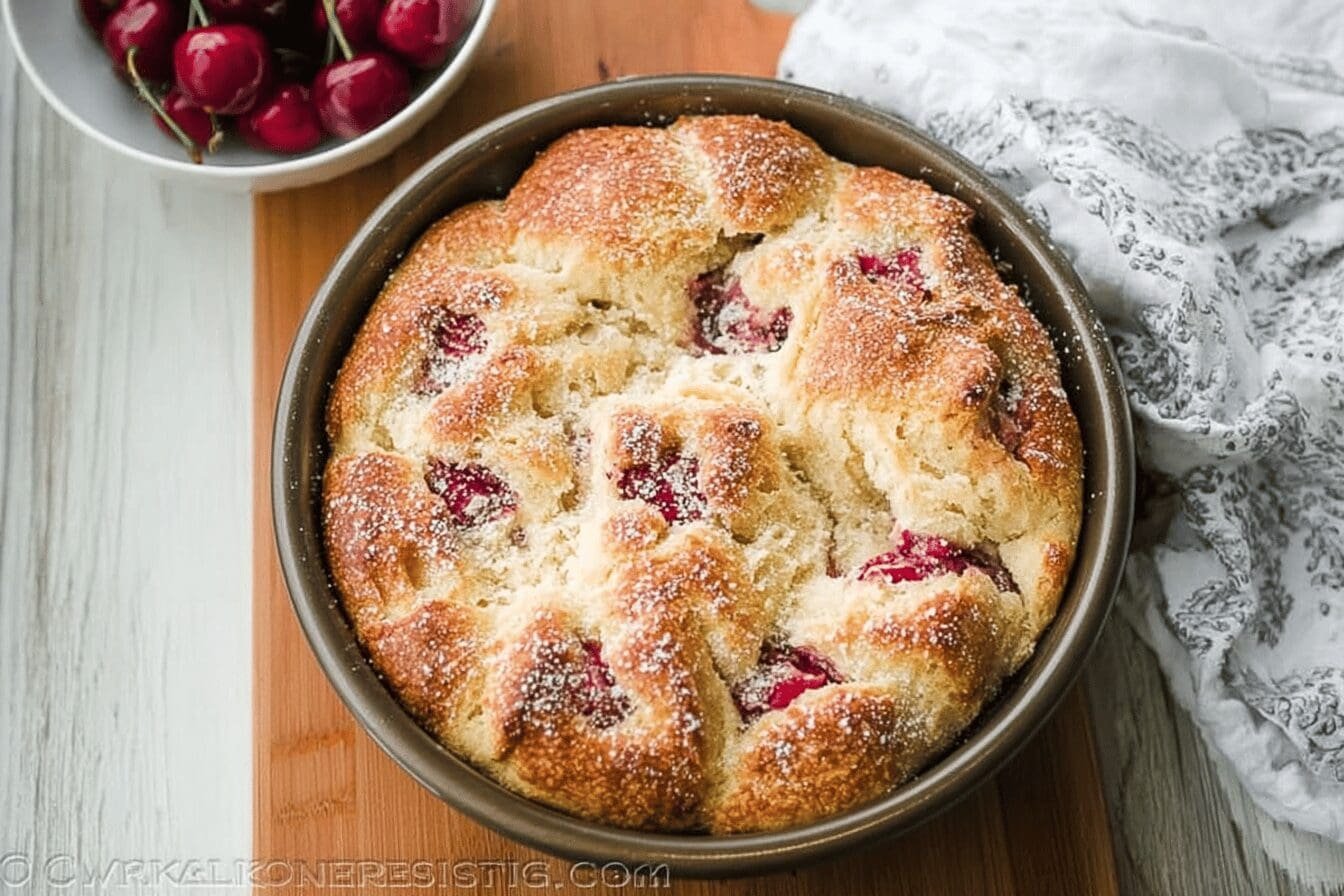
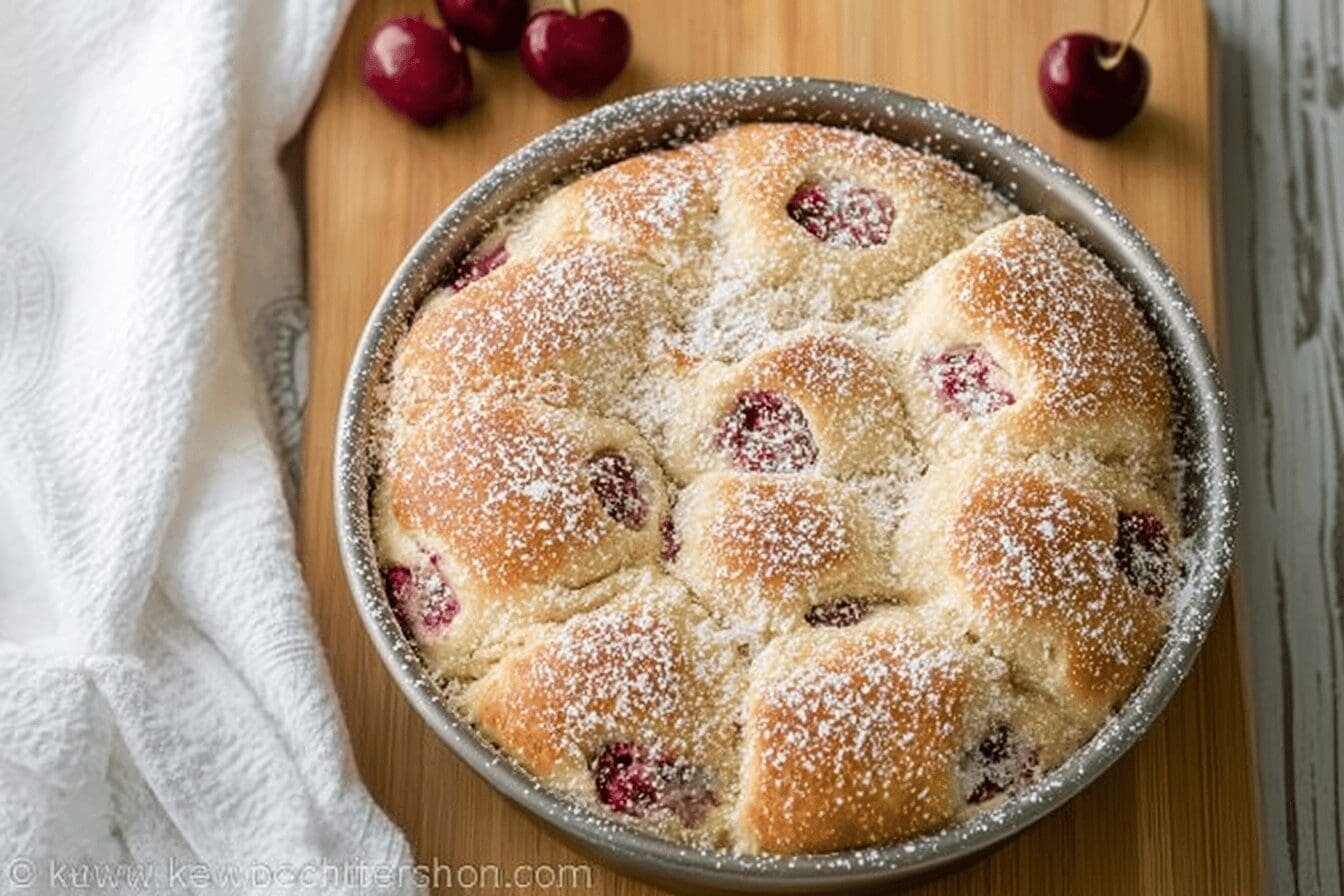
After rising, divide the dough into 30 equal pieces and shape them into flattened balls. Place these balls 2 inches apart on parchment-lined baking sheets, cover them, and let them rise for another 30 minutes to ensure they puff up. Press the center of each ball with an oiled glass to make a hollow for the filling, and prepare the cheese mixture by whisking together cream cheese, farmer’s cheese or cottage cheese, eggs, sugar, and optional soaked raisins until smooth.
Spoon the filling into the hollows, slightly overfilling since it shrinks during baking. Preheat your oven to 350°F and bake the buns for 30 minutes or until they turn golden brown. Once done, let them cool a bit before enjoying this whole process takes about 3 hours total, with 30 minutes of active prep.

Dietary Substitutions to Customize Your Vatrushka
Adapting vatrushka for different diets keeps it fun and inclusive for everyone from busy parents to travelers. Start with protein swaps like using silken tofu or cashew cheese instead of farmer’s cheese for vegan options, which keeps the creamy texture intact. For lactose-sensitive folks, choose lactose-free cheese to maintain that rich flavor without issues.
When it comes to vegetables and seasonings, add fresh herbs such as dill or parsley for a burst of taste that elevates the dish. You can also mix in spices like nutmeg or cinnamon for new twists, or go gluten-free by switching to a certified gluten-free flour blend and checking all add-ins. These changes let you enjoy vatrushka while fitting your lifestyle, whether you’re a newlywed experimenting or a senior keeping things light.
Quick Tips for Substitutions
- Substitute farmer’s cheese with silken tofu or cashew cheese for vegan diets
- Use lactose-free cheese for those with sensitivities
- Add herbs like dill for extra flavor
- Incorporate spices such as cinnamon for variations
- Opt for gluten-free flour to accommodate gluten-free needs
Mastering Vatrushka: Advanced Tips and Variations
Once you’re comfortable with the basics, try some pro techniques to level up your vatrushka game. Use chilled butter in the dough for a flakier result and beat the cheese filling until it’s super smooth for that perfect creaminess. These small tweaks can make a big difference, especially if you’re a baking enthusiast aiming for top-notch outcomes.
Flavor variations open up even more possibilities add lemon zest or vanilla extract to the filling for a fresh kick. For presentation, pipe the filling neatly and top with toasted nuts or fresh berries to make your vatrushka look as good as it tastes. If you’re into meal prep, assemble and freeze the unbaked buns ahead of time, then bake them straight from frozen when you need a quick treat. This related bread recipe offers great inspiration for variations.
Helpful Storage and Extras
- Oil the glass before pressing centers to prevent sticking
- Slightly overfill the centers as the filling shrinks
- Try adding berries or jam for fun twists
How to Store Vatrushka: Best Practices
Proper storage keeps your vatrushka fresh and tasty, so let’s cover the essentials. Store baked vatrushka in an airtight container at room temperature for up to 3 days, or pop them in the fridge for up to a week to extend their life. Freezing is another smart move wrap fully baked and cooled buns individually, then freeze for up to 3 months and thaw overnight in the fridge.
When reheating, use the microwave for a quick warm-up or the oven for a whole tray to keep that soft texture. For meal prep, prepare the dough and filling separately ahead of time and store them as needed. This approach works wonders for busy parents or working professionals who want homemade goodness without the daily hassle.
| Nutrient | Amount per Serving |
|---|---|
| Calories | 224 |
| Fat | 9 grams |
| Saturated Fat | 4 grams |
| Cholesterol | 48 milligrams |
| Sodium | 206 milligrams |
| Carbohydrates | 29 grams |
| Protein | 7 grams |
This nutritional breakdown shows why vatrushka is a balanced choice for diet-conscious eaters. Remember, explore traditional Eastern European recipes for more ideas.
FAQs: Frequently Asked Questions About Vatrushka
What is a Vatrushka and where does it come from?
A Vatrushka is a traditional Eastern European pastry, especially popular in Russia and Ukraine. It consists of a round yeast dough base filled with sweetened farmer’s cheese (tvorog), sometimes mixed with raisins or jam. This soft, slightly tangy cheese filling sets it apart from other pastries. Vatrushkas are often enjoyed as a breakfast item or a snack, reflecting simple, rustic flavors common in Slavic baking traditions.
How do I make Vatrushka dough from scratch?
Vatrushka dough is typically made using basic ingredients: flour, milk, yeast, sugar, butter, eggs, and salt. Begin by activating the yeast in warm milk with a bit of sugar. Then combine it with flour, melted butter, beaten eggs, and salt to form a soft, elastic dough. Let it rise for about 1–2 hours until doubled in size before shaping. This yeast dough creates a tender yet sturdy base that holds the cheese filling well.
What ingredients can I use for the traditional Vatrushka filling?
The classic filling for Vatrushka is a sweetened farmer’s cheese known as tvorog or quark. To make the filling, blend the cheese with sugar, vanilla, and sometimes an egg yolk to improve texture. Raisins, lemon zest, or sour cream can also be added for extra flavor and moisture. The filling should be creamy but firm enough to hold its shape when baked.
Can Vatrushka be made in a gluten-free or vegan way?
Yes, you can make Vatrushka gluten-free by substituting traditional flour with gluten-free blends designed for baking, ensuring the dough maintains the right consistency. For a vegan version, replace dairy milk with plant-based milk, use vegan butter or oil, and select vegan-friendly yeast. The cheese filling can be swapped with vegan cream cheese or a homemade cashew-based cheese mixed with sweeteners and flavorings to replicate the creamy texture.
How should I store Vatrushka to keep it fresh longer?
Store Vatrushka in an airtight container at room temperature if you plan to eat it within 1–2 days. For longer storage, refrigerate for up to 4 days; let it come to room temperature before serving. Vatrushkas also freeze well—wrap each one individually in plastic wrap and place in a freezer bag for up to 2 months. Reheat in a low oven to restore softness. Avoid microwave reheating, which can make the dough chewy.

Vatrushka
- Total Time: 3 hours
- Yield: 30 buns 1x
- Diet: Vegetarian
Description
🍞 Vatrushka Buns feature authentic mom-style dough and a rich, creamy cheese filling for a traditional Eastern European treat.
🧀 This recipe delivers soft, fluffy buns with a versatile filling that can be customized with fruits or zest for added flavor.
Ingredients
1 1/2 tablespoons yeast
2 cups warm milk (110°F)
1/2 cup sugar, divided
3 eggs
2 tablespoons mayonnaise
1 teaspoon salt
5 cups all-purpose flour (may need more depending on brand)
3 tablespoons avocado or canola oil
16 ounces cream cheese at room temperature
16 ounces farmer’s cheese or cottage cheese
2 eggs
1/2 cup sugar
1 cup golden raisins (optional, soaked in boiled water for 10–15 minutes then drained)
Instructions
1-First, gather all your ingredients and set up your workspace make sure any dairy items are at room temperature for smooth mixing. Combine yeast with warm milk and 1 tablespoon of sugar; let it rest for 10 minutes to activate, which helps the dough rise nicely. Then add eggs, mayonnaise, salt, and the remaining sugar, whisking everything together until it’s well blended.
2-Gradually mix in the flour, then stir in the oil to form a workable dough. Knead it with a stand mixer and dough hook for about 10 minutes until it’s elastic and soft but not sticky this step is crucial for the texture. Let the dough rise for 1 hour in a warm spot, giving it time to double in size for fluffy results.
3-After rising, divide the dough into 30 equal pieces and shape them into flattened balls. Place these balls 2 inches apart on parchment-lined baking sheets, cover them, and let them rise for another 30 minutes to ensure they puff up. Press the center of each ball with an oiled glass to make a hollow for the filling, and prepare the cheese mixture by whisking together cream cheese, farmer’s cheese or cottage cheese, eggs, sugar, and optional soaked raisins until smooth.
4-Spoon the filling into the hollows, slightly overfilling since it shrinks during baking. Preheat your oven to 350°F and bake the buns for 30 minutes or until they turn golden brown. Once done, let them cool a bit before enjoying this whole process takes about 3 hours total, with 30 minutes of active prep.
Notes
🧈 Use high-quality all-purpose flour to achieve the best dough texture.
🍽 Kneading with a stand mixer ensures the dough reaches the proper consistency.
🍋 Experiment with fillings by adding berries, jam, lemon zest, or lemon curd for variety.
- Prep Time: 30 minutes
- Rising time: 2 hours
- Cook Time: 30 minutes
- Category: Dessert
- Method: Baking
- Cuisine: Eastern European
Nutrition
- Serving Size: 1 bun
- Calories: 224 kcal
- Sugar: 11 g
- Sodium: 206 mg
- Fat: 9 g
- Saturated Fat: 4 g
- Carbohydrates: 29 g
- Fiber: 1 g
- Protein: 7 g
- Cholesterol: 48 mg
Keywords: Vatrushka buns, Cheese-filled buns, Eastern European pastries, Traditional sweet buns