Why You’ll Love This Tuna Melt Wrap
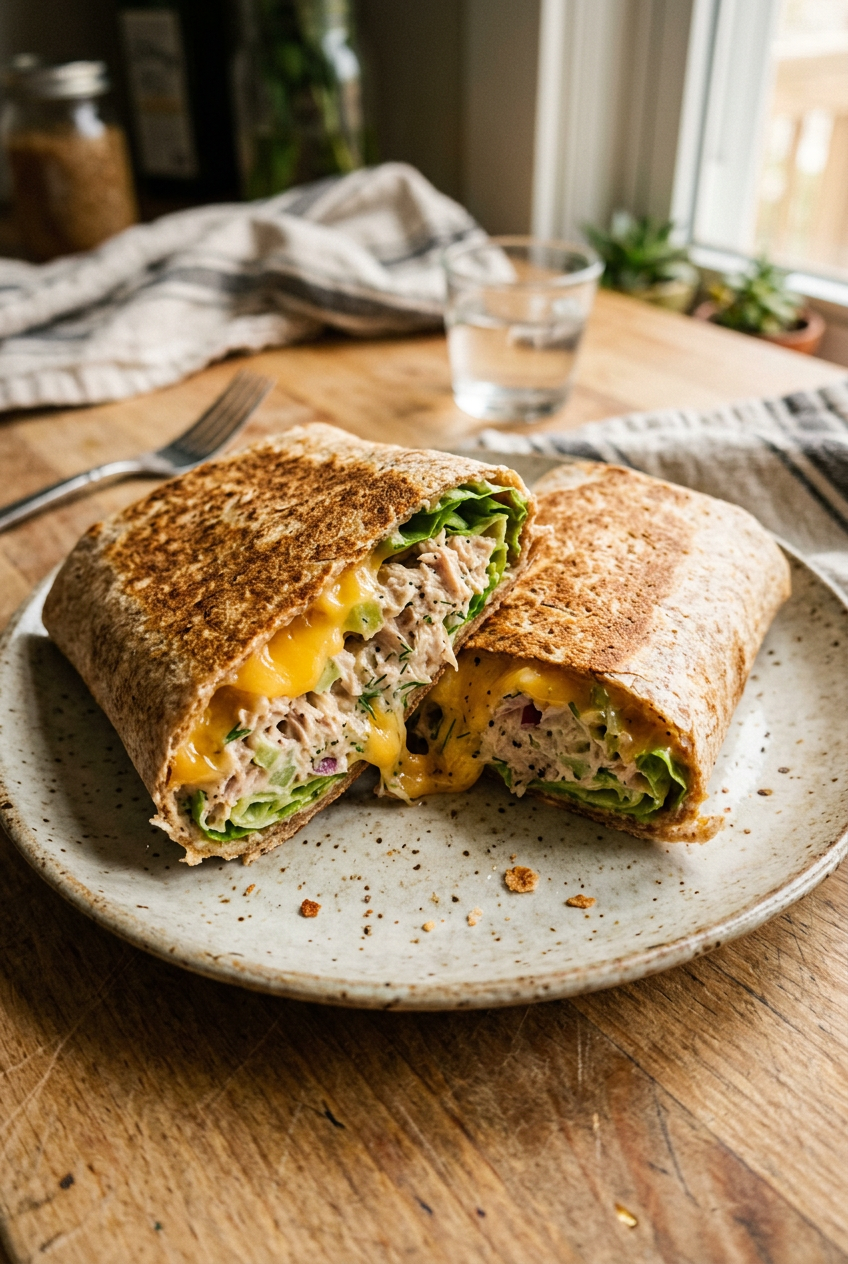
If you’re looking for a quick, satisfying meal that comes together in just 15 minutes, this Tuna Melt Wrap is exactly what you need. It combines the classic comfort of a tuna melt with the convenience of a portable wrap, making it perfect for busy weekdays, work lunches, or a simple dinner when time is short. This recipe delivers crispy, golden edges with gooey melted cheese and a flavorful tuna salad filling that hits all the right notes.
Key Benefits of This Recipe
- Ease of Preparation: With just 7 minutes of prep time and 8 minutes of cooking, this wrap is incredibly simple to make. The ingredients are pantry staples, and the steps are straightforward enough for even beginner cooks to follow with confidence.
- Health Benefits: Tuna is an excellent source of lean protein, providing about 64 grams per serving. It’s packed with omega-3 fatty acids, which support heart health and brain function. For more information on the health benefits of tuna, check out this comprehensive guide from WebMD.
- Versatility: This recipe adapts easily to different dietary needs. You can swap in low-carb wraps, reduced-fat cheese, or gluten-free tortillas. Add extra vegetables, switch up the seasonings, or make it spicy with hot sauce the possibilities are endless.
- Distinctive Flavor: The combination of creamy mayonnaise, tangy pickle relish, sharp mustard, and melty cheddar cheese creates a perfect balance of flavors. Pan-frying the wrap adds a satisfying crunch that contrasts beautifully with the soft, savory filling.
Jump To
- 1. Why You’ll Love This Tuna Melt Wrap
- 2. Essential Ingredients for Tuna Melt Wrap
- 3. How to Prepare the Perfect Tuna Melt Wrap: Step-by-Step Guide
- 4. Protein and Main Component Alternatives
- 5. Vegetable, Sauce, and Seasoning Modifications
- 6. Mastering Tuna Melt Wrap: Advanced Tips and Variations
- 7. How to Store Tuna Melt Wrap: Best Practices
- 8. FAQs: Frequently Asked Questions About Tuna Melt Wrap
- 9. Tuna Melt Wrap
Essential Ingredients for Tuna Melt Wrap
Creating the perfect tuna melt wrap starts with having the right ingredients on hand. Each component plays a specific role in building flavor, texture, and overall satisfaction. Below is a complete list of everything you’ll need, along with tips on why each ingredient matters.
Main Ingredients List
- 1 large flour tortilla or wrap (about 10-inch diameter) This serves as the foundation for your wrap. A 10-inch tortilla provides enough surface area to hold all the filling without spilling. Choose a fresh, pliable tortilla for easy rolling.
- 1 can (5 ounces) tuna (any kind, drained) The star protein of the dish. Tuna in water keeps it leaner, while tuna in oil offers richer flavor. Drain well to prevent a soggy wrap.
- 2 tablespoons mayonnaise Creates the creamy base for the tuna salad. It binds everything together and adds moisture without making the filling watery.
- 1 tablespoon sweet pickle relish Adds a touch of sweetness and tangy crunch that balances the savory tuna. It’s a classic tuna salad ingredient for good reason.
- 1 tablespoon finely chopped celery Provides fresh crunch and a mild, refreshing flavor that lightens the rich filling.
- 1 tablespoon finely chopped onion Adds depth and a slight bite. Red or white onion both work well here.
- 1 teaspoon mustard (any kind) Brings a sharp, tangy kick that cuts through the creaminess. Yellow mustard is classic, but Dijon adds a more sophisticated flavor.
- 1/4 to 1/2 cup shredded cheese or 1 to 2 slices of cheese Use melting cheeses like cheddar, Swiss, or Monterey Jack. The cheese creates that signature melty, gooey interior.
- Salt and pepper to taste Essential seasonings that enhance all the other flavors. Start with a pinch and adjust to your preference.
- 1/2 teaspoon neutral oil (vegetable, canola, etc.) Used for pan-frying the wrap to achieve that golden, crispy exterior without burning.
Special Dietary Options
| Dietary Need | Substitution Suggestion |
|---|---|
| Gluten-Free | Use a certified gluten-free tortilla or wrap made from rice flour, corn, or cassava flour |
| Low-Carb | Swap regular tortilla for a low-carb wrap or lettuce wraps for a lighter option |
| Lower Calorie | Use reduced-fat mayonnaise, low-fat cheese, and tuna packed in water |
| Lower Sodium | Choose reduced-sodium tuna and a lower-sodium wrap, reduce added salt |
| Dairy-Free | Use dairy-free cheese shreds or omit cheese entirely and add extra vegetables |
How to Prepare the Perfect Tuna Melt Wrap: Step-by-Step Guide
Making a tuna melt wrap is simple when you follow these clear, step-by-step instructions. The process involves mixing the tuna salad, assembling the wrap, and pan-frying it to crispy, golden perfection. Let’s walk through each step in detail.
Step 1: Prepare the Tuna Salad Filling
Start by draining the tuna thoroughly. Open the can and press the lid down firmly to remove excess liquid, or transfer the tuna to a fine-mesh strainer. Excess moisture can make your wrap soggy, so don’t skip this step.
Place the drained tuna in a medium mixing bowl. Add 2 tablespoons of mayonnaise, 1 tablespoon of sweet pickle relish, 1 tablespoon of finely chopped celery, 1 tablespoon of finely chopped onion, and 1 teaspoon of mustard. Mix everything together with a fork until well combined. Break up any large chunks of tuna as you mix to create a uniform texture.
Season the mixture with salt and pepper to taste. Start with a small pinch of each, give it a taste, and adjust as needed. Remember that the cheese will add some saltiness, so don’t over-season at this stage.
Step 2: Soften the Tortilla
Check your tortilla for flexibility. If it feels stiff or tends to crack when bent, you’ll want to soften it before assembling. A cracked tortilla won’t hold the filling properly and can fall apart during cooking.
Place the tortilla on a microwave-safe plate and cover it with a damp paper towel. Microwave on high for 15-20 seconds. The steam from the damp towel will soften the tortilla and make it pliable. Alternatively, you can warm it in a dry skillet over medium heat for 10-15 seconds on each side.
Step 3: Assemble the Wrap
Lay the softened tortilla flat on your work surface. Sprinkle the shredded cheese (or place the cheese slices) over the half of the tortilla closest to you. Leave about an inch of space around the edges uncovered this makes sealing the wrap much easier.
Pro Tip: Placing the cheese down first creates a barrier between the tuna salad and the tortilla, which helps prevent sogginess and ensures the cheese melts evenly throughout the filling.
Spread the tuna salad mixture evenly over the cheese layer, again leaving the edges clean. Don’t overfill one can of tuna makes one generously-sized wrap. If you’re using a smaller tortilla, consider splitting the filling between two wraps.
Step 4: Fold and Roll the Wrap
Fold the left and right sides of the tortilla inward, bringing them toward the center over the filling. Think of this like folding a burrito the sides should overlap slightly in the middle.
Next, fold the edge closest to you up and over the filling. Tuck the sides in as you go. Then, roll the wrap away from you in one smooth motion, keeping the filling tucked inside. The goal is a tight, burrito-shaped bundle with the seam facing down.
If your tortilla cracks or tears during this process, don’t worry. You can patch small tears by pressing the dough together, or simply fold the wrap like a flat sandwich instead of rolling it. It will still taste delicious.
Step 5: Pan-Fry to Golden Perfection
Heat 1/2 teaspoon of neutral oil in a nonstick skillet or cast-iron pan over medium-low heat. You don’t need much oil just enough to create a light coating on the pan surface.
Place the wrap seam-side down in the pan. This is important because it helps seal the wrap as it cooks. Cook for 3-4 minutes without moving it. Press gently with a spatula occasionally to ensure even contact with the pan and to help the cheese melt.
When the bottom is golden brown, carefully flip the wrap using a wide spatula. Cook the second side for another 3-4 minutes until it matches the golden color of the first side. The wrap should feel slightly crispy on the outside and the cheese should be completely melted inside.
If you’re making multiple wraps, you can keep the finished ones warm in a 200°F oven while you cook the rest.
Step 6: Serve and Enjoy
Remove the wrap from the pan and transfer it to a cutting board. Let it rest for about 30 seconds this helps the cheese set slightly so it doesn’t ooze out immediately when you cut it.
Use a serrated knife to cut the wrap in half diagonally. The serrated edge cuts cleanly through the crispy tortilla without squishing the filling. Serve immediately while it’s warm and the cheese is still melty.
This tuna melt wrap pairs wonderfully with a simple side salad, soup, or some crunchy chips. For more quick and satisfying meal ideas, check out Isabella’s collection of recipes on the home page.
Protein and Main Component Alternatives
While canned tuna is the traditional choice for a tuna melt wrap, you can easily switch up the protein based on what you have available or your dietary preferences. Here are some tasty alternatives that work just as well.
Chicken Alternative
Canned chicken makes an excellent substitute for tuna. Use the same quantities (one 5-ounce can, drained) and follow the identical preparation method. The flavor is milder than tuna, making it a great option for those who find tuna too strong. You can also use leftover cooked chicken just shred or dice it before mixing with the other ingredients.
Salmon Option
Canned salmon offers a richer, more robust flavor than tuna. It’s packed with omega-3 fatty acids and provides a different taste profile that many people love. Remove any visible skin or bones before mixing, or buy boneless, skinless canned salmon for convenience. Learn more about the nutritional benefits of different fish options at Verywell Fit.
Plant-Based Substitutes
For a vegetarian or vegan version, consider using mashed chickpeas as a tuna substitute. One 15-ounce can of chickpeas, drained and mashed with a fork, replicates the texture remarkably well. Add a pinch of dulse flakes or nori powder for a subtle sea-like flavor. Commercial plant-based tuna alternatives are also available in many grocery stores now.
Other Seafood Options
Canned crab meat creates a more luxurious melt wrap with a sweeter, more delicate flavor. Crab also works beautifully with the cheese and seasonings in this recipe. Similarly, small salad shrimp (fresh or canned) can be chopped and used as the protein base.
Vegetable, Sauce, and Seasoning Modifications
One of the best things about this tuna melt wrap is how easily it adapts to different tastes and ingredients you might have on hand. Here are some creative ways to modify the vegetables, sauces, and seasonings.
Vegetable Additions
- Sliced Tomato: Add raw tomato slices inside the wrap before cooking for fresh flavor and juiciness.
- Sautéed Vegetables: Cooked mushrooms, bell peppers, or caramelized onions add depth and sweetness.
- Leafy Greens: Fresh spinach, arugula, or lettuce can be added after cooking for a fresh crunch.
- Avocado: Sliced avocado adds creaminess and healthy fats.
- Jalapeños: Pickled or fresh jalapeño slices bring heat and tang.
Sauce Variations
The mayonnaise and mustard combination is classic, but you can switch things up with different sauce approaches. Try mixing Sriracha into the mayonnaise for a spicy kick. A spoonful of Greek yogurt can replace some or all of the mayonnaise for a tangier, protein-boosted filling. Pesto adds an herby, garlicky dimension that pairs surprisingly well with tuna.
Seasoning Options
- Fresh Herbs: Chopped parsley, dill, chives, or cilantro brighten the filling.
- Dried Herbs: Dried dill weed, oregano, or Italian seasoning work when fresh isn’t available.
- Hot Sauce: A few dashes of your favorite hot sauce add flavor without overwhelming the dish.
- Red Pepper Flakes: For a subtle but persistent heat.
- Everything Bagel Seasoning: Sprinkle some inside the wrap or on the outside before cooking for extra flavor.
Cheese Alternatives
Cheddar is recommended for its excellent melting properties and sharp flavor, but many cheeses work beautifully in this recipe. Swiss cheese offers a nutty, slightly sweet taste. Monterey Jack melts beautifully and has a mild, creamy flavor. Pepper Jack adds a spicy kick. Provolone provides a smoky note. For something different, try crumbled feta or goat cheese mixed into the tuna salad instead of melted cheese inside the wrap.
Mastering Tuna Melt Wrap: Advanced Tips and Variations
Once you’ve mastered the basic technique, you can take your tuna melt wrap to the next level with these pro tips and creative variations.
Pro Cooking Techniques
For an extra-crispy exterior, try the “double-crisp” method. After cooking the wrap normally, remove it from the pan. Add a tiny bit more oil, then return the wrap and cook each side for another minute on slightly higher heat. This creates an even crunchier shell.
Use a cast-iron skillet or a heavy-bottomed pan for the most even heat distribution. Thin pans can create hot spots that burn parts of the wrap while leaving other areas undercooked.
Cover the pan with a lid for the first 2 minutes of cooking. This traps heat and helps the cheese melt faster before the tortilla browns, ensuring perfectly melted cheese and a golden exterior.
Flavor Variations
Mediterranean Style: Add chopped sun-dried tomatoes, crumbled feta, and fresh basil. Swap the mustard for a squeeze of lemon juice.
Spicy Southwest: Mix in diced green chiles, use pepper jack cheese, and add a smear of chipotle mayo inside. Top with fresh cilantro after cooking.
Classic Deli: Add sauerkraut and use Swiss cheese for a Reuben-inspired twist. Serve with Thousand Island dressing for dipping.
Bacon Lover’s: Add cooked, crumbled bacon strips to the filling. The smoky, salty crunch takes this wrap to indulgent new heights.
Presentation Tips
Cut the wrap diagonally and arrange the two halves on a plate with points facing outward for a restaurant-style presentation. A simple garnish of fresh parsley or a sprinkle of paprika adds color. Serve with a small cup of pickles, coleslaw, or potato chips on the side for a complete meal. For more creative meal ideas that pair well with this wrap, check out this fresh pasta salad recipe that makes an excellent side dish.
Make-Ahead Options
The tuna salad filling can be prepared up to 3-4 days in advance and stored in an airtight container in the refrigerator. This makes assembly quick and easy when you’re ready to eat. In fact, the flavors often improve after sitting overnight as the seasonings meld together.
For meal prep, portion the tuna salad into individual containers. Store tortillas and cheese separately. When you’re ready to eat, simply assemble and cook the wrap fresh. This approach gives you the convenience of meal prep with the quality of a freshly made wrap.
How to Store Tuna Melt Wrap: Best Practices
Proper storage ensures your tuna melt wrap stays fresh and safe to eat. Here are the best methods for storing leftovers and prepped ingredients.
Refrigeration Guidelines
Cooked tuna melt wraps can be stored in the refrigerator for 3-4 days when wrapped properly. Wrap each portion tightly in plastic wrap or aluminum foil, or place in an airtight container. The filling contains mayonnaise and fish, so refrigeration within two hours of cooking is essential for food safety.
Uncooked tuna salad (without the tortilla and cheese) keeps well in an airtight container in the refrigerator for up to 4 days. This makes it perfect for meal prep you can make a batch on Sunday and enjoy wraps throughout the week.
Freezing Recommendations
Freezing assembled tuna melt wraps is not recommended. The mayonnaise in the filling can separate when thawed, and the texture of the tortilla may become soggy or mealy. However, you can freeze cooked, plain tortillas for up to 3 months just thaw and warm before using.
If you want to prep ingredients for future wraps, you can freeze extra cans of tuna in their unopened state. They’ll keep for years in a cool, dry pantry.
Reheating Instructions
For best results, reheat leftover tuna melt wraps in a skillet on the stovetop. Heat a dry pan (no additional oil needed) over medium-low heat. Place the wrap in the pan and cook for 2-3 minutes per side until heated through and crispy again.
Microwaving is faster but results in a softer texture. If you use the microwave, wrap the tuna melt in a paper towel to absorb excess moisture. Heat in 30-second intervals until warm.
A toaster oven or regular oven works well too. Preheat to 350°F and wrap the tuna melt in foil. Heat for 10-12 minutes, then unwrap and heat for another 2-3 minutes to crisp the exterior.
Meal Prep Considerations
For efficient meal prep, prepare the tuna salad filling and store it separately from the tortillas and cheese. Keep shredded cheese in a sealed bag or container. When ready to eat, simply warm the tortilla, add cheese and filling, roll, and cook. This method ensures fresh, crispy wraps every time while still saving you prep work during busy weekdays.

FAQs: Frequently Asked Questions About Tuna Melt Wrap
What kind of wrap works best for a tuna melt wrap?
Use a large flour tortilla or wrap, ideally 10 inches in diameter—often labeled “burrito size” in stores. These provide enough surface area to hold the tuna filling, cheese, and extras without spilling. Flavored options like spinach, tomato basil, or whole wheat add variety and pair well with the savory tuna. If you only have smaller 8-inch tortillas, split the filling to make two wraps instead of forcing one oversized roll. Always check for freshness; stale wraps tear easily. This size ensures even cooking when pan-fried or grilled, giving a crispy exterior and gooey melted cheese inside. Pro tip: warm wraps briefly before filling for easier rolling. (87 words)
Why does my tortilla crack when rolling a tuna melt wrap and how do I stop it?
Cracking happens when the tortilla is dry or cold, making it brittle. To fix it, soften the wrap first: place it on a microwave-safe plate, cover with a damp paper towel, and heat on high for 15-20 seconds until pliable and warm. Alternatively, warm it in a dry skillet over medium heat for 10-15 seconds per side. This adds steam and flexibility for smooth rolling. Avoid overfilling, which stretches the tortilla too thin. After softening, add filling to the center, fold in the sides, then roll tightly from the bottom. This method prevents cracks and helps the wrap hold together during cooking for perfect results every time. (102 words)
Can I make a tuna melt wrap ahead of time?
Yes, prepare the tuna salad filling in advance and store it covered in the fridge for 3-4 days. Mix canned tuna with mayo, celery, onion, pickles, and seasonings as usual. Keep cheese and wraps separate until ready to assemble and cook fresh—this maintains texture and safety. Assembled wraps don’t store well due to moisture from the filling softening the tortilla. If using day-old tuna salad, limit cooked wrap leftovers to 1-2 days in the fridge. Reheat in a skillet over medium heat to crisp the exterior and remelt cheese. Always check for off smells before eating. (96 words)
What ingredients go into a classic tuna melt wrap?
For one large wrap, drain one 5-oz can of tuna and mix with 2 tablespoons mayonnaise, 1 tablespoon diced celery, 1 tablespoon minced red onion, 1 teaspoon Dijon mustard, salt, and pepper to taste. Spread this on a 10-inch flour tortilla, top with ½ cup shredded cheddar or Swiss cheese, sliced tomato, and lettuce if desired. Fold and cook. This simple combo delivers the creamy, cheesy tuna melt flavor in wrap form. Customize with relish for tang or hot sauce for heat. Canned tuna in water keeps it lean at about 300-400 calories per wrap. Prep takes 10 minutes. (98 words)
How do I cook a tuna melt wrap for melted cheese?
Heat a nonstick skillet over medium heat with a teaspoon of butter or oil. Place the assembled wrap seam-side down and cook 2-3 minutes per side until golden and crisp. Press gently with a spatula to flatten and melt the cheese evenly—cover with a lid for 1 minute if needed for extra gooeyness. Avoid high heat to prevent burning the tortilla before the cheese melts. For crispier results, use medium-low and cook longer. Cut in half to serve; the interior stays warm and melty. Air fryer option: 375°F for 5-7 minutes, flipping halfway. Serves hot for best taste. (97 words)
Tuna Melt Wrap
- Total Time: 15 minutes
- Yield: 1 serving
Description
🥪 Enjoy a quick and tasty high-protein lunch that’s ready in just 15 minutes, perfect for busy days on the go.
🧀 Savor the melty cheese and flavorful tuna salad wrapped in a crispy tortilla for a satisfying bite every time.
Ingredients
– 1 large flour tortilla or wrap (about 10-inch diameter)
– 1 can (5 ounces) tuna (any kind, drained)
– 2 tablespoons mayonnaise
– 1 tablespoon sweet pickle relish
– 1 tablespoon finely chopped celery
– 1 tablespoon finely chopped onion
– 1 teaspoon mustard (any kind)
– 1/4 to 1/2 cup shredded cheese or 1 to 2 slices of cheese
– Salt and pepper to taste
– 1/2 teaspoon neutral oil (vegetable, canola, etc.)
Instructions
1-Step 1: Prepare the Tuna Salad Filling Start by draining the tuna thoroughly. Open the can and press the lid down firmly to remove excess liquid, or transfer the tuna to a fine-mesh strainer. Excess moisture can make your wrap soggy, so don’t skip this step. Place the drained tuna in a medium mixing bowl. Add 2 tablespoons of mayonnaise, 1 tablespoon of sweet pickle relish, 1 tablespoon of finely chopped celery, 1 tablespoon of finely chopped onion, and 1 teaspoon of mustard. Mix everything together with a fork until well combined. Break up any large chunks of tuna as you mix to create a uniform texture. Season the mixture with salt and pepper to taste. Start with a small pinch of each, give it a taste, and adjust as needed. Remember that the cheese will add some saltiness, so don’t over-season at this stage.
2-Step 2: Soften the Tortilla Check your tortilla for flexibility. If it feels stiff or tends to crack when bent, you’ll want to soften it before assembling. A cracked tortilla won’t hold the filling properly and can fall apart during cooking. Place the tortilla on a microwave-safe plate and cover it with a damp paper towel. Microwave on high for 15-20 seconds. The steam from the damp towel will soften the tortilla and make it pliable. Alternatively, you can warm it in a dry skillet over medium heat for 10-15 seconds on each side.
3-Step 3: Assemble the Wrap Lay the softened tortilla flat on your work surface. Sprinkle the shredded cheese (or place the cheese slices) over the half of the tortilla closest to you. Leave about an inch of space around the edges uncovered this makes sealing the wrap much easier. Spread the tuna salad mixture evenly over the cheese layer, again leaving the edges clean. Don’t overfill one can of tuna makes one generously-sized wrap. If you’re using a smaller tortilla, consider splitting the filling between two wraps.
4-Step 4: Fold and Roll the Wrap Fold the left and right sides of the tortilla inward, bringing them toward the center over the filling. Think of this like folding a burrito the sides should overlap slightly in the middle. Next, fold the edge closest to you up and over the filling. Tuck the sides in as you go. Then, roll the wrap away from you in one smooth motion, keeping the filling tucked inside. The goal is a tight, burrito-shaped bundle with the seam facing down. If your tortilla cracks or tears during this process, don’t worry. You can patch small tears by pressing the dough together, or simply fold the wrap like a flat sandwich instead of rolling it. It will still taste delicious.
5-Step 5: Pan-Fry to Golden Perfection Heat 1/2 teaspoon of neutral oil in a nonstick skillet or cast-iron pan over medium-low heat. You don’t need much oil just enough to create a light coating on the pan surface. Place the wrap seam-side down in the pan. This is important because it helps seal the wrap as it cooks. Cook for 3-4 minutes without moving it. Press gently with a spatula occasionally to ensure even contact with the pan and to help the cheese melt. When the bottom is golden brown, carefully flip the wrap using a wide spatula. Cook the second side for another 3-4 minutes until it matches the golden color of the first side. The wrap should feel slightly crispy on the outside and the cheese should be completely melted inside. If you’re making multiple wraps, you can keep the finished ones warm in a 200°F oven while you cook the rest.
6-Step 6: Serve and Enjoy Remove the wrap from the pan and transfer it to a cutting board. Let it rest for about 30 seconds this helps the cheese set slightly so it doesn’t ooze out immediately when you cut it. Use a serrated knife to cut the wrap in half diagonally. The serrated edge cuts cleanly through the crispy tortilla without squishing the filling. Serve immediately while it’s warm and the cheese is still melty.
Notes
🥪 If tortilla cracks when rolling, soften it first in the microwave with a damp paper towel.
🔪 Use a serrated knife with gentle back-and-forth motion to cut the wrap cleanly without squishing filling.
❄️ Leftovers can be stored wrapped tightly in the fridge for 3-4 days; enjoy cold or reheat gently.
- Prep Time: 7 minutes
- Cook Time: 8 minutes
- Category: Lunch
- Method: Pan-Frying
- Cuisine: American
Nutrition
- Serving Size: 1 wrap
- Calories: 691 kcal
- Sugar: 7 g
- Sodium: 1370 mg
- Fat: 39 g
- Saturated Fat: 11 g
- Unsaturated Fat: 28 g
- Trans Fat: 0 g
- Carbohydrates: 42 g
- Fiber: 3 g
- Protein: 64 g
- Cholesterol: 93 mg
Keywords: tuna melt wrap, quick lunch, cheesy tuna, easy sandwich