
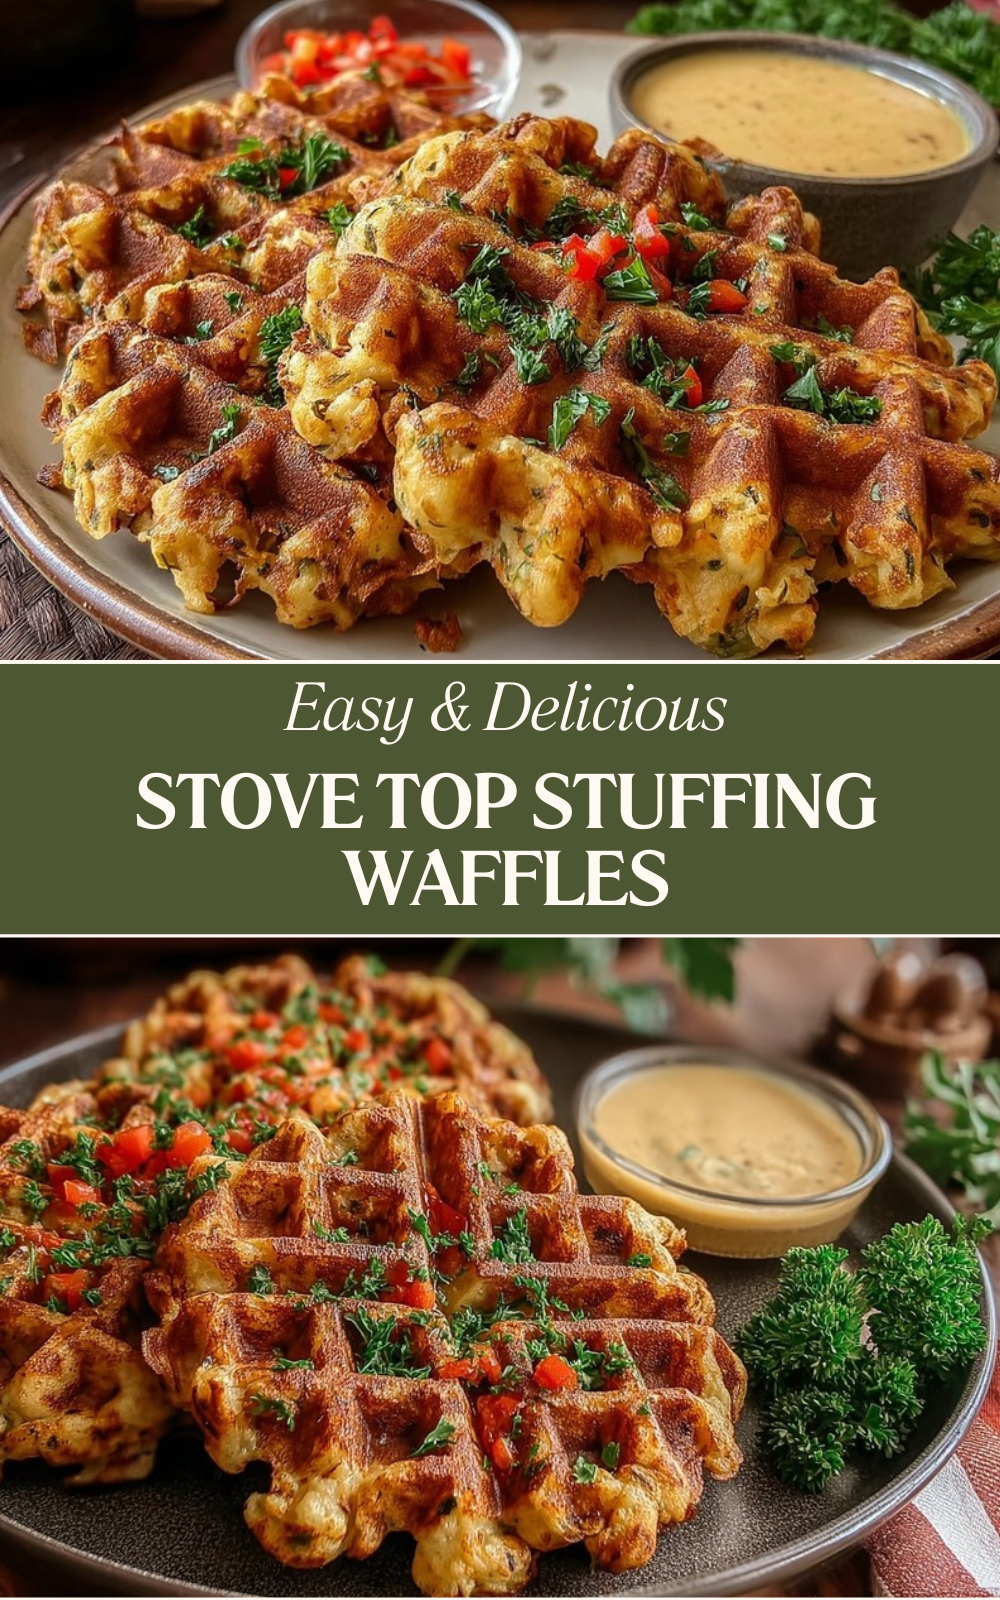
Why You’ll Love These Stove Top Stuffing Waffles
If you have leftover stuffing and a waffle maker, Stove Top Stuffing Waffles are one of the easiest ways to turn simple ingredients into something fun and filling. They come together fast, use pantry staples, and bring a crispy texture that makes leftovers feel brand new. This Stove Top Stuffing Waffles recipe works well for busy weeknights, holiday brunches, and quick snack plates.
- Easy to make: This is a true quick recipe. You prepare the stuffing, mix in eggs and a little chicken stock, and press it into the waffle maker. The whole process takes about 35 minutes, which is great for home cooks who want something fast without a lot of cleanup.
- Great for leftovers: These stuffing waffles are perfect when you have extra holiday stuffing sitting in the fridge. Instead of reheating the same side dish again, you get a new meal with a crisp outside and soft, savory center.
- Flexible for many meals: Serve them for breakfast with fried eggs, at lunch with turkey, or as a side with gravy and mashed potatoes. They also fit well into meal prep plans for busy parents, students, and working professionals.
- Comforting flavor: The flavor of Stove Top stuffing gives these waffles a familiar herby taste that pairs well with sweet or savory toppings. That mix of crispy edges and warm stuffing inside makes them stand out from regular quick waffles.
These quick Stove Top Stuffing Waffles are proof that leftovers do not have to feel boring. With the right texture and toppings, they can become the star of the plate.
For readers who like easy brunch ideas, you may also enjoy this cheesy quick bread recipe or this hearty ham and cheese hash brown casserole from the blog.
Jump To
- 1. Why You’ll Love These Stove Top Stuffing Waffles
- 2. Essential Ingredients for Stove Top Stuffing Waffles
- 3. How to Prepare the Perfect Stove Top Stuffing Waffles: Step-by-Step Guide
- 4. Dietary Substitutions to Customize Your Stove Top Stuffing Waffles
- 5. Mastering Stove Top Stuffing Waffles: Advanced Tips and Variations
- 6. How to Store Stove Top Stuffing Waffles: Best Practices
- 7. Nutrition Information for Stove Top Stuffing Waffles
- 8. FAQs: Frequently Asked Questions About Stove Top Stuffing Waffles
- 9. Stove Top Stuffing Waffles
Essential Ingredients for Stove Top Stuffing Waffles
The ingredients for Stove Top Stuffing Waffles are simple, but each one plays an important role. The stuffing gives the waffles their structure and flavor, the eggs help bind everything together, and the chicken stock adds just enough moisture to keep the mixture workable without making it soggy. The cooking spray helps the waffles release cleanly from the iron.
Main Ingredients
- Prepared stuffing, equivalent to 2 boxes or homemade stuffing leftovers: This is the base of the recipe. You can use boxed stuffing made according to package directions or leftover homemade stuffing from a holiday meal.
- 2 eggs: The eggs help hold the mixture together so the waffles keep their shape in the waffle maker. They also add a little richness and protein.
- 1/4 cup chicken stock: This adds moisture and flavor. Start with this amount so the stuffing stays moist but not wet.
- Cooking spray for waffle maker: A light coating keeps the stuffing waffles from sticking and helps the outside brown nicely.
Optional Toppings and Add-Ins
- Cranberry sauce: Adds a sweet-tart holiday touch.
- Green bean casserole: A savory topping that makes the waffles feel like a full Thanksgiving plate.
- Gravy: A classic choice that keeps the waffles moist and flavorful.
- Mashed potatoes: Great for a hearty comfort-food meal.
- Turkey or ham: Perfect for using up more leftovers.
- Fried eggs: A strong breakfast option that works well on top of savory waffles.
- Butter, maple syrup, honey, fruit, Nutella, jam, or fresh berries: These are good choices if you want a sweeter plate.
- Optional 1/2 cup shredded cheese or chopped herbs: These add extra flavor if you want to customize the batter.
Special Dietary Options
- Vegan: Use plant-based stuffing, swap the eggs for a flax egg or egg replacer, and choose vegetable broth instead of chicken stock.
- Gluten-free: Use gluten-free stuffing mix and make sure the stock and toppings are gluten-free too.
- Low-calorie: Use a lighter stuffing mix, reduce rich toppings, and keep portions small.
For more breakfast and brunch inspiration, you might like this cabbage eggs recipe, which is another simple, budget-friendly meal idea.
How to Prepare the Perfect Stove Top Stuffing Waffles: Step-by-Step Guide
Making quick Stove Top Stuffing Waffles is very easy once you know how to manage the texture. The biggest thing to remember is that the stuffing should be moist enough to hold together, but not so wet that it turns soft in the waffle maker. Follow the steps below and you will get crispy, golden waffles with a tender center.
First Step: Prepare and cool the stuffing
Start by preparing the stuffing according to the package instructions if you are using a boxed mix. If you are using homemade stuffing leftovers, warm them gently if needed so they are easy to mix. Then spread the stuffing out in a pan and let it cool completely for about 30 minutes. Cooling matters because hot stuffing holds too much steam, and steam is one of the main reasons waffles turn soggy.
If you are working with leftovers from a holiday meal, break up any large clumps before cooling. This helps the mixture blend more evenly later. A flat layer also cools faster, which is useful when you are trying to get dinner on the table quickly.
Second Step: Mix the binding ingredients
Transfer the cooled stuffing to a mixing bowl. Add 2 whisked eggs and 1/4 cup chicken stock, then mix well until everything is evenly combined. You want the mixture to hold together when pressed, but it should not feel wet or loose. If it seems too dry, add a tiny splash more stock. If it seems too wet, let it rest for a few minutes so the stuffing can absorb the liquid.
This step is where the recipe starts to come together. The eggs help bind the mixture, while the chicken stock gives flavor and softness. For readers who want a different flavor profile, a low-sodium broth works too, as long as the texture stays balanced.
Third Step: Shape the mixture into portions
Form the stuffing mixture into 8 equal balls, about 1/3 cup each. Pack each one tightly so it keeps its shape when it hits the hot waffle maker. Tight packing is important because loose stuffing can fall apart before the waffle sets. If you are making a double batch, keep the portions even so they cook at the same speed.
This is also a good time to think about serving size. Eight waffles is a nice amount for a family side dish or a small gathering. If you need more, double or triple the recipe based on the number of people at the table.
Fourth Step: Preheat and spray the waffle maker
Preheat your waffle maker according to the manufacturer instructions. Once it is hot, spray it lightly with cooking spray. Do not skip this part. Even a nonstick waffle maker can hold onto stuffing if it is not lightly coated first. A hot surface also helps start the browning process right away.
If your waffle maker has a deeper grid, it can create extra crisp edges, which is great for stuffing waffles. If it is smaller, you may need to work in batches and press the mixture in carefully.
Fifth Step: Cook the stuffing waffles
Place one stuffing ball in the center of the waffle maker and press it down to fill the entire surface. Close the lid and hold it shut for about 15 seconds so the stuffing starts to set in place. After that, continue cooking until the waffles are crispy and browned.
Cooking time can vary depending on your waffle maker, but the goal is a crisp outside with a firm center. Avoid opening the lid too early because that lets steam escape and can slow the browning. If the waffles seem soft, give them a little more time. Moisture is often the reason stuffing waffles do not crisp up properly.
Sixth Step: Keep the waffles warm while you finish the batch
When a waffle is done, transfer it to a cooling rack. This helps airflow move around the waffle so it stays crisp instead of steaming on a plate. You can keep finished waffles warm in the oven or microwave while you make the remaining ones. If you use the oven, keep it on a low warm setting so the waffles do not dry out.
Working in batches is normal with this recipe. Since the mixture is compact and filling, each waffle needs space to brown well. A cooling rack also makes serving easier later because the waffles will not get soggy from trapped steam.
Final Step: Serve hot or save for later
Serve the waffles hot with your favorite toppings. For a holiday meal, try cranberry sauce, gravy, turkey, or mashed potatoes. For a breakfast plate, add fried eggs or a drizzle of maple syrup. If you want a sweeter snack, butter, honey, jam, fruit, Nutella, or fresh berries all work well.
To reheat leftover waffles, place them in the air fryer or oven at 400 degrees Fahrenheit for about 5 minutes until golden and crispy. This works much better than the microwave, which can soften the outside. With the right reheating method, the waffles taste freshly made again.
| Recipe Detail | Amount |
|---|---|
| Prep time | Approximately 15 minutes |
| Cook time | About 20 minutes |
| Total time | Approximately 35 minutes |
| Yield | 8 waffles |
| Reheat temperature | 400 degrees Fahrenheit |

Dietary Substitutions to Customize Your Stove Top Stuffing Waffles
Protein and Main Component Alternatives
If you want to make the recipe fit different eating styles, there are several easy swaps. For a vegetarian version, use vegetable broth instead of chicken stock and choose stuffing made without meat. If you want a vegan version, replace the eggs with a plant-based binder such as flax eggs or a commercial egg substitute. You can also use leftover stuffing that already includes vegetables for extra flavor.
For a higher-protein plate, serve the waffles with fried eggs, turkey, ham, or even a scoop of cottage cheese on the side. If you are cooking for a crowd with mixed preferences, keep the base waffles plain and set out different toppings so everyone can build their own plate. That makes Stove Top stuffing waffles more flexible for family meals and casual gatherings.
Vegetable, Sauce, and Seasoning Modifications
There are also plenty of ways to adjust the flavor without changing the structure of the recipe. Add chopped herbs like parsley, sage, or thyme for a more savory taste. If you want a little extra richness, fold in shredded cheese before cooking. For a sweeter-salty combo, top the waffles with cranberry sauce or a small drizzle of honey.
During different seasons, you can match toppings to what is already on hand. In fall, gravy and roasted vegetables work well. In spring, fresh herbs and eggs make the plate feel lighter. For a quick lunch, pair the waffles with soup or salad. If you need another easy side dish idea, try these hoe cakes from the blog for a simple skillet favorite.
Mastering Stove Top Stuffing Waffles: Advanced Tips and Variations
Once you have the base recipe down, it is easy to make your Stove Top Stuffing Waffles recipe even better. Small changes in moisture, shaping, and cooking time can give you a crispier result and more consistent waffles every time. This is especially helpful if you plan to make them often or serve them for a holiday brunch.
Pro cooking techniques
The most important technique is managing moisture. Keep the stuffing mixture moist but not wet. If the stuffing is too loose, it will steam instead of crisp. Packing the balls tightly before cooking also helps them hold together. Another helpful trick is to let finished waffles rest on a cooling rack instead of stacking them. That keeps the outside crisp while you finish the batch.
If your waffle maker has adjustable heat, medium-high usually works best. You want enough heat to brown the outside without burning the edges. If the first waffle comes out pale, give the iron a little more time to heat up before cooking the next one.
Flavor variations
You can keep the waffles classic or change the flavor a little based on your meal plan. Add chopped sage for a more holiday-style taste. Mix in shredded cheddar for a richer bite. Stir in cooked crumbled bacon if you want a breakfast version. For a sweeter side dish, top plain waffles with butter and maple syrup or honey.
Presentation tips
Serve the waffles stacked on a platter with a small bowl of gravy or cranberry sauce on the side. Garnish with fresh herbs for color. If you are serving brunch, add fried eggs on top so the yolk runs into the waffle grid. A neat presentation makes a simple dish feel special, even when you are just using leftovers.
Make-ahead options
This recipe is friendly for busy schedules. You can prepare the stuffing mixture ahead of time, cover it, and chill it for a short period before cooking. You can also make a full batch, cool the waffles, and store them for later. That is helpful for meal prep, school lunches, and quick snacks during the week. If you need more, just double or triple the recipe.
How to Store Stove Top Stuffing Waffles: Best Practices
These quick waffles store well, which makes them useful for leftovers and meal prep. Once the waffles cool, place them in an airtight container and refrigerate them for short-term storage. They will keep best for up to 3 days in the fridge. If you want to store them longer, freeze them in a single layer first, then move them to a freezer-safe bag or container.
For reheating, the air fryer is one of the best choices because it brings back the crisp texture. Reheat at 400 degrees Fahrenheit for about 5 minutes, or until golden and hot. The oven also works well at the same temperature for a few minutes. Try to avoid the microwave if you want to keep the outside crisp.
For meal prep, freeze individual waffles with parchment between them so they do not stick together. That way, you can take out one or two at a time for a fast breakfast, lunch, or side dish. This makes Stove Top Stuffing Waffles a smart option for family cooks who want something ready in advance.
Nutrition Information for Stove Top Stuffing Waffles
Here is the nutrition breakdown per waffle for this recipe:
| Nutrient | Amount per waffle |
|---|---|
| Calories | 241 |
| Carbohydrates | 32 grams |
| Protein | 6 grams |
| Fat | 10 grams |
| Saturated Fat | 3 grams |
| Polyunsaturated Fat | 1 gram |
| Monounsaturated Fat | 1 gram |
| Trans Fat | 1 gram |
| Cholesterol | 41 milligrams |
| Sodium | 676 milligrams |
| Potassium | 15 milligrams |
| Fiber | 1 gram |
| Sugar | 3 grams |
| Vitamin A | 60 IU |
| Calcium | 6 milligrams |
| Iron | 1 milligram |
If you are watching portions or sodium, pairing one waffle with a fresh salad or simple vegetables can make the meal feel lighter. For more on eggs, which are part of this recipe, you can read this helpful guide from WebMD on the health benefits of eggs. For chicken stock, calorie information is also useful when planning meals, and this chicken stock nutrition page can help.
FAQs: Frequently Asked Questions About Stove Top Stuffing Waffles
What ingredients do I need for Stove Top stuffing waffles?
To make Stove Top stuffing waffles, gather 2 boxes (or 6 cups) of prepared Stove Top stuffing (chicken or turkey flavor works best), 2 large eggs, 1/4 cup chicken stock or broth for moisture, and non-stick cooking spray for the waffle iron. Optional add-ins include 1/2 cup shredded cheese or chopped herbs for extra flavor. Prepare the stuffing per package directions first and let it cool completely—this prevents a mushy texture. These simple pantry staples transform leftovers into crispy waffles in under 30 minutes. Yields about 8-10 waffles, perfect for 4 servings as a side or snack. Always check for freshness on boxed stuffing to avoid off flavors. (78 words)
How do you make Stove Top stuffing waffles step by step?
Start by preparing 2 boxes of Stove Top stuffing according to package instructions; cool for 10 minutes. In a bowl, whisk 2 eggs and mix in 1/4 cup chicken stock, then fold into the stuffing until evenly coated but not soupy. Preheat your waffle iron to medium-high and spray generously with cooking spray. Scoop 1/2 cup portions, press into the waffle grids, and close. Cook 5-7 minutes until golden and crisp—don’t peek early to build steam. Gently remove with a fork. Repeat for all batter. Serve hot with gravy. Pro tip: Chill mixture 15 minutes for easier handling. Total time: 25 minutes. (102 words)
How do you get Stove Top stuffing waffles crispy and not soggy?
Crispiness comes from balancing moisture and heat. Avoid sogginess by using cooled, fully prepared stuffing—never oversaturate with extra stock beyond 1/4 cup per 2 boxes. Whisk eggs lightly to bind without adding wateriness. Spray the hot waffle iron well and cook on medium-high for 6-8 minutes without opening. Excess liquid steams instead of crisps the exterior. If still soft, your iron might need higher heat or longer cook time. Let waffles rest on a wire rack 2 minutes post-cook to stay crunchy. Air fry leftovers at 400°F for 4 minutes to revive texture. This method yields restaurant-style crunch every time. (98 words)
How do you reheat Stove Top stuffing waffles?
For the best results, reheat Stove Top stuffing waffles in an air fryer at 400°F for 4-5 minutes, flipping halfway, until edges are golden and hot inside. Oven method: Bake on a parchment-lined sheet at 400°F for 5-7 minutes, no flipping needed. Avoid microwave—it steams and softens them. If frozen, thaw in fridge first or add 2 extra minutes. These methods restore the crispy shell while warming the tender center, ideal for meal prep. Store extras in an airtight container up to 3 days in fridge or 1 month frozen. Pairs perfectly with reheated turkey for quick Thanksgiving leftovers. (92 words)
What are the best toppings for Stove Top stuffing waffles?
Elevate Stove Top stuffing waffles with classic toppings like warm gravy, cranberry sauce, or turkey slices for a holiday vibe. Savory options include fried eggs, mashed potatoes, green bean casserole, or ham chunks. For breakfast twists, add maple syrup with bacon bits or cheese sauce. Sweet-savory fans try apple butter or hot honey. Start with a drizzle to keep the crisp texture intact—pile high after. Nutrition note: A plain waffle is about 150 calories; toppings add 50-200 each. Link these to full recipes on your site for turkey day sides or brunch ideas. Experiment for 20+ variations! (96 words)

Stove Top Stuffing Waffles
- Total Time: 35 minutes
- Yield: 8 waffles
- Diet: Vegetarian
Description
🧇 Turn leftover Stove Top stuffing into crispy, golden waffles for a genius, quick twist on holiday sides or brunch.
🍲 Customizable with gravy, eggs, or cranberry sauce, this fun recipe revives leftovers into a crunchy delight in under 35 minutes.
Ingredients
– Prepared stuffing, equivalent to 2 boxes or homemade stuffing leftovers
– 2 eggs
– 1/4 cup chicken stock
– Cooking spray for waffle maker
– Cranberry sauce
– Green bean casserole
– Gravy
– Mashed potatoes
– Turkey or ham
– Fried eggs
– Butter, maple syrup, honey, fruit, Nutella, jam, or fresh berries
– 1/2 cup shredded cheese or chopped herbs
Instructions
1-First Step: Prepare and cool the stuffing Start by preparing the stuffing according to the package instructions if you are using a boxed mix. If you are using homemade stuffing leftovers, warm them gently if needed so they are easy to mix. Then spread the stuffing out in a pan and let it cool completely for about 30 minutes. Cooling matters because hot stuffing holds too much steam, and steam is one of the main reasons waffles turn soggy. If you are working with leftovers from a holiday meal, break up any large clumps before cooling. This helps the mixture blend more evenly later. A flat layer also cools faster, which is useful when you are trying to get dinner on the table quickly.
2-Second Step: Mix the binding ingredients Transfer the cooled stuffing to a mixing bowl. Add 2 whisked eggs and 1/4 cup chicken stock, then mix well until everything is evenly combined. You want the mixture to hold together when pressed, but it should not feel wet or loose. If it seems too dry, add a tiny splash more stock. If it seems too wet, let it rest for a few minutes so the stuffing can absorb the liquid. This step is where the recipe starts to come together. The eggs help bind the mixture, while the chicken stock gives flavor and softness. For readers who want a different flavor profile, a low-sodium broth works too, as long as the texture stays balanced.
3-Third Step: Shape the mixture into portions Form the stuffing mixture into 8 equal balls, about 1/3 cup each. Pack each one tightly so it keeps its shape when it hits the hot waffle maker. Tight packing is important because loose stuffing can fall apart before the waffle sets. If you are making a double batch, keep the portions even so they cook at the same speed. This is also a good time to think about serving size. Eight waffles is a nice amount for a family side dish or a small gathering. If you need more, double or triple the recipe based on the number of people at the table.
4-Fourth Step: Preheat and spray the waffle maker Preheat your waffle maker according to the manufacturer instructions. Once it is hot, spray it lightly with cooking spray. Do not skip this part. Even a nonstick waffle maker can hold onto stuffing if it is not lightly coated first. A hot surface also helps start the browning process right away. If your waffle maker has a deeper grid, it can create extra crisp edges, which is great for stuffing waffles. If it is smaller, you may need to work in batches and press the mixture in carefully.
5-Fifth Step: Cook the stuffing waffles Place one stuffing ball in the center of the waffle maker and press it down to fill the entire surface. Close the lid and hold it shut for about 15 seconds so the stuffing starts to set in place. After that, continue cooking until the waffles are crispy and browned. Cooking time can vary depending on your waffle maker, but the goal is a crisp outside with a firm center. Avoid opening the lid too early because that lets steam escape and can slow the browning. If the waffles seem soft, give them a little more time. Moisture is often the reason stuffing waffles do not crisp up properly.
6-Sixth Step: Keep the waffles warm while you finish the batch When a waffle is done, transfer it to a cooling rack. This helps airflow move around the waffle so it stays crisp instead of steaming on a plate. You can keep finished waffles warm in the oven or microwave while you make the remaining ones. If you use the oven, keep it on a low warm setting so the waffles do not dry out. Working in batches is normal with this recipe. Since the mixture is compact and filling, each waffle needs space to brown well. A cooling rack also makes serving easier later because the waffles will not get soggy from trapped steam.
7-Final Step: Serve hot or save for later Serve the waffles hot with your favorite toppings. For a holiday meal, try cranberry sauce, gravy, turkey, or mashed potatoes. For a breakfast plate, add fried eggs or a drizzle of maple syrup. If you want a sweeter snack, butter, honey, jam, fruit, Nutella, or fresh berries all work well. To reheat leftover waffles, place them in the air fryer or oven at 400 degrees Fahrenheit for about 5 minutes until golden and crispy. This works much better than the microwave, which can soften the outside. With the right reheating method, the waffles taste freshly made again.
Notes
💧 Keep the stuffing mixture moist but not wet to prevent soggy waffles and ensure crispiness.
🍯 Top with gravy, cranberry sauce, fried eggs, or maple syrup for endless delicious variations.
❄️ Double the recipe easily for crowds, and store extras in the fridge for quick reheating.
- Prep Time: 15 minutes
- Cool: 30 minutes
- Cook Time: 20 minutes
- Category: Side Dishes
- Method: Waffle Iron
- Cuisine: American
Nutrition
- Serving Size: 1 waffle
- Calories: 241 kcal
- Sugar: 3 g
- Sodium: 676 mg
- Fat: 10 g
- Saturated Fat: 3 g
- Unsaturated Fat: 2 g
- Trans Fat: 1 g
- Carbohydrates: 32 g
- Fiber: 1 g
- Protein: 6 g
- Cholesterol: 41 mg
Keywords: stuffing waffles, stove top, quick, recipe