Why You’ll Love This Soy Glazed Chicken
If you’re looking for a dinner that hits all the right notes quick, flavorful, and family-friendly this soy glazed chicken recipe is about to become your new go-to. It’s the kind of meal that comes together effortlessly but tastes like you spent hours in the kitchen. The sticky, sweet, and savory glaze caramelizes beautifully on the chicken, creating a dish that’s equal parts comforting and exciting.
Ease of Preparation
One of the biggest reasons to love this recipe is how simple it is to make. With just a handful of pantry staples and about 20 minutes of actual cooking time, you can have a restaurant-quality meal on the table. The marinade comes together in minutes, and while the chicken soaks up all that flavor, you can prep a side dish or two. Whether you’re a seasoned home cook or just starting out, the steps are straightforward and forgiving.
Health Benefits
This soy glazed chicken isn’t just delicious it’s also packed with nutrition. Each serving delivers 23 grams of protein while keeping calories reasonable at 192 kcal per serving. Chicken thighs are naturally rich in vitamins and minerals, and when paired with fresh ginger and garlic, you’re adding anti-inflammatory and immune-boosting properties to your plate. For more on the nutritional benefits of chicken, check out WebMD’s guide to chicken nutrition.
Versatility
This recipe adapts beautifully to whatever you have on hand or whatever dietary preferences your family follows. You can easily swap in chicken breasts for a leaner option, or use the glaze on tofu, salmon, or even roasted vegetables. It pairs perfectly with steamed rice, quinoa, or cauliflower rice for a low-carb twist. The marinade works for grilling, skillet cooking, or even baking, so you can choose the method that fits your schedule.
Distinctive Flavor
What really sets this soy glazed chicken apart is the depth of flavor. The brown sugar creates a caramelized exterior, while the soy sauce adds that classic umami richness. Fresh ginger brings a warm, slightly spicy kick, and garlic rounds everything out with its savory aroma. Together, these ingredients create a sticky, glossy glaze that coats every piece of chicken in pure deliciousness.
Jump To
- 1. Why You’ll Love This Soy Glazed Chicken
- 2. Essential Ingredients for Soy Glazed Chicken
- 3. How to Prepare the Perfect Soy Glazed Chicken: Step-by-Step Guide
- 4. Dietary Substitutions to Customize Your Soy Glazed Chicken
- 5. Mastering Soy Glazed Chicken: Advanced Tips and Variations
- 6. How to Store Soy Glazed Chicken: Best Practices
- 7. FAQs: Frequently Asked Questions About Soy Glazed Chicken
- 8. Soy Glazed Chicken
Essential Ingredients for Soy Glazed Chicken
Before you start cooking, gather all your ingredients. Having everything measured and ready makes the process smooth and enjoyable. Here’s everything you need to make this flavorful dish:
Marinade Ingredients
- 1/4 cup brown sugar – Provides sweetness and helps create that gorgeous caramelized glaze
- 3 tablespoons soy sauce – Adds deep umami flavor and saltiness; soy sauce is the backbone of this marinade
- 2 garlic cloves, minced – Delivers aromatic, savory flavor throughout the dish
- 1 tablespoon grated fresh ginger – Brings warmth and a subtle spicy kick
- Freshly cracked black pepper (to taste) – Adds a mild heat and enhances other flavors
- 1 tablespoon cooking oil – Helps distribute flavors and prevents sticking
Chicken
- 8 boneless, skinless chicken thighs (about 1.75 lbs) – Thighs remain juicy and tender during cooking
- 1/2 tablespoon cooking oil – For cooking the chicken in the skillet
Optional Garnishes
- 2 sliced green onions – Adds fresh color and mild onion flavor
- 1 teaspoon sesame seeds – Provides a nutty crunch and visual appeal
Special Dietary Options
This recipe is naturally gluten-free if you use tamari instead of regular soy sauce. For a lower-sodium version, look for reduced-sodium soy sauce. If you’re watching sugar intake, you can reduce the brown sugar slightly or substitute with a natural sweetener like honey.
| Ingredient | Regular Version | Gluten-Free Option | Lower-Calorie Option |
|---|---|---|---|
| Soy Sauce | Regular soy sauce | Tamari or coconut aminos | Reduced-sodium soy sauce |
| Brown Sugar | 1/4 cup brown sugar | Same measurement | 2 tablespoons + 1 tbsp honey |
| Chicken | Chicken thighs | Same | Chicken breasts (pounded thin) |
How to Prepare the Perfect Soy Glazed Chicken: Step-by-Step Guide
Ready to make the best soy glazed chicken you’ve ever tasted? Follow these detailed steps, and you’ll have a flavorful meal that everyone will request again and again.
Step 1: Prepare the Marinade
Start by prepping your aromatics. Mince 2 garlic cloves finely you want small pieces that will distribute evenly throughout the marinade. Next, grate 1 tablespoon of fresh ginger. If you’ve never cooked with fresh ginger before, don’t worry it’s super easy to grate, and this simple marinade will have your taste buds doing a happy dance before you know it.
In a medium bowl, combine the minced garlic, grated ginger, 1/4 cup brown sugar, 3 tablespoons soy sauce, freshly cracked black pepper (to your taste), and 1 tablespoon cooking oil. Whisk everything together until the brown sugar starts to dissolve. The mixture should look glossy and smell absolutely amazing.
Pro tip: For the best flavor, use fresh ginger rather than dried or powdered. Fresh ginger has a brighter, more complex taste that really shines in this marinade.
Step 2: Marinate the Chicken
Place your 8 boneless, skinless chicken thighs in a shallow dish or a large ziplock bag. Pour the marinade over the chicken, making sure each piece gets well coated. Use your hands or tongs to turn the chicken and distribute the marinade evenly.
Cover the dish or seal the bag, then place it in the refrigerator. For the best results, let the chicken marinate for at least 30 minutes. If you have more time, marinating for a few hours or even overnight allows the flavors to penetrate deeper into the meat. The maximum recommended marinating time is 1 day, as the acid and salt can start to break down the meat texture if left too long.
Step 3: Heat the Skillet
When you’re ready to cook, remove the chicken from the refrigerator and let it sit at room temperature for about 10-15 minutes. This helps the chicken cook more evenly. While the chicken comes to temperature, heat a large skillet over medium heat.
Once the skillet is hot, add 1/2 tablespoon of cooking oil and swirl it around to coat the bottom of the pan. You want the oil to shimmer slightly but not smoke medium heat is key here because the sugar in the marinade can burn if the heat is too high.
Step 4: Cook the Chicken
Working in batches, place the chicken thighs in the skillet. Don’t overcrowd the pan cook about half the chicken at a time so each piece has room to brown properly. If you try to cook everything at once, the chicken will steam instead of developing that beautiful golden crust.
Cook the first side for about 4-5 minutes until you see the edges turning golden brown. Flip the chicken and cook for another 4-5 minutes on the second side. The chicken is done when it reaches an internal temperature of 165°F and the juices run clear when you cut into the thickest part.
Transfer the cooked chicken to a plate and cover loosely with foil to keep warm. Repeat with the remaining chicken thighs, adding a touch more oil if needed.
Step 5: Create the Glaze
Here’s where the magic happens. Pour the leftover marinade into the same skillet you used to cook the chicken. Bring it to a boil over medium-high heat, using a whisk to scrape up any browned bits from the bottom of the pan. These browned bits are packed with flavor and will make your glaze even more delicious.
Let the marinade bubble and reduce for 2-3 minutes, whisking constantly. The liquid will thicken into a glossy, syrupy glaze that coats the back of a spoon. Watch it closely the sugar can go from caramelized to burnt quickly. You want it thick enough to coat the chicken but not so thick that it becomes hard to work with.
Step 6: Finish and Serve
Turn off the heat and return all the cooked chicken to the skillet. Toss the chicken in the glaze, turning each piece so it’s completely coated in that sticky, flavorful sauce. The residual heat will help the glaze adhere to the chicken.
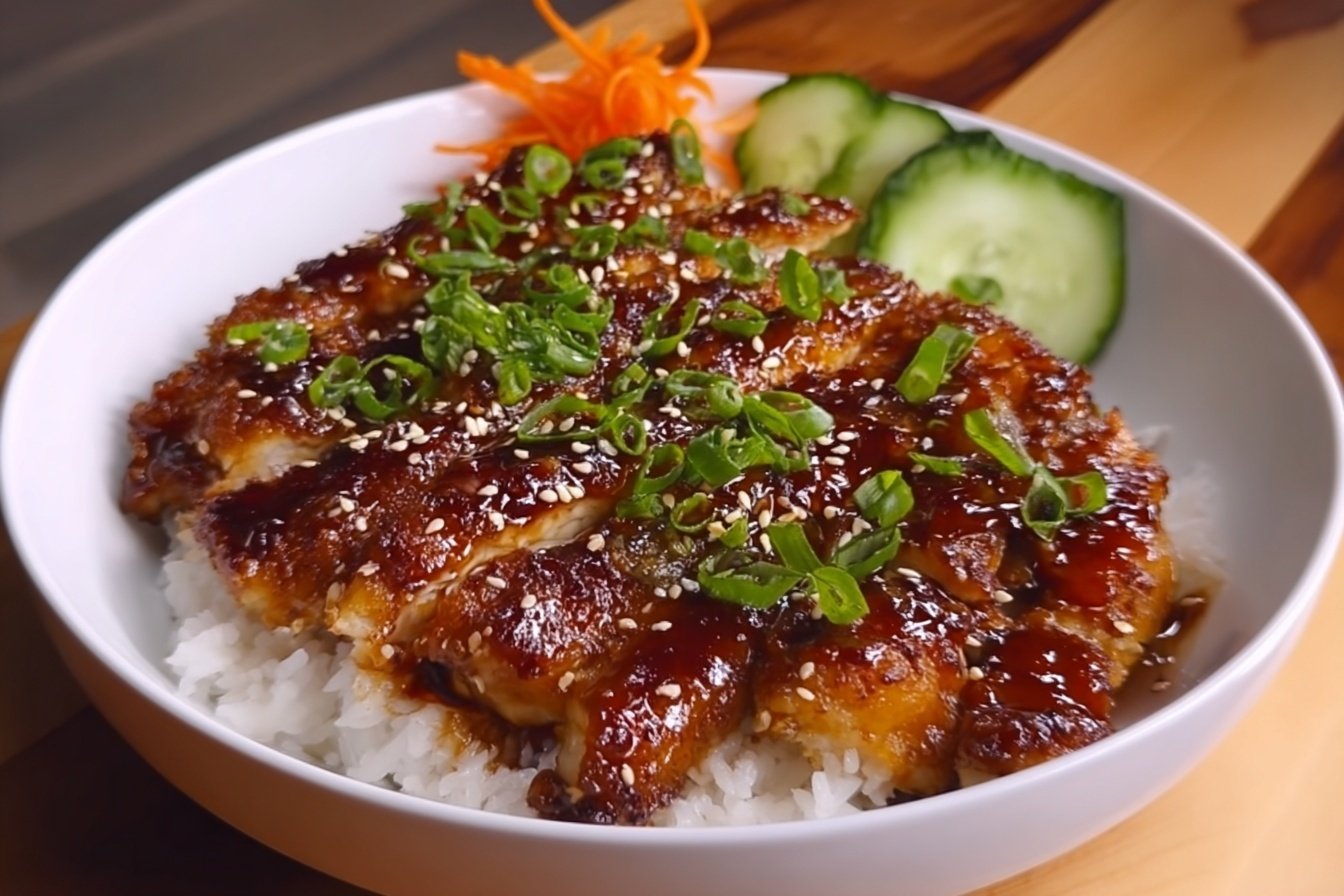
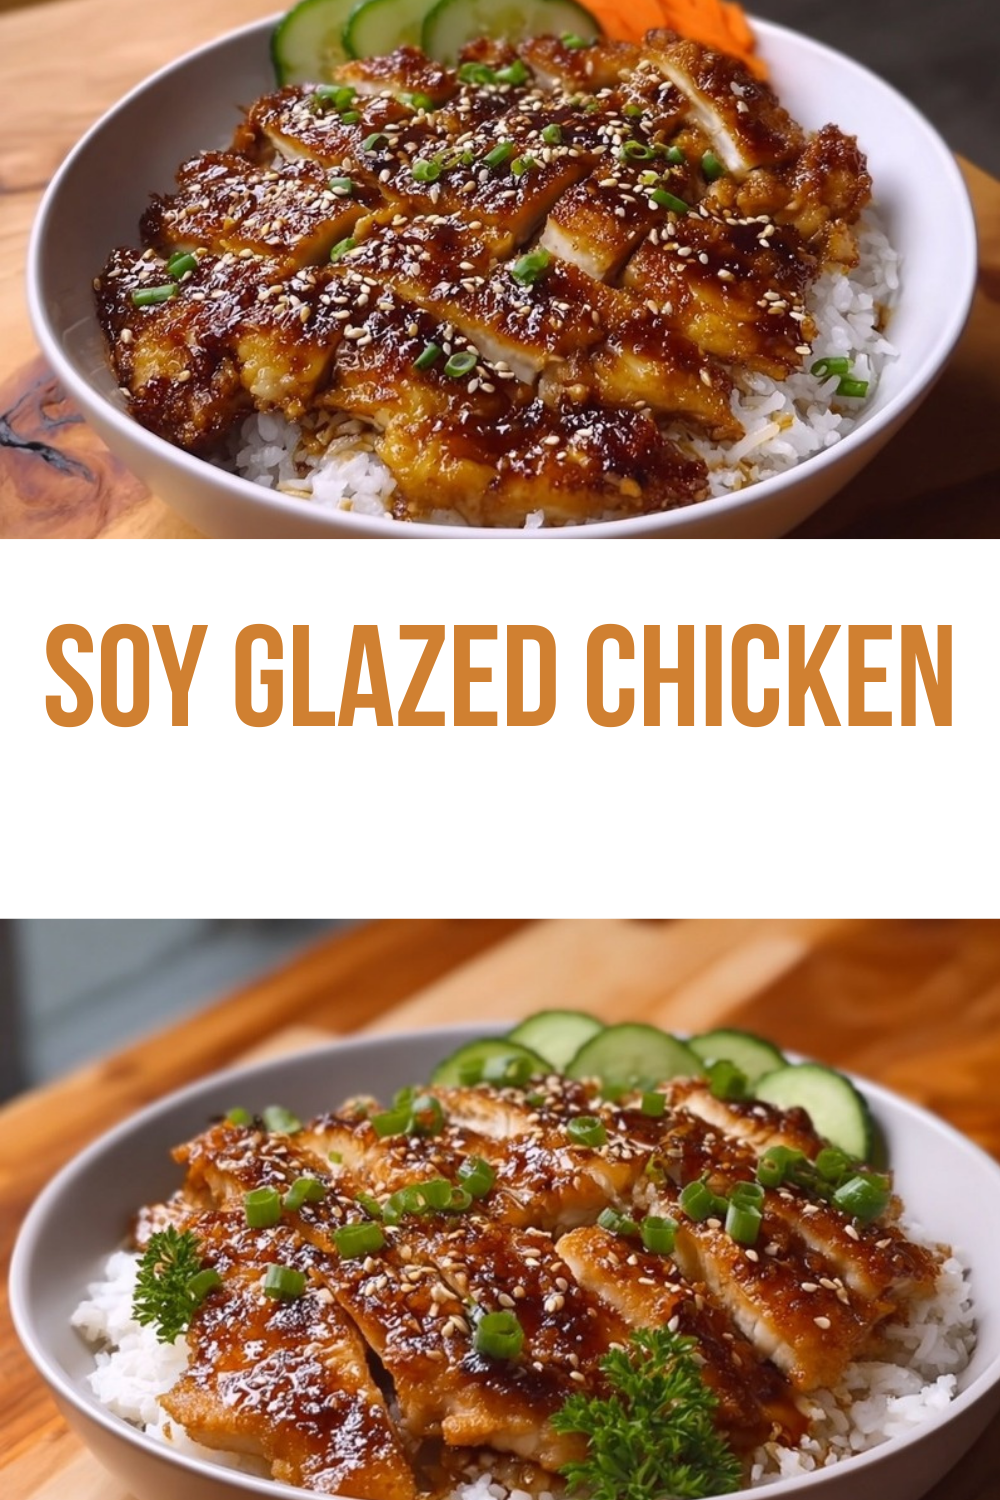
Transfer the glazed chicken to a serving platter. If desired, sprinkle with 2 sliced green onions and 1 teaspoon sesame seeds for a pop of color and extra flavor. Serve immediately with steamed rice, roasted vegetables, or your favorite sides. This dish pairs wonderfully with simple preparations that can soak up the extra glaze.

Dietary Substitutions to Customize Your Soy Glazed Chicken
One of the best things about this recipe is how easy it is to adapt. Whether you’re accommodating dietary restrictions or simply working with what’s in your pantry, here are some smart substitutions to make this dish work for you.
Protein and Main Component Alternatives
If you prefer white meat, chicken breasts work beautifully in this recipe. Simply pound them to an even thickness (about 1/2 inch) or slice them into smaller pieces for faster cooking. Keep in mind that breasts cook faster than thighs, so check them after 3-4 minutes per side. For a lighter dish, chicken breast recipes offer great inspiration for healthy variations.
For a plant-based option, firm or extra-firm tofu works well. Press the tofu to remove excess moisture, then cut into thick slices or cubes. Marinate for at least 30 minutes, then pan-fry until golden. The glaze clings to tofu just as beautifully as it does to chicken. You could also try this marinade on salmon fillets, shrimp, or even portobello mushrooms for different protein options.
Vegetable, Sauce, and Seasoning Modifications
Want to add more vegetables to your meal? Stir-ins like broccoli florets, sliced bell peppers, snow peas, or snap peas work wonderfully. Sauté hearty vegetables in the skillet before adding the chicken, then stir them back in at the end to coat with the glaze. Softer vegetables like bok choy, spinach, or mushrooms can be added during the last few minutes of cooking.
If you’re watching your sodium intake, use reduced-sodium soy sauce or coconut aminos. For a gluten-free version, tamari is the perfect substitute. You can also experiment with the flavor profile by adding a splash of rice vinegar for acidity, a dollop of chili paste for heat, or a tablespoon of honey for extra sweetness. Some cooks like to add a teaspoon of sesame oil to the marinade for a nuttier flavor.
Mastering Soy Glazed Chicken: Advanced Tips and Variations
Once you’ve mastered the basic recipe, here are some advanced techniques and creative variations to take your soy glazed chicken to the next level.
Pro Cooking Techniques
The key to perfect soy glazed chicken is controlling your heat. Brown sugar burns easily, so resist the temptation to crank up the heat. Medium heat allows the sugars to caramelize slowly without scorching. If you notice the glaze darkening too quickly, reduce the heat slightly or add a splash of water to thin it out.
For the best sear, pat the chicken dry with paper towels before adding it to the skillet. Excess marinade on the surface can prevent proper browning. Also, resist the urge to move the chicken around too much let it develop a nice crust before flipping.
Flavor Variations
This versatile base recipe welcomes all sorts of flavor twists. Try adding a tablespoon of hoisin sauce for a deeper, more complex flavor. A splash of rice wine or mirin adds brightness and helps balance the sweetness. For some heat, add a teaspoon of sriracha, gochujang, or red pepper flakes to the marinade.
You can also infuse the oil with aromatics before cooking. Heat the oil with sliced garlic and ginger, then remove them before adding the chicken. This creates a subtle background flavor that permeates the entire dish.
Make-Ahead Options
This recipe is perfect for meal prep. You can marinate the chicken up to 24 hours ahead of time, making weeknight cooking a breeze. The glazed chicken stores well in an airtight container in the refrigerator for 3-4 days, and it reheats beautifully. For busy weeks, double the marinade and freeze half for a future meal.
Meal prep tip: Slice any leftover chicken and store it with extra glaze. The next day, toss it into a stir-fry, wrap it in a lettuce cup, or use it to top a fresh salad for lunch.
Grilling Variation
When weather permits, take this recipe outdoors. Grilling adds a smoky char that complements the sweet glaze beautifully. Preheat your grill to medium heat (around 350-400°F). Pat the marinated chicken dry to prevent flare-ups, then grill for 6-8 minutes per side for thighs. Baste with reserved glaze during the last few minutes of cooking. Keep a close eye on it the sugars can burn quickly over direct flame.
How to Store Soy Glazed Chicken: Best Practices
Proper storage ensures your leftovers stay fresh and delicious. Here’s everything you need to know about storing and reheating your soy glazed chicken.
Refrigeration
Allow the cooked chicken to cool completely before storing this prevents condensation from making the glaze soggy. Place the chicken in an airtight container and store in the refrigerator for up to 3-4 days. For best results, store the chicken with some of the extra glaze to keep it moist. If you’ve added vegetables to the dish, they’ll stay fresh for the same amount of time, though they may soften slightly.
Freezing
Soy glazed chicken freezes remarkably well. For easy thawing, portion the cooled chicken into single-serving sizes before freezing. Place pieces in a single layer on a baking sheet and freeze until solid, then transfer to a freezer-safe bag or container. This prevents the pieces from sticking together. Frozen properly, the chicken will maintain good quality for up to 3 months. Label your container with the date so you know when it was frozen.
Reheating
The key to reheating glazed chicken is doing it gently to preserve the texture. For stovetop reheating, place the chicken in a skillet over low-medium heat with a splash of water, broth, or extra soy sauce. Cover and heat for 5-7 minutes, turning occasionally, until the internal temperature reaches 165°F. The added liquid helps recreate that fresh-from-the-skillet texture.
Microwave reheating works in a pinch. Place the chicken in a microwave-safe dish, cover loosely, and heat in 30-second intervals until hot. The glaze may soften slightly, but the flavor remains delicious. For a quick dinner, thaw frozen chicken in the refrigerator overnight, then reheat as directed.
Meal Prep Considerations
This recipe is ideal for batch cooking. The chicken stays juicy when reheated, and the flavors actually deepen over time. Consider cooking a double batch on Sunday for easy lunches throughout the week. Pair with different sides each day rice, quinoa, roasted vegetables, or a fresh salad to keep things interesting.
FAQs: Frequently Asked Questions About Soy Glazed Chicken
Can I use chicken breasts instead of thighs for soy glazed chicken?
Yes, you can substitute chicken breasts for thighs in soy glazed chicken. Slice the breasts into smaller pieces or pound them to about ½-inch thickness for even cooking and better marinade absorption. Marinate for at least 30 minutes or up to overnight in the fridge. Cook over medium heat in a skillet for 5-7 minutes per side until they reach 165°F internally. Breasts cook faster than thighs, so check early to prevent drying out. This swap works well for a lighter dish, and the soy glaze still caramelizes nicely. Serve with rice or veggies for a complete meal. (78 words)
How do I grill soy glazed chicken instead of using a skillet?
Grilling soy glazed chicken is a great option for extra flavor and char. Preheat your grill to medium heat (about 350-400°F). Pat marinated chicken dry to prevent flare-ups from sugars in the glaze. Grill thighs skin-side down first for 6-8 minutes, then flip and cook another 5-7 minutes until internal temperature hits 165°F. Baste with reserved glaze during the last few minutes. For breasts, grill 4-6 minutes per side. Let rest 5 minutes before serving. This method adds smoky notes—perfect for summer barbecues. Watch for burning due to the glaze. (92 words)
Is it safe to turn leftover marinade into sauce for soy glazed chicken?
Yes, it’s safe to boil the leftover marinade into a glaze for soy glazed chicken. After removing the raw chicken, pour the marinade into a saucepan and bring it to a rolling boil for at least 2 minutes to kill any bacteria. Reduce over medium heat until it thickens, about 5-7 minutes, stirring often. This creates a shiny, sticky sauce to drizzle over the cooked chicken, rice, or veggies. Taste and adjust with a splash of lime or honey if needed. Always use a separate brush for basting raw vs. cooked chicken to avoid cross-contamination. (89 words)
How should I store and reheat soy glazed chicken leftovers?
Cool soy glazed chicken completely, then store in an airtight container in the fridge for up to 3-4 days or freeze for 3 months. For freezing, portion into single layers on a baking sheet first, then transfer to freezer bags to prevent sticking. Thaw frozen chicken overnight in the fridge. Reheat gently in a skillet over low-medium heat with a splash of water or broth to restore moisture, about 5-7 minutes until hot (165°F internal). Microwave in short bursts, covered, works too but may soften the glaze. Avoid high heat to keep it juicy. (94 words)
Can I add vegetables to my soy glazed chicken recipe?
Absolutely, adding vegetables makes soy glazed chicken a one-pan meal. Sauté sturdy veggies like broccoli florets, green beans, sliced bell peppers, or snow peas in the skillet for 3-5 minutes before adding the chicken. Use medium heat with a bit of oil. Push veggies to the sides once chicken goes in, then stir them back during the last 2 minutes to coat in glaze and warm through. Soft veggies like bok choy or mushrooms can go in later. This boosts nutrition—aim for 165°F chicken temp. Pairs great with steamed rice to soak up the sauce. (92 words)

Soy Glazed Chicken
- Total Time: 1 hour
- Yield: 4 servings
- Diet: High-Protein
Description
🍗 Juicy sticky ginger soy glazed chicken thighs bursting with caramelized umami – high-protein, crave-worthy Asian flavors!
🌿 Minimal prep, ready in 1 hour, versatile over rice or veggies for effortless weeknight dinners.
Ingredients
– 1/4 cup brown sugar for sweetness and caramelized glaze
– 3 tablespoons soy sauce for deep umami flavor and saltiness
– 2 garlic cloves, minced for aromatic, savory flavor
– 1 tablespoon grated fresh ginger for warmth and subtle spicy kick
– Freshly cracked black pepper (to taste) for mild heat and enhancing other flavors
– 1 tablespoon cooking oil for distributing flavors and preventing sticking
– 8 boneless, skinless chicken thighs (about 1.75 lbs) remain juicy and tender during cooking
– 1/2 tablespoon cooking oil for cooking the chicken in the skillet
– 2 sliced green onions for fresh color and mild onion flavor
– 1 teaspoon sesame seeds for nutty crunch and visual appeal
Instructions
1-Step 1: Prepare the Marinade Start by prepping your aromatics. Mince 2 garlic cloves finely you want small pieces that will distribute evenly throughout the marinade. Next, grate 1 tablespoon of fresh ginger. If you’ve never cooked with fresh ginger before, don’t worry it’s super easy to grate, and this simple marinade will have your taste buds doing a happy dance before you know it. In a medium bowl, combine the minced garlic, grated ginger, 1/4 cup brown sugar, 3 tablespoons soy sauce, freshly cracked black pepper (to your taste), and 1 tablespoon cooking oil. Whisk everything together until the brown sugar starts to dissolve. The mixture should look glossy and smell absolutely amazing.
2-Step 2: Marinate the Chicken Place your 8 boneless, skinless chicken thighs in a shallow dish or a large ziplock bag. Pour the marinade over the chicken, making sure each piece gets well coated. Use your hands or tongs to turn the chicken and distribute the marinade evenly. Cover the dish or seal the bag, then place it in the refrigerator. For the best results, let the chicken marinate for at least 30 minutes. If you have more time, marinating for a few hours or even overnight allows the flavors to penetrate deeper into the meat. The maximum recommended marinating time is 1 day, as the acid and salt can start to break down the meat texture if left too long.
3-Step 3: Heat the Skillet When you’re ready to cook, remove the chicken from the refrigerator and let it sit at room temperature for about 10-15 minutes. This helps the chicken cook more evenly. While the chicken comes to temperature, heat a large skillet over medium heat. Once the skillet is hot, add 1/2 tablespoon of cooking oil and swirl it around to coat the bottom of the pan. You want the oil to shimmer slightly but not smoke medium heat is key here because the sugar in the marinade can burn if the heat is too high.
4-Step 4: Cook the Chicken Working in batches, place the chicken thighs in the skillet. Don’t overcrowd the pan cook about half the chicken at a time so each piece has room to brown properly. If you try to cook everything at once, the chicken will steam instead of developing that beautiful golden crust. Cook the first side for about 4-5 minutes until you see the edges turning golden brown. Flip the chicken and cook for another 4-5 minutes on the second side. The chicken is done when it reaches an internal temperature of 165°F and the juices run clear when you cut into the thickest part. Transfer the cooked chicken to a plate and cover loosely with foil to keep warm. Repeat with the remaining chicken thighs, adding a touch more oil if needed.
5-Step 5: Create the Glaze Here’s where the magic happens. Pour the leftover marinade into the same skillet you used to cook the chicken. Bring it to a boil over medium-high heat, using a whisk to scrape up any browned bits from the bottom of the pan. These browned bits are packed with flavor and will make your glaze even more delicious. Let the marinade bubble and reduce for 2-3 minutes, whisking constantly. The liquid will thicken into a glossy, syrupy glaze that coats the back of a spoon. Watch it closely the sugar can go from caramelized to burnt quickly. You want it thick enough to coat the chicken but not so thick that it becomes hard to work with.
6-Step 6: Finish and Serve Turn off the heat and return all the cooked chicken to the skillet. Toss the chicken in the glaze, turning each piece so it’s completely coated in that sticky, flavorful sauce. The residual heat will help the glaze adhere to the chicken. Transfer the glazed chicken to a serving platter. If desired, sprinkle with 2 sliced green onions and 1 teaspoon sesame seeds for a pop of color and extra flavor. Serve immediately with steamed rice, roasted vegetables, or your favorite sides. This dish pairs wonderfully with simple preparations that can soak up the extra glaze.
Notes
🥡 Double marinade for extra sauce to drizzle over rice or veggies.
🔥 Medium heat prevents burning sugars; boil used marinade fully for safe glaze.
🥦 Add broccoli or peppers: sauté first, mix in at end for one-pan meal.
- Prep Time: 10 minutes
- Marinating: 30 minutes
- Cook Time: 20 minutes
- Category: Main Course
- Method: Stovetop
- Cuisine: Asian
Nutrition
- Serving Size: 2 thighs
- Calories: 192 kcal
- Sugar: 7g
- Sodium: 480mg
- Fat: 7g
- Saturated Fat: 2g
- Unsaturated Fat: 5g
- Trans Fat: 0g
- Carbohydrates: 8g
- Fiber: 0g
- Protein: 23g
- Cholesterol: 100mg
Keywords: Sticky Ginger Soy Chicken, Glazed Chicken Thighs, Ginger Soy Glaze Recipe, Sticky Chicken Recipe