Why You’ll Love This Russian Cherry Layer Cake
As a home cook who’s always on the hunt for recipes that bring families together, this Russian Cherry Layer Cake has become one of my favorites. It’s simple to whip up, even if you’re juggling a busy day like I often do with work and family. The blend of tart cherries and creamy layers creates a dessert that’s not just tasty but also feels like a warm hug on your plate.
One reason you’ll adore this recipe is its ease of preparation. It’s designed for simplicity, allowing both novice and experienced bakers to enjoy quick cooking times without sacrificing taste. The straightforward steps and minimal ingredients ensure you can assemble and bake the cake swiftly, making it perfect for last-minute celebrations or delightful everyday treats.
Plus, it offers some health benefits. This cake uses fresh cherries packed with antioxidants and natural vitamins, supporting wellness while indulging your sweet tooth. Using wholesome ingredients balances the fun with smarter choices, turning it into a guilt-free option for diet-conscious folks like busy parents or students.
And don’t forget about its versatility. The recipe adapts seamlessly to various dietary needs, including adjustments for vegan or gluten-free options. This flexibility means everyone can enjoy the rich and distinctive flavors of Russian Cherry Layer Cake, no matter their preferences.
Finally, the taste is what really sets it apart. The unique mix of tart cherries and luscious layers delivers a memorable profile that stands out from ordinary desserts. It’s all about that traditional Russian flair, making your gatherings extra special and full of joy.
Jump To
- 1. Why You’ll Love This Russian Cherry Layer Cake
- 2. Essential Ingredients for Russian Cherry Layer Cake
- 3. How to Prepare the Perfect Russian Cherry Layer Cake: Step-by-Step Guide
- 4. Dietary Substitutions to Customize Your Russian Cherry Layer Cake
- 5. Mastering Russian Cherry Layer Cake: Advanced Tips and Variations
- 6. How to Store Russian Cherry Layer Cake: Best Practices
- 7. FAQs: Frequently Asked Questions About Russian Cherry Layer Cake
- 8. Russian Cherry Layer Cake
Essential Ingredients for Russian Cherry Layer Cake
Getting the ingredients right is key to making this Russian Cherry Layer Cake turn out perfectly. I always start by gathering everything ahead of time, just like I do for my family dinners. That way, baking feels less stressful and more fun. Below, I’ve listed out all the exact ingredients you’ll need, based on what works best in my kitchen trials.
For the Cake
- 15 large eggs, separated, whites and yolks at room temperature
- 1 1/2 cups sugar
- 1 3/4 cups unbleached all-purpose flour
- 3 tablespoons cocoa powder (Dutch cocoa recommended)
For the Syrup
- 21 ounces country cherry pie filling or topping
- 1 3/4 cups cold water
- 1 tablespoon sugar
For the Frosting
- 1 can cooked sweetened condensed milk (dulce de leche)
- 3 cups cold heavy whipping cream
- Chocolate shavings and cordial cherries for decoration (optional)
This structured list makes it easy to shop and measure out everything precisely. I love how these ingredients come together to create such a rich flavor it’s like a little piece of tradition in every bite.
How to Prepare the Perfect Russian Cherry Layer Cake: Step-by-Step Guide
When I first tried this Russian Cherry Layer Cake, I remember thinking how straightforward it was, even on a hectic weeknight. Let’s dive into the steps that make this recipe so approachable. I’ll walk you through it like I’m chatting with a friend in the kitchen, keeping things simple and clear.
Preparing the Cake Layers
- Preheat oven to 350 °F (175 °C). Line two 13×9 inch rectangular baking pans and one round cake pan with wax paper.
- Mix egg yolks with sugar until well blended, then add flour and mix well.
- Beat egg whites on high speed for 2-3 minutes until fluffy and tripled in volume but not stiff.
- Gently fold yolk mixture into egg whites using a spatula.
- Separate one-third of the batter and stir in cocoa powder evenly; pour into the round pan.
- Divide the remaining batter evenly between the two rectangular pans.
- Bake all three cakes for 23-25 minutes or until golden and a toothpick comes out clean.
- Remove cakes from pans, run a spatula underneath to separate from wax paper while warm, and cool to room temperature.
Making the Syrup
- Pour cherry pie filling into a bowl, add cold water, and mix.
- Remove cherries with a slotted spoon, squeeze out excess juice, and reserve the juice.
- Add sugar to the reserved juice and mix to form the syrup.
Preparing the Frosting
- Prepare cooked sweetened condensed milk and cool to room temperature.
- Chill whipping cream and mixing bowl for 10-15 minutes.
- Whip cream on high speed until stiff, about 3 minutes.
- Reduce speed and gradually add sweetened condensed milk, continuing to mix well.
- Refrigerate frosting until use.
Assembling the Cake
- Place one white cake layer face down on a serving dish.
- Pour half the syrup evenly over this layer and let it soak.
- Crumble the chocolate cake into a bowl, add strained cherries and one-third of the frosting, mixing gently.
- Spread the cherry-chocolate mixture over the first layer.
- Place the second white cake layer face down on top, pour remaining syrup over it, and let soak for 10 minutes.
- Trim sides if needed.
- Spread remaining frosting over the top and sides.
- Decorate with chocolate shavings and cordial cherries as desired.
- Refrigerate the assembled cake and consume within 3 days.
This guide keeps things simple, just like my go-to strawberry rhubarb pie filling recipe that adds a fruity twist to desserts. For more baking ideas, check out my chocolate peanut butter poke cake.

Dietary Substitutions to Customize Your Russian Cherry Layer Cake
One thing I love about baking is making recipes fit everyone’s needs, like when I tweak things for my gluten-free friends. For this Russian Cherry Layer Cake, there are plenty of ways to adjust it while keeping that rich flavor intact.
Protein and Main Component Alternatives: Replace eggs with flax or chia eggs for a vegan-friendly option without compromising texture. Use aquafaba as another excellent egg white substitute, providing structure while keeping the cake moist. Swap sour cream with coconut cream or vegan yogurt for plant-based variations.
Vegetable, Sauce, and Seasoning Modifications: Introduce fresh herbs like mint or rosemary into the cherry filling to enhance flavor complexity. Experiment with sauces such as almond or vanilla glaze for added richness. Adjust sweetness levels or use natural sweeteners like honey or maple syrup to suit dietary preferences. Seasonal variations can include incorporating other berries or stone fruits while maintaining the cake’s essence.
This flexible approach ensures the Russian Cherry Layer Cake caters to various palates and dietary requirements without losing its traditional charm. It’s all about making it your own, just as I do in my kitchen experiments.
Mastering Russian Cherry Layer Cake: Advanced Tips and Variations
After baking this Russian Cherry Layer Cake a few times, I’ve picked up some tricks that make it even better. Let me share them with you in a way that feels like we’re chatting over coffee.
Remember, the key to a great cake is in the details, like using room temperature ingredients for the best mix.
- Pro cooking techniques: Use room temperature ingredients for better mixing and rise. Sift flour and baking powder for a lighter texture. Employ an electric mixer to achieve a perfect batter consistency.
- Flavor variations: Try adding almond extract alongside vanilla to complement the cherry taste. Incorporate dark chocolate shavings in layers for a richer dessert.
- Presentation tips: Garnish with fresh cherries, edible flowers, or a dusting of powdered sugar for an elegant appearance. Use a piping bag to create decorative cream patterns on top.
- Make-ahead options: Bake cake layers in advance and freeze them wrapped tightly. Prepare fillings ahead and refrigerate to save time during assembly. This strategy is ideal for busy schedules while ensuring freshness and flavor preservation.
These tips have helped me turn this into a go-to recipe for special occasions. For instance, I once added a touch of almond to make it pop at a family gathering.
How to Store Russian Cherry Layer Cake: Best Practices
Storing this Russian Cherry Layer Cake properly keeps it tasting fresh, which is something I always think about after baking. Here’s how to handle leftovers without any fuss.
| Storage Method | Duration | Tips |
|---|---|---|
| Refrigeration | Up to 3 4 days | Store in an airtight container to maintain freshness and texture. |
| Freezing | Up to 2 months | Wrap cake layers tightly in plastic wrap and aluminum foil. |
| Reheating | N/A | Thaw overnight in the refrigerator and bring to room temperature. |
Meal prep considerations: Portion the cake into single servings before storage for convenience. Use freezer-safe containers or wraps to protect against freezer burn during batch cooking and extended storage. I find this method helps when I’m planning ahead for busy weeks.
FAQs: Frequently Asked Questions About Russian Cherry Layer Cake
What ingredients do I need to make a traditional Russian Cherry Layer Cake?
To make a traditional Russian Cherry Layer Cake, you will need eggs, sugar, all-purpose flour, unsalted butter, sour cream, cherry preserves or fresh pitted cherries, and baking powder. Many recipes also include a pinch of salt and vanilla extract for enhanced flavor. The cake layers are typically light and fluffy with a tangy cherry filling, and a sour cream-based frosting or glaze is commonly used to complement the fruit’s sweetness.
How do I assemble a Russian Cherry Layer Cake to prevent it from becoming soggy?
To prevent sogginess, spread a thin layer of buttercream or frosting between the cake layers before adding the cherry filling. This creates a moisture barrier. Use well-drained cherries or cherry preserves with minimal syrup, and allow the cake layers to cool completely before assembly. Chilling the assembled cake briefly helps the flavors set and keeps the layers intact without becoming too moist.
Can I use frozen cherries for a Russian Cherry Layer Cake, and how should I prepare them?
Yes, you can use frozen cherries for this cake. Thaw them completely and drain excess juice to avoid making the cake soggy. For better texture and flavor, gently cook the thawed cherries with a bit of sugar and lemon juice until slightly thickened, then cool before layering. This also enhances the cherry flavor while reducing excess moisture.
What is the best way to store Russian Cherry Layer Cake to keep it fresh?
Store the cake covered in the refrigerator in an airtight container or wrapped tightly with plastic wrap to preserve moisture and prevent it from drying out. Ideally, consume it within 3-4 days for best taste and texture. If you want to keep it longer, wrap it well and freeze the cake, thawing it in the fridge overnight before serving.
How can I make a Russian Cherry Layer Cake less sweet without losing flavor?
To reduce sweetness, use unsweetened or lightly sweetened cherry preserves, and decrease the sugar in the cake batter slightly. Incorporate sour cream or yogurt-based frosting, which adds tanginess that balances the sweetness. Adding a small amount of lemon zest or juice to the cherry filling also brightens flavors and reduces perceived sweetness without compromising the cake’s delicious richness.
Russian Cherry Layer Cake
- Total Time: 55 minutes plus cooling and chilling
- Yield: 12 servings
- Diet: Vegetarian
Description
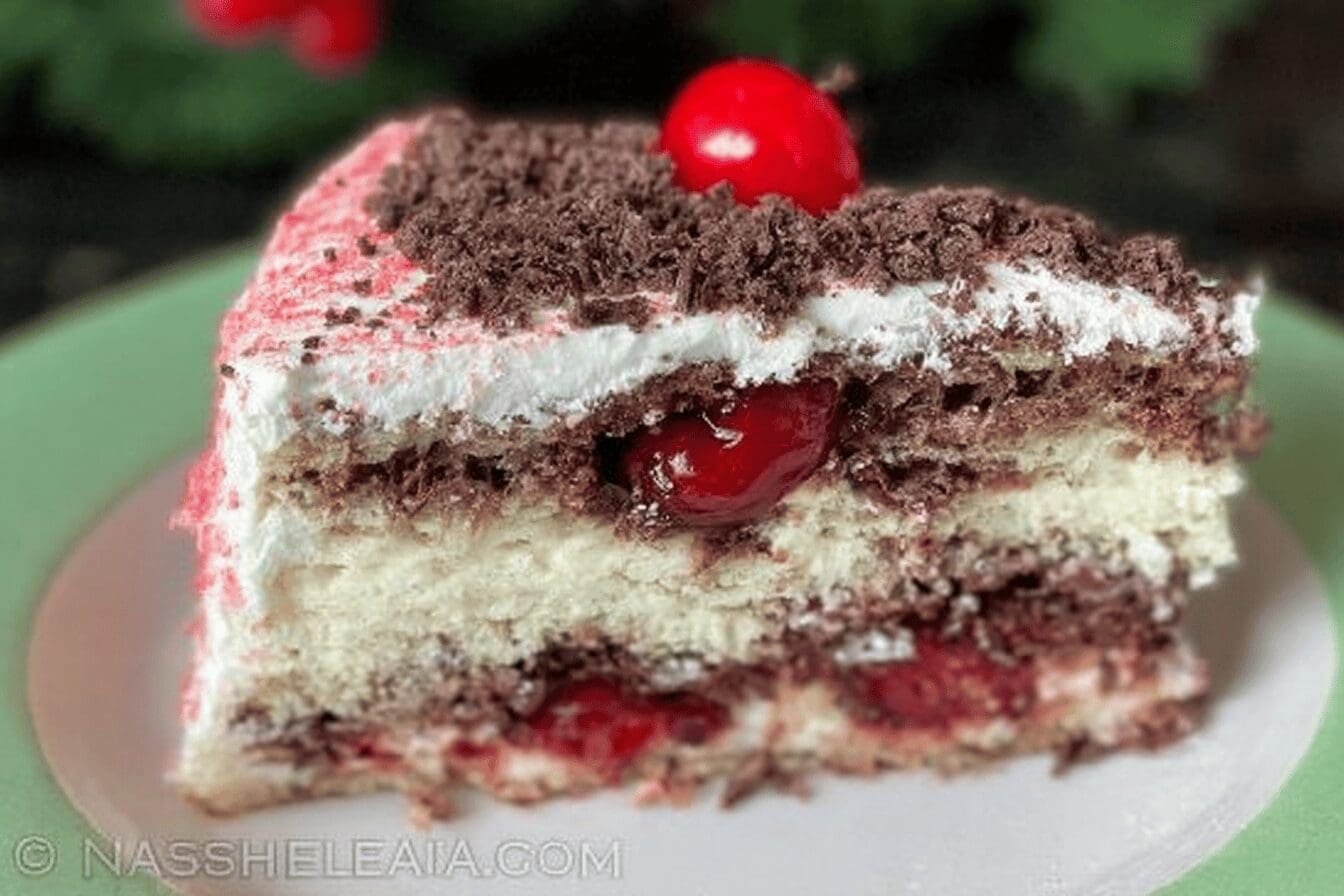
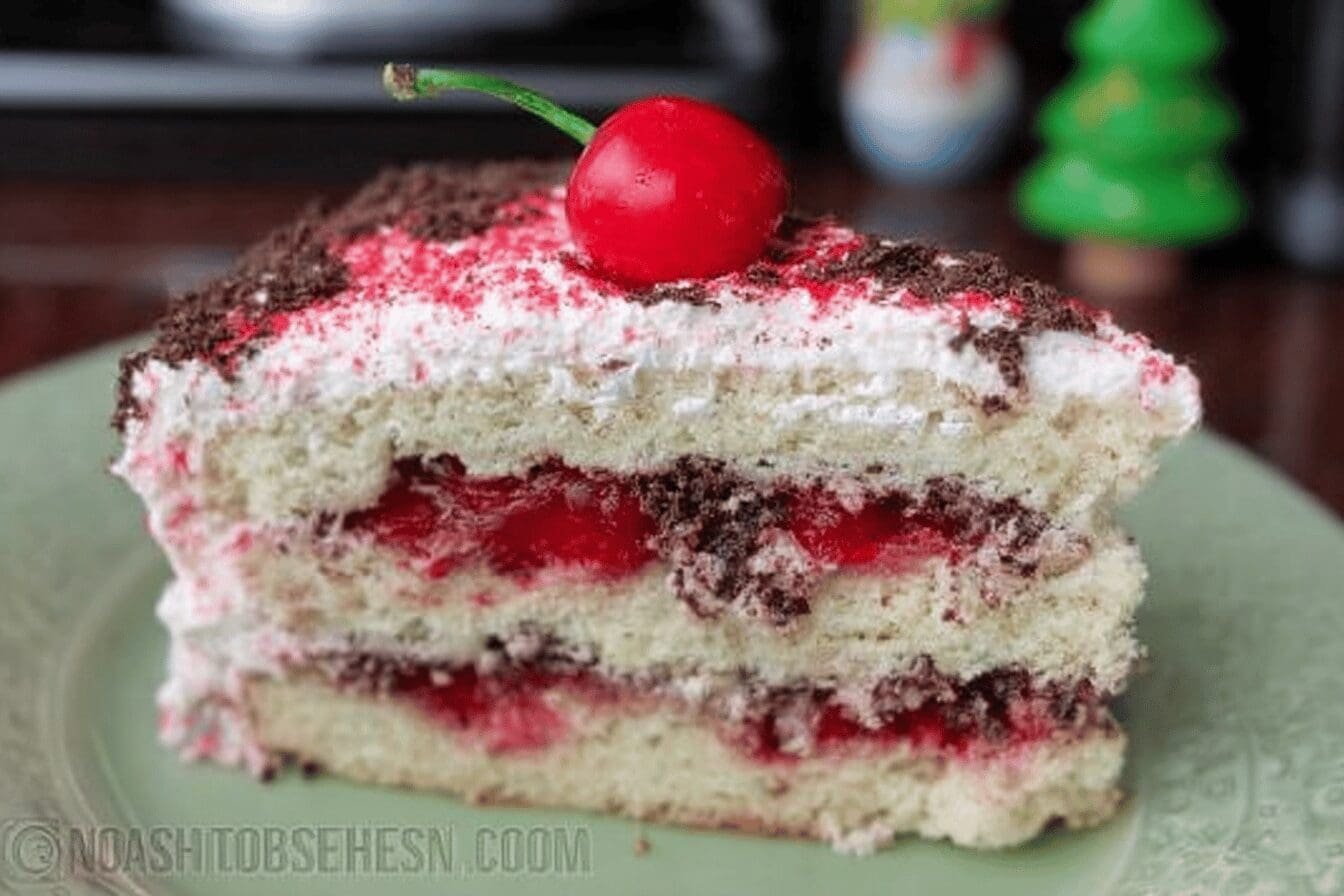
🍒 This Russian Cherry Layer Cake features a creamy filling combined with rich cherry and chocolate flavors for a luscious dessert.
🎂 Its layered structure with moist cake and sweet syrup makes it a perfect choice for special occasions or a decadent treat.
Ingredients
– 15 large eggs, separated, whites and yolks at room temperature
– 1 1/2 cups sugar
– 1 3/4 cups unbleached all-purpose flour
– 3 tablespoons cocoa powder (Dutch cocoa recommended)
– 21 ounces country cherry pie filling or topping
– 1 3/4 cups cold water
– 1 tablespoon sugar
– 1 can cooked sweetened condensed milk (dulce de leche)
– 3 cups cold heavy whipping cream
– Chocolate shavings and cordial cherries for decoration (optional)
Instructions
1-Preparing the Cake Layers: Preheat oven to 350 °F (175 °C). Line two 13×9 inch rectangular baking pans and one round cake pan with wax paper.
Mix egg yolks with sugar until well blended, then add flour and mix well.
Beat egg whites on high speed for 2-3 minutes until fluffy and tripled in volume but not stiff.
Gently fold yolk mixture into egg whites using a spatula.
Separate one-third of the batter and stir in cocoa powder evenly; pour into the round pan.
Divide the remaining batter evenly between the two rectangular pans.
Bake all three cakes for 23-25 minutes or until golden and a toothpick comes out clean.
Remove cakes from pans, run a spatula underneath to separate from wax paper while warm, and cool to room temperature.
2-Making the Syrup: Pour cherry pie filling into a bowl, add cold water, and mix.
Remove cherries with a slotted spoon, squeeze out excess juice, and reserve the juice.
Add sugar to the reserved juice and mix to form the syrup.
3-Preparing the Frosting: Prepare cooked sweetened condensed milk and cool to room temperature.
Chill whipping cream and mixing bowl for 10-15 minutes.
Whip cream on high speed until stiff, about 3 minutes.
Reduce speed and gradually add sweetened condensed milk, continuing to mix well.
Refrigerate frosting until use.
4-Assembling the Cake: Place one white cake layer face down on a serving dish.
Pour half the syrup evenly over this layer and let it soak.
Crumble the chocolate cake into a bowl, add strained cherries and one-third of the frosting, mixing gently.
Spread the cherry-chocolate mixture over the first layer.
Place the second white cake layer face down on top, pour remaining syrup over it, and let soak for 10 minutes.
Trim sides if needed.
Spread remaining frosting over the top and sides.
Decorate with chocolate shavings and cordial cherries as desired.
Refrigerate the assembled cake and consume within 3 days.
Notes
🍰 Avoid beating egg whites to stiff peaks to keep batter light and fluffy.
🌿 Remove wax paper from warm cakes for easier separation without damage.
❄️ Chill cream and bowl well before whipping for better frosting consistency.
- Prep Time: 30 minutes
- Baking time: 25 minutes
- Cook Time: 25 minutes
- Category: Dessert
- Method: Baking and assembling
- Cuisine: Russian
Nutrition
- Serving Size: 1 slice
- Calories: 410 kcal
- Sugar: 50 g
- Sodium: 150 mg
- Fat: 20 g
- Saturated Fat: 12 g
- Unsaturated Fat: 7 g
- Trans Fat: 0 g
- Carbohydrates: 45 g
- Fiber: 2 g
- Protein: 7 g
- Cholesterol: 210 mg
Keywords: Russian cherry cake, Cherry layer cake, Creamy cherry dessert, Chocolate cherry cake