Why You’ll Love This Oreo Balls
Oreo balls are the ultimate crowd-pleasing dessert that combines simplicity with irresistible flavor. These bite-sized treats have become a staple at parties, holiday gatherings, and family celebrations for good reason. Whether you’re a seasoned baker or someone who typically avoids the oven, this no bake dessert delivers impressive results every single time.- Ease of preparation: This oreo balls recipe requires zero baking time, making it perfect for hot summer days when you don’t want to heat up the kitchen. With just 45 minutes from start to finish, you can whip up a batch of these cookie balls with minimal effort. The process involves simple crushing, mixing, rolling, and dipping no complicated techniques or special equipment needed beyond a food processor or rolling pin.
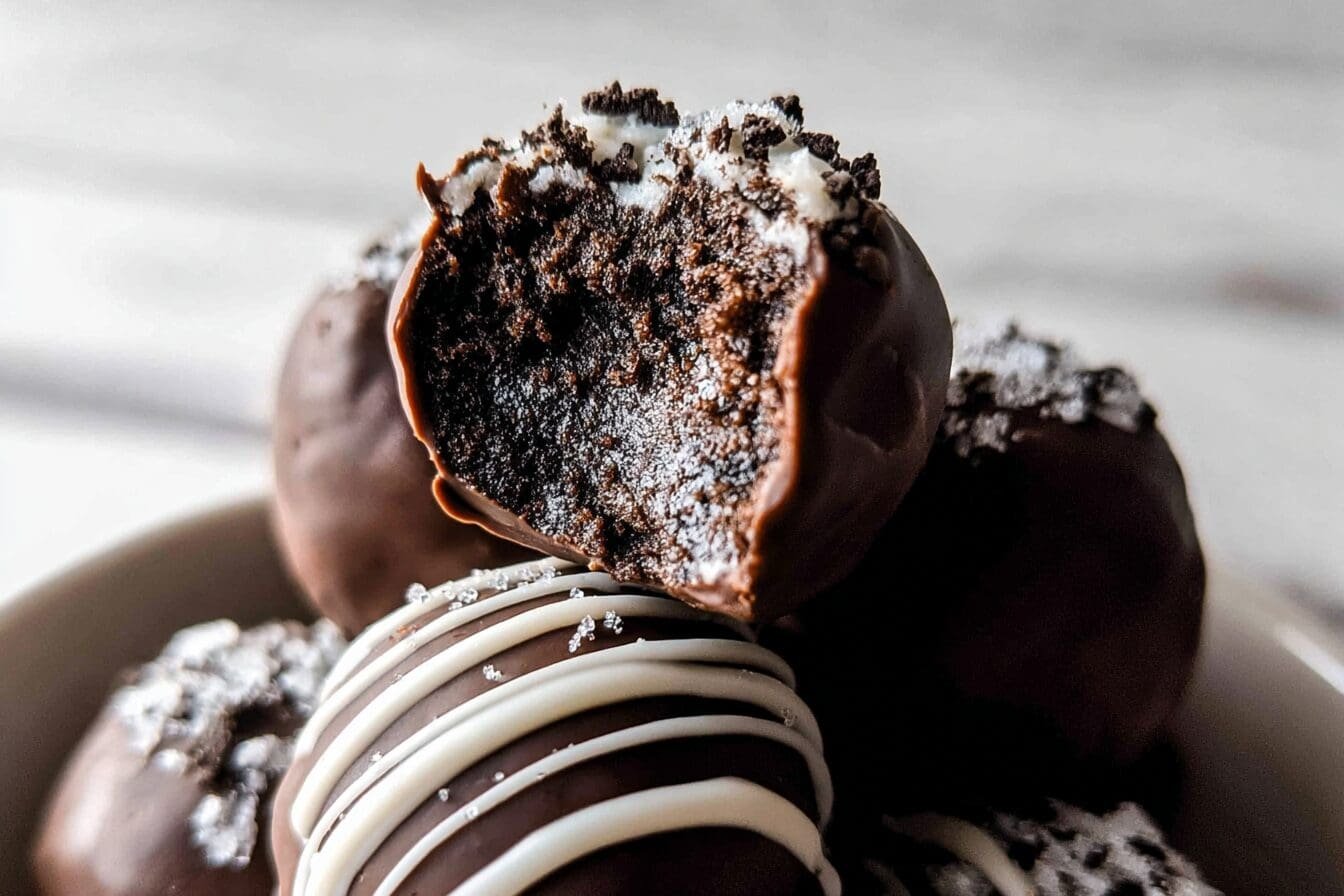
- Incredible flavor combination: The contrast between the crunchy chocolate cookies, creamy cheese filling, and smooth chocolate coating creates a taste sensation that keeps people coming back for more. Each bite delivers a perfect balance of sweetness and richness that satisfies any sweet tooth.
- Versatility for any occasion: These oreo truffles work beautifully as holiday treats, birthday party favors, potluck contributions, or everyday desserts. You can customize the coating color with candy melts, add sprinkles for festive occasions, or drizzle with contrasting chocolate for an elegant finish.
- Budget-friendly dessert: With just three main ingredients totaling under $10, this simple oreo truffles recipe offers exceptional value. One batch yields approximately 36 balls, making it an economical choice for feeding crowds or satisfying a sweet craving throughout the week.
Jump To
- 1. Why You’ll Love This Oreo Balls
- 2. Essential Ingredients for Oreo Balls
- 3. How to Prepare the Perfect Oreo Balls: Step-by-Step Guide
- 4. Dietary Substitutions to Customize Your Oreo Balls
- 5. Mastering Oreo Balls: Advanced Tips and Variations
- 6. How to Store Oreo Balls: Best Practices
- 7. FAQs: Frequently Asked Questions About Oreo Balls
- 8. Oreo Balls
Essential Ingredients for Oreo Balls
Creating the perfect easy no bake oreo balls starts with understanding each ingredient’s role in the final product. Quality ingredients make a noticeable difference in taste and texture, so choose wisely for the best results.Main Ingredients
- 36 Oreo cookies (one 14-oz package) The foundation of this recipe provides chocolate flavor and structural integrity. Regular Oreos work best, though double-stuffed varieties create an extra creamy interior. The cookies get crushed into fine crumbs that bind with the cream cheese.
- 8 oz cream cheese (one block), softened This ingredient transforms dry cookie crumbs into a pliable, truffle-like consistency. Full-fat cream cheese creates the smoothest texture; low-fat versions tend to make crumbly mixture. Allow cream cheese to reach room temperature for easier mixing.
- 12-16 oz chocolate candy coating or almond bark The outer shell that gives these quick oreo cookie balls their professional appearance. White, milk, or dark chocolate all work beautifully. Candy coating melts smoother than regular chocolate and sets with a satisfying snap.
Optional Add-Ins and Toppings
- 1 tsp vanilla extract Adds depth to the cream cheese mixture and enhances the overall flavor profile.
- Sprinkles, crushed nuts, or cookie crumbs Perfect for decorating the exterior before the coating sets.
- Additional melted chocolate for drizzling Creates an elegant two-tone finish on your finished balls.
Special Dietary Options
Vegan: Replace regular Oreos with vegan chocolate sandwich cookies and use dairy-free cream cheese alternatives. Many store-brand sandwich cookies are accidentally vegan check labels carefully.
Gluten-free: Use gluten-free chocolate sandwich cookies now available at most grocery stores. The texture and taste remain virtually identical to the traditional version.
Low-calorie: Consider using reduced-fat cream cheese, though expect a slightly softer texture. Some bakers add 1/4 cup powdered sugar to compensate for structural changes.
How to Prepare the Perfect Oreo Balls: Step-by-Step Guide
Creating beautiful no bake oreo balls requires attention to detail and proper technique. Follow these comprehensive steps to achieve bakery-quality results in your own kitchen. If you enjoy no bake desserts that impress without the fuss, this recipe will become your go-to favorite.Step 1: Prepare Your Workspace and Ingredients
Start by gathering all ingredients and equipment. You’ll need a food processor or rolling pin, a large mixing bowl, a baking sheet lined with parchment paper, a microwave-safe bowl for melting chocolate, and two forks for dipping. Allow the cream cheese to soften completely at room temperature for about 30 minutes this ensures smooth mixing without lumps. Cold cream cheese creates an uneven texture that affects the final product.Step 2: Crush the Cookies
Place all 36 Oreo cookies into a food processor and pulse until you achieve fine, consistent crumbs. If you don’t have a food processor, place cookies in a large zip-top bag, squeeze out excess air, seal it, and crush with a rolling pin or meat mallet. Work until no large chunks remain the crumbs should resemble coarse sand. Don’t remove the cream filling; it adds sweetness and helps bind the mixture together.
Pro Tip: Save about 1/4 cup of the crushed crumbs for decorating the finished balls. Simply roll freshly dipped balls in these crumbs or sprinkle on top before the coating sets.
Step 3: Mix the Filling
Transfer the cookie crumbs to a large mixing bowl. Add the softened cream cheese and, if using, vanilla extract. Using clean hands or a sturdy spoon, mix until the ingredients form a uniform dough. The mixture should hold together when pressed but remain slightly sticky. Over-mixing can make the filling gummy, so stop once everything is evenly combined. If the mixture feels too soft, refrigerate for 10-15 minutes before shaping.
Step 4: Shape the Balls
Using a tablespoon or small cookie scoop, portion the mixture into evenly sized balls. Aim for balls about 1 inch in diameter this size creates perfect bite-sized treats. Roll each portion between your palms until smooth and round. Work quickly to prevent the mixture from warming up too much from your hands. Place shaped balls on the prepared baking sheet lined with parchment paper, leaving space between each one.
Step 5: Chill Before Dipping
Refrigerate the shaped balls for 15-30 minutes. This crucial step firms them up, making the dipping process much easier and cleaner. Cold balls hold their shape better when dipped in warm chocolate, resulting in a smoother finish. Skip this step and you risk balls falling apart in the coating or developing flat bottoms.
Step 6: Melt the Chocolate Coating
Place your chocolate candy coating in a microwave-safe bowl. Microwave in 30-second intervals, stirring thoroughly between each burst. The coating should reach a temperature between 90-100°F for optimal dipping consistency hotter chocolate causes the balls to soften and melt. Stir until completely smooth with no lumps remaining. If the coating seems too thick, add a teaspoon of shortening or coconut oil to thin it slightly.
Step 7: Dip Each Ball
Working with one chilled ball at a time, drop it into the melted chocolate. Use a fork to gently roll it around until completely coated. Lift the ball with the fork, tapping the fork’s edge against the bowl to remove excess chocolate. This tapping motion creates a thin, even coating that sets properly. Place the dipped ball back on the parchment paper and immediately add any decorations before the coating hardens.
Step 8: Set and Serve
Allow the coated balls to set at room temperature for about 20 minutes, or speed up the process by refrigerating for 15 minutes. Once the coating is firm to the touch, transfer the finished oreo balls to an airtight container. Store in the refrigerator until ready to serve. For best presentation, remove from the fridge 10 minutes before serving to take the chill off the coating.
For those who love creative desserts, you might also enjoy these easy no-bake treats that pair wonderfully with any occasion.

Dietary Substitutions to Customize Your Oreo Balls
One of the best aspects of this quick oreo cookie balls recipe is its adaptability to various dietary needs and preferences. With a few strategic substitutions, everyone can enjoy these delicious treats regardless of their restrictions.Protein and Main Component Alternatives
The cream cheese in traditional oreo truffles can be replaced with several alternatives depending on your needs. Dairy-free cream cheese works well for vegans or those avoiding dairy look for brands that have a similar consistency to regular cream cheese. Some bakers experiment with Greek yogurt, though this creates a tangier flavor and softer texture that requires longer chilling time.
For a protein boost, consider adding 2 tablespoons of vanilla protein powder to the mixture. This addition works particularly well if you’re reducing the cookie portion for a lower-carb version. The protein powder helps bind the mixture while adding nutritional value.
Those seeking healthier alternatives might enjoy experimenting with cashew butter or almond butter as partial replacements for cream cheese. These nut butters add healthy fats and protein while creating an equally delicious, though distinctly different, flavor profile.
Coating and Flavor Modifications
The chocolate coating offers endless possibilities for customization. Candy melts come in numerous colors, making them perfect for holiday treats think red and green for Christmas, orange for Halloween, or pastels for Easter. Dark chocolate creates a more sophisticated, less sweet finish that pairs beautifully with a sprinkle of sea salt on top.
According to culinary experts at Two Peas and Their Pod, the key to successful coating lies in proper temperature control. Keeping your chocolate at the right consistency ensures even coverage and prevents unsightly streaks or blooms.
For texture variations, mix in 1/2 cup of mini chocolate chips, crushed pretzels, or chopped nuts into the filling before shaping. These additions create interesting textural contrasts and unexpected flavor combinations that elevate the basic recipe.
Mastering Oreo Balls: Advanced Tips and Variations
Once you’ve mastered the basic simple oreo truffles recipe, it’s time to explore creative variations and professional techniques that will make your treats stand out from the crowd.Professional Techniques for Perfect Results
Temperature control remains the most critical factor in creating bakery-quality cookie balls. Keep your shaped balls cold throughout the dipping process work in small batches, returning undipped balls to the refrigerator while you work. This prevents soft, misshapen results that occur when warm balls hit the chocolate coating.
Use a double boiler for melting chocolate if you’re working with large batches. This method provides more consistent heat than microwaving and reduces the risk of overheating. The ideal chocolate temperature should feel barely warm to the touch hotter chocolate causes coating failures and grainy textures.
Consider tempering your chocolate for a glossy finish that doesn’t develop white streaks when stored. Tempering involves carefully heating and cooling chocolate to specific temperatures, creating stable crystals that result in a professional appearance and satisfying snap.
Creative Flavor Variations
Transform your basic oreo balls into gourmet creations with these inspired variations:
- Mint Chocolate: Add 1/4 tsp peppermint extract to the filling and use mint Oreos. Top with crushed candy canes for a festive touch.
- Peanut Butter Cup: Mix 1/2 cup creamy peanut butter into the filling. Dip in milk chocolate and drizzle with melted peanut butter.
- Red Velvet: Use red velvet sandwich cookies instead of Oreos. The cream cheese filling mimics traditional red velvet cake frosting.
- Espresso: Dissolve 1 tsp instant espresso powder in the cream cheese before mixing. This creates a mocha flavor profile perfect for coffee lovers.
- Seasonal Spice: Add 1/2 tsp cinnamon and a pinch of nutmeg to the filling for fall-inspired treats.
Presentation Ideas
Transform simple balls into showstopping desserts with creative presentation. Place each ball in a decorative cupcake liner for easy serving at parties. Create gift-worthy treats by packaging in clear cellophane bags tied with ribbon. For elegant occasions, drizzle finished balls with contrasting chocolate or dust with edible gold powder.
Consider making these alongside other desserts like cookies and cream cake for a coordinated Oreo-themed celebration that will impress any crowd.
How to Store Oreo Balls: Best Practices
Proper storage ensures your homemade oreo balls stay fresh and delicious for as long as possible. Understanding the best methods for short-term and long-term storage helps you plan ahead for parties and maintain quality.Refrigeration Guidelines
Store finished oreo balls in an airtight container in the refrigerator for up to two weeks. Layer balls between sheets of parchment paper to prevent sticking and maintain the smooth coating surface. The cream cheese filling requires refrigeration for food safety never leave these treats at room temperature for more than 2-4 hours.
For best taste and texture, consume within 5-7 days. The coating may develop slight condensation after extended refrigeration, but this doesn’t affect taste. Simply pat dry with a paper towel before serving if needed.
Freezing for Long-Term Storage
Oreo balls freeze exceptionally well for up to 3 months when stored properly. After dipping and allowing the coating to set completely, place balls on a baking sheet and freeze until solid (about 2 hours). Transfer frozen balls to freezer-safe bags or containers, removing as much air as possible to prevent freezer burn.
Thaw frozen balls in the refrigerator overnight avoid room temperature thawing which causes condensation and texture changes. Once thawed, consume within one week for best quality. Many bakers prefer making these ahead for holidays and special occasions.
Meal Prep Considerations
If you enjoy healthier cookie ball alternatives, you can apply similar storage principles. For make-ahead convenience, prepare the filling and shape balls up to 3 days before dipping. Store undipped balls in the refrigerator, then dip on the day you plan to serve them. This approach ensures the freshest coating and presentation.

FAQs: Frequently Asked Questions About Oreo Balls
How do you make Oreo balls?
Oreo balls are a simple no-bake treat. Crush 36 Oreo cookies (about one 14-oz package) into fine crumbs using a food processor or by placing them in a zip-top bag and smashing with a rolling pin. Mix in 8 oz softened cream cheese until smooth. Scoop tablespoon-sized portions, roll into balls, and chill for 15-30 minutes. Melt 12 oz white or milk chocolate candy coating (like almond bark) in the microwave in 30-second bursts, stirring between. Dip each ball using a fork, tap off excess, and place on parchment-lined baking sheet. Add sprinkles or drizzle with extra chocolate. Refrigerate 20 minutes to set. Makes about 36 balls. Store in an airtight container in the fridge for up to 2 weeks. Total time: 45 minutes. Perfect for parties!
What ingredients are needed for Oreo balls?
Basic Oreo balls require just three main ingredients: one 14-oz package of Oreo cookies (36 cookies), 8 oz (1 block) cream cheese softened to room temperature, and 12-16 oz chocolate candy coating (white, milk, or dark for dipping). Optional add-ins: 1 tsp vanilla extract for flavor, crushed nuts or sprinkles for topping. Use full-fat cream cheese for best texture—low-fat makes them crumbly. Choose double-stuffed Oreos for extra creaminess. No baking soda, flour, or eggs needed. This recipe yields 36 bite-sized balls, ideal for crowds. Prep tip: Soften cream cheese in microwave for 10-15 seconds if needed. Total cost: under $10.
How long do Oreo balls last in the fridge?
Homemade Oreo balls stay fresh in the refrigerator for up to 2 weeks when stored in an airtight container or zip-top bags. Layer with parchment paper to prevent sticking. For best taste and texture, enjoy within 5-7 days as the cream cheese softens over time. They don’t need to be frozen initially but can be for longer storage. To freeze: Place on a tray to freeze solid (2 hours), then transfer to freezer bags for up to 3 months. Thaw in fridge overnight before serving—avoid microwaving to prevent melting. At room temperature, they’re good for 2-4 hours max due to cream cheese. Label containers with dates for easy tracking.
Can you freeze Oreo balls?
Yes, Oreo balls freeze beautifully for up to 3 months. After dipping and setting, flash-freeze them on a parchment-lined tray for 2 hours until solid. Then store in freezer-safe bags or containers, removing air to prevent freezer burn. Thaw in the refrigerator for 4-6 hours or overnight; they regain firmness without sweating. Avoid room temp thawing. Freezing works post-dipping—undipped balls may soften during thaw. Pro tip: Freeze in single layers first. They’re great for holiday prep; make a batch now for later. One serving (2 balls) is about 150 calories, so portion control helps. No texture loss if done right.
Why are my Oreo balls too soft and how to fix it?
Soft Oreo balls usually result from too much cream cheese, warm chocolate, or insufficient chilling. Fix ratios: use exactly 36 Oreos to 8 oz cream cheese—overdoing cream cheese makes mushy mixture. Crush cookies finely but not to dust. Chill rolled balls 30 minutes before dipping to firm up. Use candy melts or tempered chocolate at 90-100°F; overheating causes soft coating. Dip quickly and tap fork gently. If still soft, re-chill 1 hour or add 1/4 cup powdered sugar to mixture next time. For salvage: refreeze briefly, then re-dip in fresh melted coating. Test one ball first. Common with humid kitchens—dry hands help rolling.

Oreo Balls
- Total Time: 50 minutes
- Yield: 40 balls
- Diet: Vegetarian
Description
🍪 Whip up addictive, creamy Oreo balls in minutes – no baking needed for perfect party treats or quick desserts!
🎉 Crunchy cookie center coated in smooth chocolate, customizable and always a crowd-pleasing hit.
Ingredients
– 36 Oreo cookies (one 14-oz package)
– 8 oz cream cheese (one block), softened
– 12-16 oz chocolate candy coating or almond bark
– 1 tsp vanilla extract
– Sprinkles, crushed nuts, or cookie crumbs
– Additional melted chocolate for drizzling
Instructions
1-Step 1: Prepare Your Workspace and Ingredients: Start by gathering all ingredients and equipment. You’ll need a food processor or rolling pin, a large mixing bowl, a baking sheet lined with parchment paper, a microwave-safe bowl for melting chocolate, and two forks for dipping. Allow the cream cheese to soften completely at room temperature for about 30 minutes this ensures smooth mixing without lumps. Cold cream cheese creates an uneven texture that affects the final product.
2-Step 2: Crush the Cookies: Place all 36 Oreo cookies into a food processor and pulse until you achieve fine, consistent crumbs. If you don’t have a food processor, place cookies in a large zip-top bag, squeeze out excess air, seal it, and crush with a rolling pin or meat mallet. Work until no large chunks remain the crumbs should resemble coarse sand. Don’t remove the cream filling; it adds sweetness and helps bind the mixture together.
3-Step 3: Mix the Filling: Transfer the cookie crumbs to a large mixing bowl. Add the softened cream cheese and, if using, vanilla extract. Using clean hands or a sturdy spoon, mix until the ingredients form a uniform dough. The mixture should hold together when pressed but remain slightly sticky. Over-mixing can make the filling gummy, so stop once everything is evenly combined. If the mixture feels too soft, refrigerate for 10-15 minutes before shaping.
4-Step 4: Shape the Balls: Using a tablespoon or small cookie scoop, portion the mixture into evenly sized balls. Aim for balls about 1 inch in diameter this size creates perfect bite-sized treats. Roll each portion between your palms until smooth and round. Work quickly to prevent the mixture from warming up too much from your hands. Place shaped balls on the prepared baking sheet lined with parchment paper, leaving space between each one.
5-Step 5: Chill Before Dipping: Refrigerate the shaped balls for 15-30 minutes. This crucial step firms them up, making the dipping process much easier and cleaner. Cold balls hold their shape better when dipped in warm chocolate, resulting in a smoother finish. Skip this step and you risk balls falling apart in the coating or developing flat bottoms.
6-Step 6: Melt the Chocolate Coating: Place your chocolate candy coating in a microwave-safe bowl. Microwave in 30-second intervals, stirring thoroughly between each burst. The coating should reach a temperature between 90-100°F for optimal dipping consistency hotter chocolate causes the balls to soften and melt. Stir until completely smooth with no lumps remaining. If the coating seems too thick, add a teaspoon of shortening or coconut oil to thin it slightly.
7-Step 7: Dip Each Ball: Working with one chilled ball at a time, drop it into the melted chocolate. Use a fork to gently roll it around until completely coated. Lift the ball with the fork, tapping the fork’s edge against the bowl to remove excess chocolate. This tapping motion creates a thin, even coating that sets properly. Place the dipped ball back on the parchment paper and immediately add any decorations before the coating hardens.
8-Step 8: Set and Serve: Allow the coated balls to set at room temperature for about 20 minutes, or speed up the process by refrigerating for 15 minutes. Once the coating is firm to the touch, transfer the finished oreo balls to an airtight container. Store in the refrigerator until ready to serve. For best presentation, remove from the fridge 10 minutes before serving to take the chill off the coating.
Notes
❄️ Chill the rolled balls before dipping to prevent them from falling apart.
🍫 Use candy coating for easiest dipping, or add shortening to chocolate chips for smoother results.
📦 Make ahead and freeze for up to 1 month; thaw in fridge before serving.
- Prep Time: 20 minutes
- Chill: 30 minutes
- Cook Time: 0 minutes
- Category: Dessert
- Method: No-Bake
- Cuisine: American
Nutrition
- Serving Size: 1 ball
- Calories: 110 kcal
- Sugar: 8 g
- Sodium: 70 mg
- Fat: 7 g
- Saturated Fat: 3 g
- Unsaturated Fat: 3.5 g
- Trans Fat: 0 g
- Carbohydrates: 12 g
- Fiber: 0.5 g
- Protein: 1 g
- Cholesterol: 5 mg
Keywords: oreo balls, no bake oreo treats, easy oreo truffles, chocolate oreo balls