Description
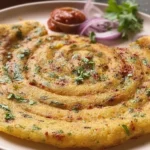
🥞🌶️ Crispy, protein-packed red lentil pancakes offer a gluten-free, vegan alternative to breads, bursting with mild spice and soft texture for healthy meals.
🥞🌶️ High-fiber, quick-cooking after soaking, perfect for breakfast or snacks—nutritious, filling, and customizable with veggies.
Ingredients
– 1 cup masoor dal (split red lentils)
– 3 cups water for soaking the lentils
– 1 green chili
– 1 inch ginger
– 1 teaspoon salt
– ½ cup water for grinding
– 2 tablespoons finely chopped cilantro
– 2 tablespoons oil for cooking
Instructions
1-Step 1: Rinse and Soak the Lentils Begin by measuring 1 cup of masoor dal and placing it in a fine-mesh strainer. Rinse thoroughly under cold running water for about 30-45 seconds, gently agitating the lentils with your fingers. This removes any dust, debris, or surface starch that could affect the batter consistency. Continue rinsing until the water runs clear. Transfer the rinsed lentils to a large bowl and add 3 cups of water. The lentils will expand as they soak, so ensure the bowl has enough room. Cover the bowl with a clean cloth or plate and let the lentils soak overnight or for at least 4 hours. Longer soaking produces a smoother batter and softer chillas.
2-Step 2: Drain and Prepare for Blending After soaking, drain the lentils completely using your strainer. Give them a gentle shake to remove excess water. You’ll notice the lentils have softened significantly and expanded to about double their original size. This transformation is exactly what you want. Transfer the drained lentils to your blender jar. Add 1 green chili (stem removed), 1 inch of fresh ginger (peeled and roughly chopped), and 1 teaspoon of salt. These aromatics will blend into the batter, creating a flavorful base for your chillas.
3-Step 3: Blend into Smooth Batter Add ½ cup of fresh water to the blender and begin blending on medium speed. Start with pulses to break down the lentils, then increase to high speed. Continue blending until you achieve a completely smooth, pourable batter with no grainy texture. The consistency should resemble that of regular pancake batter or a thick crepe batter. If the batter seems too thick or your blender struggles, add water 1-2 tablespoons at a time. Avoid adding too much water at once, as thin batter creates fragile chillas that break easily. Test the consistency by lifting some batter with a spoon. It should flow smoothly but not be watery. If it falls in thick clumps, blend longer or add a bit more water.
4-Step 4: Add Fresh Cilantro and Rest Transfer the smooth batter to a mixing bowl. Add 2 tablespoons of finely chopped fresh cilantro and stir gently to distribute evenly throughout the batter. The cilantro adds freshness and a beautiful speckled appearance to your finished chillas. Let the batter rest for 5 minutes. This resting period allows the flavors to meld and the batter to stabilize, resulting in better-textured pancakes. While the batter rests, prepare your cooking station.
5-Step 5: Heat the Pan Place a non-stick pan, cast-iron skillet, or traditional tawa on the stove over low-medium heat. Proper temperature is crucial too hot and the chilla will burn on the outside while remaining undercooked inside; too cool and it won’t develop those appealing golden spots. Test the pan’s readiness by sprinkling a few drops of water. The water should sizzle and evaporate within seconds. If it dances around and takes longer to evaporate, the pan isn’t hot enough yet.
6-Step 6: Pour and Spread the Batter Once the pan is properly heated, pour approximately ⅓ cup of batter onto the center. Using the back of your ladle or a small bowl, quickly spread the batter outward in a circular motion to create a circle roughly 5-6 inches in diameter. Work efficiently the batter begins cooking as soon as it hits the pan. Keep the thickness similar to a crepe or slightly thicker than a dosa. Thinner chillas become crispier, while thicker ones remain softer inside. Find your preferred thickness through experimentation.
7-Step 7: Cook the First Side Let the chilla cook undisturbed for 2-3 minutes on the first side. You’ll notice the edges beginning to lift slightly and the surface changing from glossy to matte. Small bubbles may form on the surface, similar to regular pancakes. Add a few drops of oil around the edges and on the surface. The oil helps create those beautiful golden-brown spots and makes flipping easier.
8-Step 8: Flip and Cook the Second Side When the edges lift easily and the bottom has developed light golden spots, it’s time to flip. Slide a thin spatula under the chilla and flip it over in one confident motion. Add a few more drops of oil around the edges. Cook the second side for another 2-3 minutes until it matches the golden color of the first side. Press gently with your spatula to ensure even cooking and contact with the pan.
9-Step 9: Serve Immediately Transfer the cooked chilla to a plate and serve hot. These healthy dal chilla pancakes taste best when fresh and warm. Repeat the process with the remaining batter, adding oil to the pan as needed between each chilla. Stack cooked chillas on a plate and cover loosely with a clean kitchen towel to keep them warm while you cook the remaining batter. This recipe yields approximately 6 to 8 chillas depending on size.
Notes
🌶️ Adjust green chili for spice level and add onions, spinach, or carrots to batter for extra nutrition and variety.
🥄 If batter is too thin and breaks, thicken with a little rice flour and cook first side longer for crispiness.
❄️ Refrigerate cooked chillas up to 5 days or freeze with parchment; reheat on a hot pan for freshness.
- Prep Time: 15 minutes
- Soaking: 4 hours or overnight
- Cook Time: 15 minutes
- Category: Breakfast
- Method: Pan-Fried
- Cuisine: Indian
Nutrition
- Serving Size: 2 pancakes
- Calories: 225 kcal
- Sugar: 1 g
- Sodium: 632 mg
- Fat: 7 g
- Saturated Fat: 1 g
- Unsaturated Fat: 7 g
- Trans Fat: 1 g
- Carbohydrates: 28 g
- Fiber: 14 g
- Protein: 12 g
- Cholesterol: 0 mg
Keywords: masoor dal chilla, red lentil pancakes, crispy savory chilla, gluten free pancakes