Why You’ll Love This Hummus
This hummus recipe delivers everything you want in a dip: creamy texture, bright flavors, and simple preparation that takes just 10 minutes from start to finish. Whether you are a busy parent looking for healthy snacks or a food enthusiast wanting to try something new, this easy homemade hummus will become a staple in your kitchen.
- Ease of preparation: This recipe comes together in one food processor with minimal prep work. No cooking required when using canned chickpeas, and the entire process takes only 10 minutes. Perfect for busy weeknights or last-minute entertaining.
- Health benefits: Each serving delivers plant-based protein, fiber, and healthy fats while remaining naturally cholesterol-free. Chickpeas provide essential nutrients like folate, iron, and magnesium, making this dip both delicious and nutritious.
- Versatility: Serve this creamy hummus with fresh vegetables, pita chips, or as a spread on sandwiches and wraps. The base recipe adapts easily to various flavor additions, from roasted red peppers to fresh herbs.
- Distinctive flavor: The secret to this best hummus recipe lies in whipping the tahini and lemon juice first. This technique creates an ultra-smooth base that results in restaurant-quality dip better than store bought versions.
According to Serious Eats, the order of ingredients matters significantly when making hummus at home. This recipe follows that professional advice to guarantee smooth, creamy results every single time.
Jump To
- 1. Why You’ll Love This Hummus
- 2. Essential Ingredients for Hummus
- 3. How to Prepare the Perfect Hummus: Step-by-Step Guide
- 4. Protein and Main Component Alternatives
- 5. Vegetable, Sauce, and Seasoning Modifications
- 6. Mastering Hummus: Advanced Tips and Variations
- 7. How to Store Hummus: Best Practices
- 8. Nutritional Information
- 9. FAQs: Frequently Asked Questions About Hummus
- 10. Hummus
Essential Ingredients for Hummus
Creating the best hummus starts with quality ingredients. Here is everything you need with precise measurements for consistent results:
Main Ingredients
- 1 (15-ounce) can chickpeas, drained or 1 1/2 cups cooked chickpeas (250g) – The foundation of any great hummus, providing protein and that signature creamy texture
- 1/4 cup fresh lemon juice, from 1 large lemon (60ml) – Adds brightness and helps create the smooth emulsion with tahini
- 1/4 cup well-stirred tahini (60ml) – Sesame paste that gives hummus its distinctive nutty flavor and creamy body
- 1 small garlic clove, minced – Provides subtle aromatic depth without overpowering the dip
- 2 tablespoons extra-virgin olive oil, plus more for serving (30ml) – Adds richness and healthy fats while smoothing the texture
- 1/2 teaspoon ground cumin – Warm spice that enhances the Middle Eastern flavor profile
- Salt to taste – Essential for bringing all flavors together
- 2 to 3 tablespoons cold water or aquafaba (45ml) – Creates the perfect creamy consistency
- Dash ground paprika, sumac, or Za’atar for serving – Traditional garnishes that add color and extra flavor dimension
Special Dietary Options
This easy hummus recipe naturally accommodates several dietary needs:
- Vegan: This recipe is completely plant-based and vegan-friendly as written
- Gluten-free: All ingredients are naturally gluten-free, making this safe for those with celiac disease or gluten sensitivity
- Low-calorie: At just 155 calories per 1/4 cup serving, this fits well into calorie-conscious eating plans
How to Prepare the Perfect Hummus: Step-by-Step Guide
Follow these detailed instructions to create homemade hummus better than store bought versions. The technique matters as much as the ingredients for achieving that signature smooth texture.
Step 1: Create the Creamy Base
Begin by whipping the tahini and lemon juice together in the bowl of a food processor. Process for 1 minute, then scrape down the sides with a rubber spatula. Continue processing for 30 seconds more until the mixture becomes smooth and creamy. This initial step is crucial because tahini thickens when mixed with acid, creating a fluffy emulsion that forms the foundation of excellent creamy hummus.
If the tahini and lemon juice do not cream well in the processor, add a small amount of olive oil or a tablespoon of cold water to help the process along. The mixture should look pale and whipped, almost like mayonnaise in consistency.
Step 2: Add Aromatics and Seasonings
Add the olive oil, minced garlic, cumin, and salt to the whipped tahini and lemon juice mixture. Process for 30 seconds, scrape the bowl thoroughly, then process again for 30 seconds until fully blended. The garlic should be completely incorporated, and the mixture should smell wonderfully aromatic. Taste at this stage and adjust salt if needed, keeping in mind that the chickpeas will dilute the seasoning slightly.
Step 3: Incorporate the Chickpeas
Add half the chickpeas to the processor and process for 1 minute until the mixture becomes a thick paste. Scrape the bowl again, then add the remaining chickpeas. Process for 1 to 2 minutes until the mixture is thick and relatively smooth. The easy hummus will still have some texture at this point, which is perfectly normal.
For an even smoother result, consider peeling the chickpeas before processing. While optional, removing the skins takes about 10 minutes for a can and results in a slightly silkier texture. However, skipping this step still yields delicious homemade hummus that beats any store-bought version.
Step 4: Achieve Perfect Consistency
With the processor running, slowly add 2 to 3 tablespoons of cold water or aquafaba through the feed tube. This step is essential for creating light and airy texture. The cold liquid helps emulsify the mixture while keeping it fluffy rather than dense. Add the liquid gradually until you reach your desired creamy consistency.
Aquafaba, the liquid from canned chickpeas, works particularly well because it contains starches that help stabilize the emulsion. If using aquafaba, remember to adjust the salt accordingly since the liquid can be salty. According to Healthline, chickpeas offer numerous health benefits including improved digestion and heart health support.
Step 5: Final Seasoning and Serving
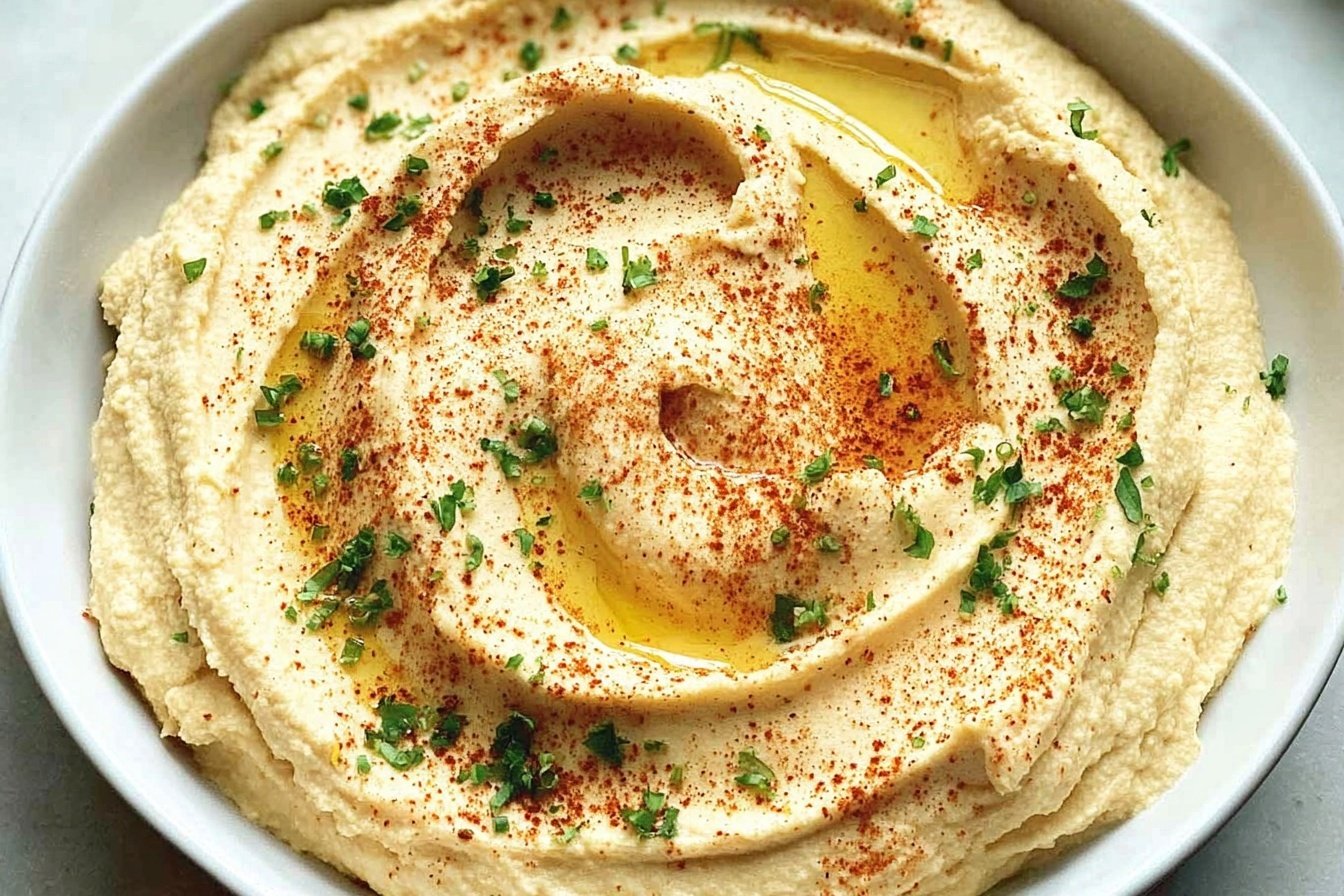
Taste your hummus recipe and adjust salt or lemon juice as needed. The flavors should be bright and well-balanced, with the lemon providing acidity and the tahini offering nutty richness. Transfer to a serving bowl and create a slight well in the center using the back of a spoon.
Drizzle generously with extra-virgin olive oil and sprinkle with paprika, sumac, or Za’atar for that authentic Middle Eastern presentation. Serve immediately with warm pita, fresh vegetable sticks, or crackers. Your easy homemade hummus recipe is now ready to enjoy!
Protein and Main Component Alternatives
While traditional hummus uses chickpeas as the primary ingredient, several alternatives work beautifully for those with different dietary preferences or ingredient availability:
Chickpea Alternatives
Both canned and homemade cooked chickpeas work well in this recipe. Homemade chickpeas, cooked from dry beans, offer slightly better flavor and texture. To cook from scratch, soak dried chickpeas overnight, then simmer until very tender, about 1 to 1.5 hours. For a unique twist, try our zucchini pesto pasta for another creative way to use similar flavors.
Tahini Substitutes
For those without tahini or with sesame allergies, several substitutions work effectively:
- Extra olive oil: Add 3 to 4 tablespoons for a lighter, though less nutty, result
- Greek yogurt: Use 2 tablespoons for added creaminess and protein
- Natural peanut butter: Substitute with 2 tablespoons of unsweetened creamy peanut butter for a surprisingly close flavor match
- Almond butter: Another nut butter option that mimics sesame richness
Vegetable, Sauce, and Seasoning Modifications
This best hummus recipe easy base welcomes countless variations to suit your taste preferences or seasonal ingredients:
Flavor Variations
- Roasted red pepper: Add 1/2 cup roasted red peppers for a smoky, sweet variation
- Roasted garlic: Substitute raw garlic with 2 to 3 cloves of roasted garlic for milder, sweeter flavor
- Fresh herbs: Blend in 1/4 cup fresh cilantro, parsley, or basil
- Spicy: Add 1 to 2 teaspoons harissa paste or a pinch of cayenne
- Lemon herb: Increase lemon juice and add fresh dill or thyme
Seasoning Options
Customize your easy hummus recipe with these seasoning ideas:
| Seasoning | Amount | Flavor Profile |
|---|---|---|
| Smoked paprika | 1/2 teaspoon | Smoky, mild heat |
| Za’atar | 1 tablespoon | Herbal, tangy |
| Sumac | 1 teaspoon | Tart, lemony |
| Cumin | Additional 1/2 teaspoon | Warm, earthy |
| Coriander | 1/2 teaspoon | Citrusy, floral |
Mastering Hummus: Advanced Tips and Variations
Take your homemade hummus better than store bought to the next level with these professional techniques and creative ideas.
Pro Cooking Techniques
The key to ultra-smooth creamy hummus lies in the processing method. Always start by whipping tahini and lemon juice together before adding other ingredients. This creates an emulsion that results in a lighter, airier texture. Use a food processor rather than a blender for best results, though a high-powered blender can work with additional scraping of the sides.
For the smoothest possible texture, peel the chickpeas before processing. Pinch each chickpea between your fingers to slip off the skin. While this takes approximately 10 minutes for one can, the result is notably silkier. Alternatively, a quick boil of the chickpeas for 2 minutes followed by an ice bath loosens skins for easier removal.
Flavor Variations
Experiment with these delicious twists on the classic easy hummus:
- Mediterranean: Add sun-dried tomatoes and fresh oregano
- Avocado: Blend in half an avocado for extra creaminess and healthy fats
- Beet: Add roasted beet for stunning pink color and earthy flavor
- Curry: Include curry powder and a touch of coconut milk
Presentation Tips
Serve your hummus recipe in style with these presentation ideas:
- Use a shallow bowl and create decorative swirls with the back of a spoon
- Drizzle high-quality olive oil in the center well
- Sprinkle toppings in sections for a professional look: paprika on one side, herbs on another
- Garnish with whole chickpeas, pine nuts, or a sprig of fresh parsley
Make-Ahead Options
For busy schedules, prepare this easy homemade hummus recipe in advance:
- Make a double batch and freeze portions for quick meals
- Prep ingredients separately and blend fresh when needed
- Store in individual containers for grab-and-go snacks
Looking for more quick meal ideas? Try our pasta salad recipe for another make-ahead option perfect for busy families.
How to Store Hummus: Best Practices
Proper storage keeps your homemade hummus fresh and delicious for days or even weeks. Follow these guidelines for the best results.
Refrigeration
Store hummus in an airtight container in the refrigerator for up to one week. Glass containers with tight-fitting lids work best for preserving freshness. Before sealing, smooth the top surface and drizzle with a thin layer of olive oil. This creates a barrier that prevents oxidation and keeps the surface from drying out or discoloring.
Freezing
For longer storage, freeze your best hummus for up to one month. Portion into small containers or ice cube trays for individual servings. Top each portion with a thin layer of olive oil before freezing. Thaw overnight in the refrigerator and stir well before serving. The texture may be slightly different after freezing, but stirring restores most of the creaminess.
Signs of Spoilage
Discard your easy hummus recipe if you notice:
- Off or sour smell
- Visible mold growth
- Excessive watery separation
- Off taste or texture
Meal Prep Tips
This recipe works beautifully for meal prep. Make a batch on Sunday and portion into small containers for the week. Pair with pre-cut vegetables for instant healthy snacks. The hummus recipe better than store bought saves money and reduces packaging waste compared to commercial versions.
Nutritional Information
Understanding the nutritional profile helps you make informed choices about incorporating this easy homemade hummus recipe into your diet:
| Nutrient (per 1/4 cup) | Amount |
|---|---|
| Calories | 155 |
| Total Fat | 11g |
| Saturated Fat | 1.5g |
| Cholesterol | 0mg |
| Sodium | 278.3mg |
| Carbohydrate | 11.8g |
| Dietary Fiber | 2.9g |
| Total Sugars | 1.8g |
| Protein | 4.5g |
This nutritional profile makes hummus an excellent choice for those following plant-based diets, Mediterranean eating patterns, or anyone seeking a nutrient-dense snack option.

FAQs: Frequently Asked Questions About Hummus
What are the main ingredients for homemade hummus?
Homemade hummus requires simple pantry staples: one 15-ounce can of chickpeas (drained and rinsed, or 1.5 cups cooked from dry), 1/4 cup tahini, juice of one large lemon (about 1/4 cup), 1-2 garlic cloves (minced), 1/2 teaspoon ground cumin, 1/2 teaspoon salt, 2-3 tablespoons olive oil, and 2-4 tablespoons cold water or aquafaba for thinning. Optional add-ins include smoked paprika for topping or fresh parsley. Start with quality chickpeas and fresh lemon for bright flavor. Measure tahini first as it thickens when mixed with acid. This basic recipe yields about 2 cups, perfect for 4-6 servings. Blend everything in a food processor until smooth, adjusting water for desired consistency. Total prep is under 10 minutes, making it ideal for quick snacks. Nutrition per 1/4 cup: around 150 calories, 10g fat, 12g carbs, 5g protein.
How do you make hummus creamy and smooth?
For ultra-creamy hummus, use a food processor and follow this order: whip 1/4 cup tahini with 1/4 cup lemon juice for 1 minute until fluffy. Add minced garlic, cumin, and salt, then process 30 seconds. Add chickpeas in two batches—pulse the first half into a thick paste, then the second for smoothness. Drizzle in 2-4 tablespoons ice-cold water or aquafaba (chickpea liquid) while running the machine; this creates airy texture without diluting flavor. Scrape sides often. Optional: peel chickpeas by pinching skins off after rinsing (10 minutes for a can) for even silkier results, though not essential. Finish with 2 tablespoons olive oil blended in. High-speed blending traps air for lightness. Taste and adjust seasoning. This method beats store-bought every time—store in fridge up to 7 days. Pro tip: chill blades beforehand for extra fluff.
Do you need to peel chickpeas to make hummus?
Peeling chickpeas isn’t required for good hummus, but it does create a noticeably smoother, silkier texture by removing tough skins. To peel a 15-ounce can: drain, rinse, then roll chickpeas between clean kitchen towels or pinch individually—takes 8-12 minutes. Skins slip off easily after a quick boil (2 minutes) and ice bath. Unpeeled chickpeas still yield delicious, creamy hummus if blended long enough with the tahini-lemon whip method and aquafaba. Most home cooks skip peeling to save time without sacrificing much. Test both ways: peeled versions feel more restaurant-quality. If using dry chickpeas, soak overnight, cook until very tender, and skins loosen naturally. This step addresses common complaints about grainy texture. Fact: Canned chickpeas have thinner skins than cooked dry ones, making peeling faster. Enjoy the dip regardless—paired with veggies, it’s a 100-calorie snack.
Can you make hummus without tahini?
Yes, tahini-free hummus works well using substitutes for creaminess. Replace 1/4 cup tahini with 3-4 tablespoons extra-virgin olive oil plus 2 tablespoons Greek yogurt or plain Greek-style plant yogurt for tang and smoothness. Another option: 2 tablespoons natural creamy peanut butter (unsweetened) or almond butter, which mimics sesame richness without overpowering. Core recipe stays the same—chickpeas, lemon, garlic, cumin, salt, water. Blend as usual: start with lemon and sub, then add rest. Greek yogurt version adds 5g protein per serving; nut butter brings nutty depth. Taste for balance, as flavors shift slightly. This hack is great for allergies or when tahini runs out. All versions store 5-7 days in the fridge. Serve with pita or carrots. Users report peanut butter hummus as surprisingly close to traditional—test in small batches. Nutrition stays similar: 120-140 calories per 1/4 cup.
How long does homemade hummus last and how to store it?
Homemade hummus lasts 5-7 days in the fridge when stored properly in an airtight container, like a glass jar with a tight lid. Smooth the top, drizzle 1 teaspoon olive oil over it to prevent drying and oxidation— this preserves color and flavor. For longer storage, freeze in portions: spoon into ice cube trays or small bags, top with oil, and freeze up to 1 month. Thaw overnight in fridge; stir well before serving. Avoid room temperature over 2 hours to prevent bacterial growth. Signs it’s gone bad: off smell, mold, or separation with watery liquid. Fresh garlic and lemon extend shelf life naturally. Pro tip: portion into single-serve sizes for grab-and-go. Freezing retains texture better than many dips. Link to our chickpea recipes for batch cooking ideas. Always use clean utensils to scoop—keeps it fresh longest.

Hummus
- Total Time: 10 minutes
- Yield: 8 servings
- Diet: Vegan, Gluten-Free
Description
🥙 Indulge in ultra-creamy, flavorful hummus that’s fresher and healthier than any store-bought version, ready in just 10 minutes!
🌿 Boost your snack game with plant-based protein, fiber, and heart-healthy fats for guilt-free dipping delight.
Ingredients
– 1 (15-ounce) can chickpeas, drained or 1 1/2 cups cooked chickpeas (250g)
– 1/4 cup fresh lemon juice, from 1 large lemon (60ml)
– 1/4 cup well-stirred tahini (60ml)
– 1 small garlic clove, minced
– 2 tablespoons extra-virgin olive oil, plus more for serving (30ml)
– 1/2 teaspoon ground cumin
– Salt to taste
– 2 to 3 tablespoons cold water or aquafaba (45ml)
– Dash ground paprika, sumac, or Za’atar for serving
Instructions
1-Step 1: Create the Creamy Base Begin by whipping the tahini and lemon juice together in the bowl of a food processor. Process for 1 minute, then scrape down the sides with a rubber spatula. Continue processing for 30 seconds more until the mixture becomes smooth and creamy. This initial step is crucial because tahini thickens when mixed with acid, creating a fluffy emulsion that forms the foundation of excellent creamy hummus. If the tahini and lemon juice do not cream well in the processor, add a small amount of olive oil or a tablespoon of cold water to help the process along. The mixture should look pale and whipped, almost like mayonnaise in consistency.
2-Step 2: Add Aromatics and Seasonings Add the olive oil, minced garlic, cumin, and salt to the whipped tahini and lemon juice mixture. Process for 30 seconds, scrape the bowl thoroughly, then process again for 30 seconds until fully blended. The garlic should be completely incorporated, and the mixture should smell wonderfully aromatic. Taste at this stage and adjust salt if needed, keeping in mind that the chickpeas will dilute the seasoning slightly.
3-Step 3: Incorporate the Chickpeas Add half the chickpeas to the processor and process for 1 minute until the mixture becomes a thick paste. Scrape the bowl again, then add the remaining chickpeas. Process for 1 to 2 minutes until the mixture is thick and relatively smooth. The easy hummus will still have some texture at this point, which is perfectly normal. For an even smoother result, consider peeling the chickpeas before processing. While optional, removing the skins takes about 10 minutes for a can and results in a slightly silkier texture. However, skipping this step still yields delicious homemade hummus that beats any store-bought version.
4-Step 4: Achieve Perfect Consistency With the processor running, slowly add 2 to 3 tablespoons of cold water or aquafaba through the feed tube. This step is essential for creating light and airy texture. The cold liquid helps emulsify the mixture while keeping it fluffy rather than dense. Add the liquid gradually until you reach your desired creamy consistency. Aquafaba, the liquid from canned chickpeas, works particularly well because it contains starches that help stabilize the emulsion. If using aquafaba, remember to adjust the salt accordingly since the liquid can be salty. According to Healthline, chickpeas offer numerous health benefits including improved digestion and heart health support.
5-Step 5: Final Seasoning and Serving Taste your hummus recipe and adjust salt or lemon juice as needed. The flavors should be bright and well-balanced, with the lemon providing acidity and the tahini offering nutty richness. Transfer to a serving bowl and create a slight well in the center using the back of a spoon. Drizzle generously with extra-virgin olive oil and sprinkle with paprika, sumac, or Za’atar for that authentic Middle Eastern presentation. Serve immediately with warm pita, fresh vegetable sticks, or crackers. Your easy homemade hummus recipe is now ready to enjoy!
Notes
❄️ Store hummus in an airtight container in the fridge for up to one week or freeze for up to one month with a layer of olive oil.
🫘 Peeling chickpeas is optional but takes 10 minutes and yields an even smoother texture.
💧 Use aquafaba instead of water for a lighter, airier hummus; adjust salt if it’s salty.
- Prep Time: 10 minutes
- Cook Time: 0 minutes
- Category: Dip
- Method: Food Processor
- Cuisine: Mediterranean
Nutrition
- Serving Size: 1/4 cup
- Calories: 155
- Sugar: 1.8g
- Sodium: 278mg
- Fat: 11g
- Saturated Fat: 1.5g
- Unsaturated Fat: 9.5g
- Trans Fat: 0g
- Carbohydrates: 11.8g
- Fiber: 2.9g
- Protein: 4.5g
- Cholesterol: 0mg
Keywords: easy hummus, homemade hummus, better than store bought, chickpea dip