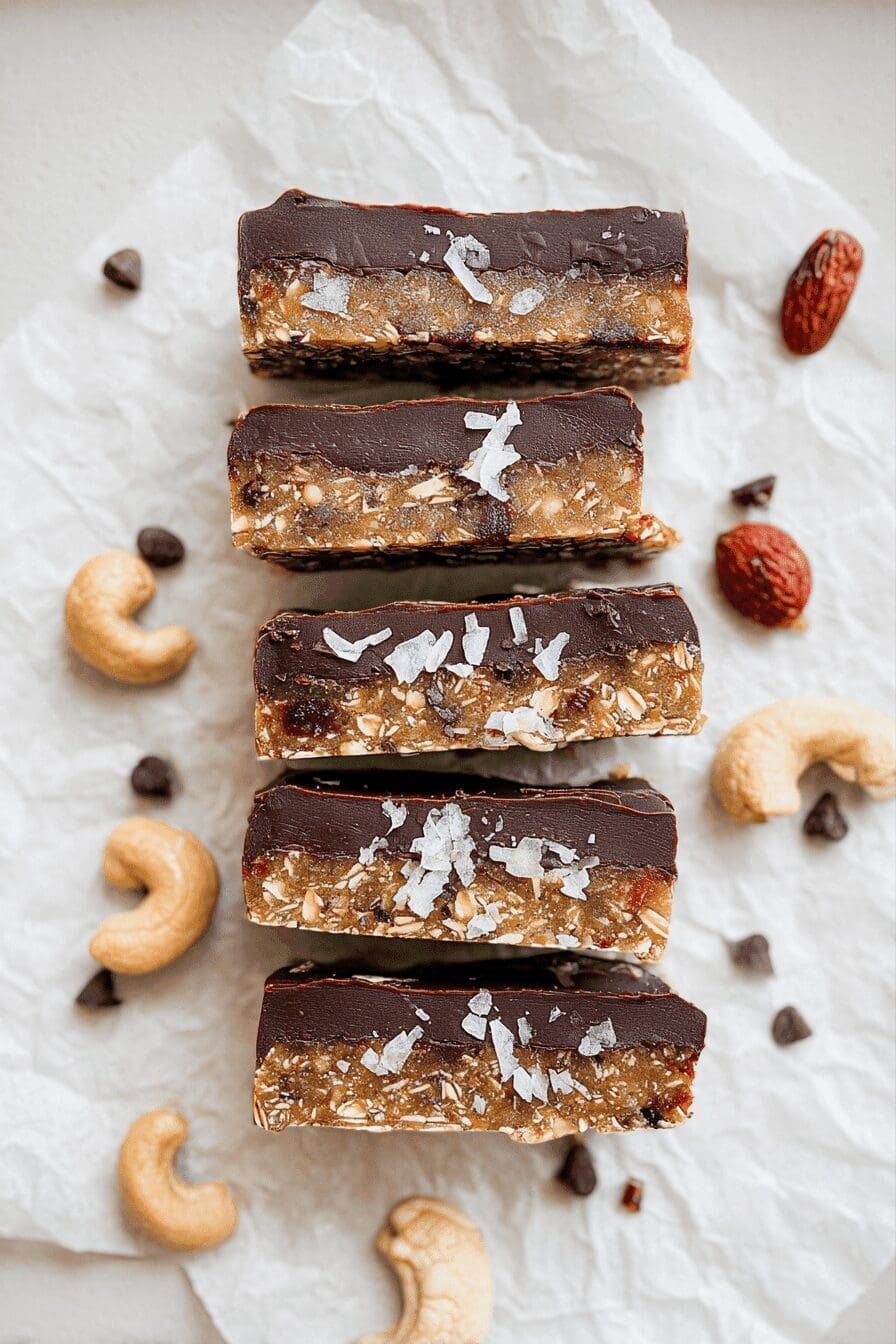
Why You’ll Love This Homemade Protein Bars
Imagine having a quick snack that’s both tasty and good for you, especially when you’re always on the go. These homemade protein bars are simple to whip up in your kitchen, using ingredients you probably already have. You’ll appreciate how they give you a boost of energy without any fuss, making them a favorite for busy days.
They pack in plenty of protein to help keep you full and support your muscles after a workout. Plus, you can tweak the recipe to fit your needs, like making it vegan or gluten-free. Whether you’re a parent rushing in the morning or a student studying late, these bars offer a healthy twist on snacking that you’ll come back to again and again.
One of the best parts is how they use natural ingredients to deliver real nutrition without added junk. Think about adding your favorite flavors to make each batch unique, turning a simple recipe into something exciting. This approach not only saves money but also lets you control what’s in your food, so you can enjoy protein bars that taste great and feel right for your body.
Key Benefits of Making Your Own
Diving into homemade protein bars means you’re getting high-quality protein that aids in muscle recovery and keeps your energy steady all day. They’re packed with nutrients from oats and nuts, which help with digestion and overall wellness. You can easily adjust portions to match your diet, whether you’re aiming for more fiber or less sugar. Busy parents and working professionals will love how quick this treat comes together, perfect for meal prep on weekends.
These bars stand out because they’re versatile for everyone, from students needing a study boost to seniors wanting light snacks. The fresh flavors beat store-bought options any day, and you avoid preservatives by making them at home. Overall, it’s a fun way to stay healthy while enjoying what you eat.
Jump To
- 1. Why You’ll Love This Homemade Protein Bars
- 2. Essential Ingredients for Homemade Protein Bars
- 3. How to Prepare the Perfect Homemade Protein Bars: Step-by-Step Guide
- 4. Dietary Substitutions to Customize Your Homemade Protein Bars – Protein and Main Component Alternatives
- 5. Mastering Homemade Protein Bars: Advanced Tips and Variations
- 6. How to Store Homemade Protein Bars: Best Practices
- 7. FAQs: Frequently Asked Questions About Homemade Protein Bars
- 8. Homemade Protein Bars
Essential Ingredients for Homemade Protein Bars
Gathering the right ingredients is the first step to creating delicious homemade protein bars that nourish your body. This recipe focuses on simple, everyday items that are easy to find and mix. You’ll need a balance of dry and wet components to get that perfect texture every time.
Here is the complete list of ingredients for this recipe. I’ve listed each one with its precise measurement to make things straightforward. Remember, these measurements ensure the bars hold together well and provide the right nutrition.
- Rolled oats or quick oats: Approximately 1 ½ cups (about 120-150 grams)
- Protein powder (whey, plant-based, flavored or plain): Approximately 1 scoop (typically 30-40 grams, check powder label)
- Nut butter (peanut, almond, sunflower seed butter, etc.): Approximately ½ cup (roughly 125-130 grams)
- Honey or agave nectar: Approximately ¼ cup (about 85 grams)
- Ground flax seed: Approximately 2 tablespoons (about 14 grams)
- Mashed banana (ripe): 1 small to medium banana (about 100-120 grams mashed)
- Salt: Approximately ¼ teaspoon
- Vanilla extract: Approximately 1 teaspoon
- Optional Mix-ins:
- Chopped dates: ¼ to ½ cup
- Dried fruit (blueberries, cranberries, raisins): ¼ to ½ cup
- Mini chocolate chips: ¼ to ½ cup
- Unsweetened coconut flakes: 2 to 4 tablespoons
- Crispy rice cereal: ½ cup
- Chopped nuts (almonds, walnuts, pecans): ¼ to ½ cup
These ingredients work together to create bars that are both tasty and packed with protein. For special diets, you can swap honey for agave if you’re going vegan, or pick gluten-free oats to keep things light. This setup not only makes the bars easy to prepare but also ensures they’re full of energy-boosting goodness for your daily routine.
Adapting for Dietary Needs
If you’re watching your calories, try cutting back on the honey or choosing a low-sugar nut butter. Home cooks will find it simple to adjust these items based on what’s in the pantry. This flexibility means protein bars can fit right into your lifestyle, whether you’re a busy parent or a fitness fan.
How to Prepare the Perfect Homemade Protein Bars: Step-by-Step Guide
Getting started with homemade protein bars is easier than you think, and it only takes about 10 minutes of active time before chilling. First, pull together all your ingredients and set up your workspace, like lining an 8×8 inch baking pan with parchment paper. This step helps everything run smoothly so you can focus on mixing without any mess.
In a large bowl, mix the rolled oats, protein powder, ground flax seed, salt, and vanilla extract until they’re well combined. You want to make sure the dry ingredients blend evenly before adding the wet ones. Next, in the same bowl, add the nut butter, honey or agave, and mashed banana, stirring everything together to form a soft dough. If the mixture feels too dry, add a little water or milk to help it stick; this keeps your bars from falling apart later.
Mixing and Forming the Bars
Once your dough is ready, press it firmly into the prepared pan to get even bars. This part is key for that perfect shape and texture. After pressing, pop the pan in the fridge for at least one hour to let it set. When it’s firm, lift it out using the parchment paper and cut it into bars of your preferred size.
For a fun twist, think about adding optional mix-ins like chopped dates or dried fruit during the mixing stage. If you’re looking for more breakfast ideas, check out our blueberry cottage cheese breakfast bake for another easy morning option. The whole process is straightforward, making it ideal for beginners or anyone short on time, and you’ll end up with snacks that beat store-bought ones hands down.
Tips for the Best Results
Remember to adjust moisture as needed to avoid crumbly bars, and always use ripe bananas for the best flavor. Students and working pros will appreciate how this recipe fits into a quick meal prep routine. Once you master this, you can experiment with flavors to keep things fresh and exciting in your kitchen.
Overall, following these steps ensures your homemade protein bars turn out just right every time. They provide sustained energy, which is great for travelers or newlyweds planning healthy meals on the go. Plus, the total prep time is so short that you’ll have more time to enjoy your day.
Dietary Substitutions to Customize Your Homemade Protein Bars – Protein and Main Component Alternatives
One of the joys of making your own protein bars is tweaking them to match your diet. For protein swaps, try plant-based powders like pea protein if you’re vegan, or stick with whey for a dairy option. This lets you keep the bars nutritious while fitting your preferences, whether you’re avoiding animal products or not.
Nut butters can switch to seed butters like sunflower for those with allergies, and oats might become quinoa flakes for gluten sensitivity. Adding veggies like shredded carrot can bring in extra moisture and nutrients without changing the taste much. For more nut-based ideas, visit our sweet pecan bread recipe to see how nuts enhance baked goods.
Seasonings such as vanilla extract or cinnamon add a nice touch, and you can use almond yogurt as a creamy substitute for dairy-free versions. These changes make the bars versatile for everyone from baking enthusiasts to diet-conscious folks, ensuring you get exactly what you need in every bite. For more on healthy options, check out benefits of protein bars from reliable sources.
Mastering Homemade Protein Bars: Advanced Tips and Variations
Once you’re comfortable with the basics, you can level up your homemade protein bars with some pro tips. Toasting the oats first brings out a deeper flavor and better texture, making your bars even more appealing. You can also mix in cacao nibs or dried fruits to create unique tastes that surprise your family and friends.
Presentation matters too, so cut the bars into even sizes and wrap them for easy grabbing. For make-ahead meals, prepare a big batch and freeze them, which works great for busy lifestyles. If you’re curious about more flavor ideas, healthy snacking tips can inspire your next creation. This way, food enthusiasts can enjoy protein bars as part of their daily routine without much effort.
Creative Variations
Try baking the mixture for a crunchier feel, but keep in mind it might change the nutrition a bit. Adjusting quantities helps you nail the perfect consistency, so don’t hesitate to play around. These tips turn simple bars into something special for all kinds of eaters.
How to Store Homemade Protein Bars: Best Practices
Keeping your homemade protein bars fresh is simple with the right storage methods. Store them in an airtight container in the fridge for up to two weeks to keep them tasty. For longer hold, freeze the bars in layers with parchment paper between them, and they can last up to three months.
| Storage Method | Duration | Tips |
|---|---|---|
| Refrigerator | Up to 2 weeks | Use an airtight container to avoid drying out |
| Freezer | Up to 3 months | Thaw in the fridge for best texture |
This makes meal prep easy for working professionals and parents. Always thaw before eating to get that soft chewiness back, helping you plan ahead without waste.

FAQs: Frequently Asked Questions About Homemade Protein Bars
How do I make homemade protein bars without baking?
To make no-bake homemade protein bars, combine protein powder, nut butter, honey or maple syrup, and oats in a bowl. Mix until the ingredients hold together well. Press the mixture into a lined pan and refrigerate for at least one hour to firm up. You can add mix-ins like chopped nuts, dried fruit, or chocolate chips for extra flavor and texture. This method saves time and keeps the bars soft and chewy.
What are the best protein powders to use in homemade protein bars?
Whey protein is popular for its smooth texture and complete amino acid profile, but plant-based powders like pea, rice, or hemp protein work well for vegan options. Choose unflavored or mildly flavored powders to avoid overpowering your bars’ taste. Always check for added sugars or fillers to keep your bars healthy and customized to your dietary needs.
How long do homemade protein bars last, and how should I store them?
Homemade protein bars typically last about one week when stored in an airtight container in the refrigerator. For longer storage, freeze them in individual portions wrapped in parchment paper or plastic wrap. Thaw in the fridge or at room temperature before eating. Proper storage helps maintain freshness and texture.
Can I customize homemade protein bars to fit a low-carb or keto diet?
Yes, you can customize your protein bars by replacing high-carb ingredients like oats and honey with low-carb alternatives such as almond flour, shredded coconut, and sugar-free sweeteners like stevia or erythritol. Use low-carb protein powders and add nuts or seeds for healthy fats. This approach helps keep your bars aligned with keto or low-carb dietary goals.
What are some common mistakes to avoid when making homemade protein bars?
Avoid using too much liquid sweetener or nut butter, which can make bars too sticky or soft. Overpacking the mixture in the pan can result in dense, hard bars. Also, don’t skip chilling time, as bars need to set properly to hold their shape. Testing small batches first helps adjust ingredient ratios for the best texture and taste.
Homemade Protein Bars
- Total Time: 1 hour 10 minutes
- Yield: 12 bars (approximate)
- Diet: Gluten-Free (if certified oats and protein powder used), Vegetarian
Description
💪 These homemade protein bars provide a tasty and convenient way to fuel your body with essential nutrients.
🍫 They combine wholesome ingredients to support muscle recovery and satisfy your sweet tooth without guilt.
Ingredients
– Approximately 1 ½ cups rolled oats or quick oats
– Approximately 1 scoop protein powder (whey, plant-based, flavored or plain)
– Approximately ½ cup nut butter (peanut, almond, sunflower seed butter, etc.)
– Approximately ¼ cup honey or agave nectar
– Approximately 2 tablespoons ground flax seed
– 1 small to medium mashed banana (ripe)
– Approximately ¼ teaspoon salt
– Approximately 1 teaspoon vanilla extract
– ¼ to ½ cup chopped dates
– ¼ to ½ cup dried fruit (blueberries, cranberries, raisins)
– ¼ to ½ cup mini chocolate chips
– 2 to 4 tablespoons unsweetened coconut flakes
– ½ cup crispy rice cereal
– ¼ to ½ cup chopped nuts (almonds, walnuts, pecans)
Instructions
1-Getting started with homemade protein bars: Getting started with homemade protein bars is easier than you think, and it only takes about 10 minutes of active time before chilling. First, pull together all your ingredients and set up your workspace, like lining an 8×8 inch baking pan with parchment paper. This step helps everything run smoothly so you can focus on mixing without any mess.
2-Mixing the dry ingredients: In a large bowl, mix the rolled oats, protein powder, ground flax seed, salt, and vanilla extract until they’re well combined. You want to make sure the dry ingredients blend evenly before adding the wet ones.
3-Mixing the wet ingredients and forming the dough: Next, in the same bowl, add the nut butter, honey or agave, and mashed banana, stirring everything together to form a soft dough. If the mixture feels too dry, add a little water or milk to help it stick; this keeps your bars from falling apart later.
4-Mixing and Forming the Bars: Once your dough is ready, press it firmly into the prepared pan to get even bars. This part is key for that perfect shape and texture. After pressing, pop the pan in the fridge for at least one hour to let it set. When it’s firm, lift it out using the parchment paper and cut it into bars of your preferred size.
5-Optional mix-ins: For a fun twist, think about adding optional mix-ins like chopped dates or dried fruit during the mixing stage. If you’re looking for more breakfast ideas, check out our blueberry cottage cheese breakfast bake for another easy morning option. The whole process is straightforward, making it ideal for beginners or anyone short on time, and you’ll end up with snacks that beat store-bought ones hands down.
6-Tips for the Best Results: Remember to adjust moisture as needed to avoid crumbly bars, and always use ripe bananas for the best flavor. Students and working pros will appreciate how this recipe fits into a quick meal prep routine. Once you master this, you can experiment with flavors to keep things fresh and exciting in your kitchen.
7-Overall benefits: Overall, following these steps ensures your homemade protein bars turn out just right every time. They provide sustained energy, which is great for travelers or newlyweds planning healthy meals on the go. Plus, the total prep time is so short that you’ll have more time to enjoy your day.
Notes
🌱 Substitute nut butters and protein powders to fit dietary preferences such as using vegan protein powder for plant-based options.
🍌 If bananas are not available, use unsweetened applesauce or pumpkin puree in equal volume.
🔥 For a crunchier texture, bake the pressed mixture at 150°C (300°F) for 20 minutes before refrigerating, noting this may slightly change nutrition.
- Prep Time: 10 minutes
- Refrigeration Time: 1 hour
- Category: Snack
- Method: No-Bake (with optional baking)
- Cuisine: American
Nutrition
- Serving Size: 1 bar
- Calories: 200-250 (varies by ingredients)
- Sugar: 10-15g (varies)
- Sodium: 100-150mg (varies)
- Fat: 8-12g (varies)
- Saturated Fat: 1-3g (varies)
- Unsaturated Fat: 5-8g (varies)
- Trans Fat: 0g
- Carbohydrates: 20-25g (varies)
- Fiber: 3-5g (varies)
- Protein: 10-15g (varies)
- Cholesterol: 0-10mg (varies)
Keywords: Protein bars, Healthy snack, Homemade protein bars, Nut butter snacks