Why You’ll Love This Crispy Chicken Tacos
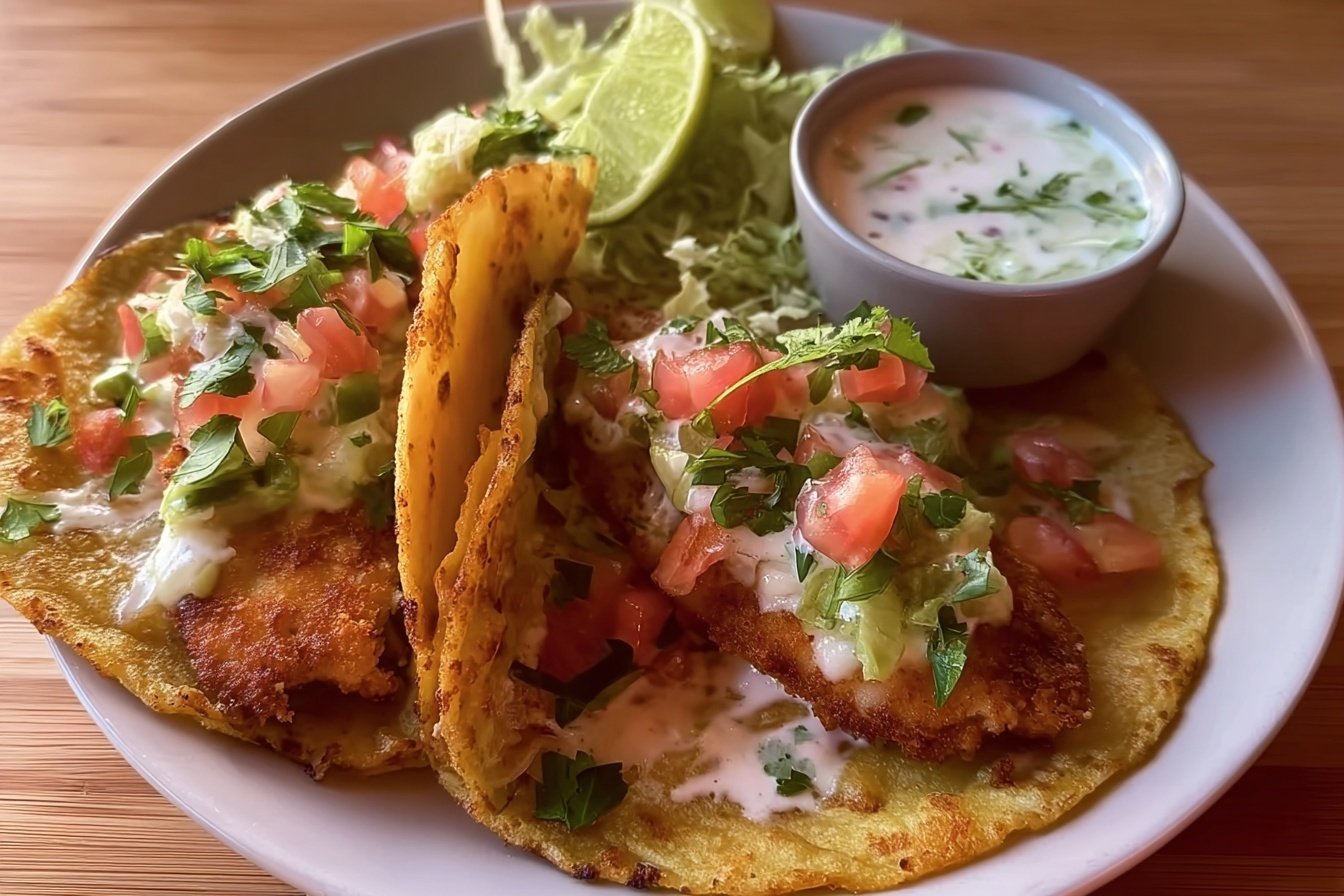
There’s something truly magical about a taco that combines crispy, cheesy goodness with a creamy, tangy sauce. These Crispy Chicken Tacos have become a family favorite in my kitchen, and I’m so excited to share them with you. The contrast between that golden, crunchy cheese exterior and the juicy, well-seasoned filling creates a flavor experience that keeps everyone coming back for more.
What makes this recipe truly special is how it transforms simple ingredients into something that feels restaurant-quality. The secret lies in that extra cheese sprinkled directly in the pan, creating a lacy, crispy shell around the taco that’s absolutely irresistible. Combined with the homemade avocado cilantro sauce, every bite delivers layers of texture and flavor.
- Ease of preparation: Ready in just 45 minutes with only 20 minutes of prep work, making these tacos perfect for busy weeknights when you still want something special on the table.
- Health benefits: Ground chicken provides lean protein at approximately 737 calories per serving, while avocado delivers heart-healthy fats and essential nutrients in the creamy sauce.
- Versatility: This recipe works beautifully with ground beef or turkey, and you can easily adjust the spice level to suit your family’s preferences.
- Distinctive flavor: The combination of chipotle chili powder, cumin, and enchilada sauce creates a deeply flavorful filling, while the avocado cilantro sauce adds brightness that balances the rich, cheesy exterior.
Jump To
- 1. Why You’ll Love This Crispy Chicken Tacos
- 2. Essential Ingredients for Crispy Chicken Tacos
- 3. How to Prepare the Perfect Crispy Chicken Tacos: Step-by-Step Guide
- 4. Protein and Main Component Alternatives
- 5. Vegetable, Sauce, and Seasoning Modifications
- 6. Mastering Crispy Chicken Tacos: Advanced Tips and Variations
- 7. How to Store Crispy Chicken Tacos: Best Practices
- 8. FAQs: Frequently Asked Questions About Crispy Chicken Tacos
- 9. Crispy Chicken Tacos
Essential Ingredients for Crispy Chicken Tacos
Having all your ingredients measured and ready before you start cooking makes the process so much smoother. Here’s everything you’ll need to make these delicious tacos and the accompanying avocado cilantro sauce.
Main Protein and Seasonings
- 450g (1 lb) ground chicken, beef, or turkey – The star protein that creates a juicy, satisfying filling; chicken is leaner while beef offers richer flavor.
- 1 tbsp olive oil – Helps brown the meat and prevents sticking in the pan.
- 1 small diced onion – Adds sweetness and depth to the filling as it cooks with the meat.
- 1 tbsp chipotle chili powder – Brings smoky heat and authentic Mexican flavor to the seasoning blend.
- 1 tsp ground cumin – Provides earthy, warm notes that are essential to taco seasoning.
- 1 tsp garlic powder – Delivers savory depth without the moisture of fresh garlic.
- 1 tsp salt – Enhances all the flavors in the filling.
- 120ml (1/2 cup) enchilada sauce – Creates a thick, flavorful sauce that coats the meat beautifully.
Taco Assembly Ingredients
- 340g (12 oz) Mexican cheese blend – A mix of pepper jack, Monterey jack, and cheddar that melts perfectly and creates that signature crispy shell.
- 8-10 jalapeño slices – Optional but recommended for adding pops of heat throughout the tacos.
- 6-8 small flour tortillas – The base for your tacos; small tortillas are easier to handle and create the perfect portion size.
Avocado Cilantro Sauce Ingredients
- 1 ripe avocado – Creates the creamy base and adds healthy fats to the sauce.
- 120ml (1/2 cup) salsa verde – Provides tangy tomatillo flavor and helps thin the sauce.
- 30g (1/2 cup packed) cilantro leaves – Fresh herb that gives the sauce its signature bright flavor.
- 60ml (1/4 cup) plain yogurt or sour cream – Adds tanginess and extra creaminess to the sauce.
- Juice of 1 lime – Brings acidity that brightens all the flavors.
- 1/2 tsp salt – Enhances the sauce flavors.
- 1-2 tbsp water – Adjusts the sauce to your desired consistency.
Special Dietary Options
For those with dietary restrictions, here are some simple swaps that work beautifully:
- Gluten-free: Use corn tortillas instead of flour tortillas, and verify your enchilada sauce is gluten-free.
- Dairy-free: Substitute the cheese blend with dairy-free alternatives, though the crispy cheese effect may differ slightly.
- Lower calorie: Use ground turkey and reduce the cheese amount slightly while still achieving good flavor.
How to Prepare the Perfect Crispy Chicken Tacos: Step-by-Step Guide
Let me walk you through exactly how to create these incredible tacos. The process involves two main components: the flavorful meat filling and the refreshing avocado cilantro sauce. Both come together quickly, and the final pan-frying step creates that amazing crispy cheese exterior.
Preparing the Meat Filling
Start by heating a large skillet over medium heat. Add the tablespoon of olive oil and let it warm for about 30 seconds. Once the oil shimmers, add your diced onion and cook for 2-3 minutes until it becomes translucent and fragrant. This step builds the flavor foundation for your entire filling.
Add the ground chicken (or your chosen protein) to the pan with the onions. Break the meat apart with a wooden spoon or spatula as it cooks, ensuring even browning. Cook for about 8-10 minutes, stirring frequently, until no pink remains and the meat is fully cooked through. If you’re using ground beef, you may want to drain some of the excess fat at this point.
Adding Seasonings and Sauce
Once your meat is browned, it’s time to add all those wonderful seasonings. Sprinkle in the chipotle chili powder, ground cumin, garlic powder, and salt. Stir everything together for about a minute, allowing the spices to toast slightly and become fragrant. This step awakens all those aromatic compounds and intensifies the flavors.
Pour in the enchilada sauce and stir well to combine. Reduce the heat to medium-low and let the mixture simmer for 5-7 minutes. The sauce will thicken and coat the meat beautifully, creating a rich, flavorful filling that stays juicy inside the tacos. Remove from heat and set aside while you prepare the avocado cilantro sauce.
Making the Avocado Cilantro Sauce
While the meat filling simmers, you can work on the sauce. Place all the sauce ingredients into a blender or food processor: the ripe avocado, salsa verde, cilantro leaves, yogurt or sour cream, lime juice, salt, and water. Blend until completely smooth and creamy, about 30-45 seconds.
Taste the sauce and adjust the seasoning as needed. If it’s too thick, add more water a tablespoon at a time until you reach your desired consistency. The sauce should be pourable but still thick enough to cling to the tacos. Transfer to a serving bowl and set aside.
Pro tip: For the smoothest sauce, use a ripe avocado that yields slightly to gentle pressure. An underripe avocado will leave chunks, while an overripe one may have dark spots that affect the color.
Assembling the Tacos
Now comes the fun part assembling your tacos. Take each small flour tortilla and spoon a portion of the meat filling down the center. Don’t overstuff them, as you need to fold them tightly. Top each taco with some shredded Mexican cheese blend and a few jalapeño slices if you’re using them.
Fold each tortilla in half, pressing down gently but firmly to seal. The cheese inside will help hold everything together as it melts. Set the assembled tacos aside while you prepare your cooking pan.
Creating the Crispy Cheese Shell
Here’s where the magic happens. Heat a clean non-stick skillet over medium heat. You want it hot enough to melt and crisp the cheese quickly, but not so hot that it burns. Sprinkle a generous amount of the remaining Mexican cheese blend directly onto the pan in a line slightly longer than your folded taco.
Place a folded taco seam-side down on top of the melting cheese. Cook for 2-3 minutes until the cheese beneath creates a golden, lacy, crispy layer. The cheese will spread out slightly and bubble, creating that amazing crunchy shell around the bottom and sides of the taco.
Carefully flip the taco using a wide spatula. Cook the other side for another 1-2 minutes until all the cheese is crispy and golden. The exterior should be crunchy while the inside stays warm and melty. Remove from the pan and place on a paper towel-lined plate to drain any excess oil. Repeat with remaining tacos.
Serve your crispy chicken tacos warm with generous drizzles of the avocado cilantro sauce. The contrast between the hot, crunchy exterior and the cool, creamy sauce is absolutely sensational. For another delicious weeknight option, check out this taco casserole that’s perfect for feeding a crowd.
Protein and Main Component Alternatives
One of the best things about this crispy chicken tacos recipe is how adaptable it is to different proteins and dietary preferences. While ground chicken is delicious and lean, you have several excellent alternatives that each bring their own unique qualities to the dish.
Ground beef creates a richer, more traditional taco flavor. The higher fat content means the filling stays extra juicy, and the beef flavor stands up beautifully to the bold seasonings. Choose a lean ground beef (85-90% lean) for the best balance of flavor and health benefits. If you’re watching calories, ground turkey is an excellent option that’s very similar to chicken in texture and mildness. It absorbs the seasonings well and creates a lighter version of these tacos.
For a plant-based alternative, crumbled plant-based meat substitutes work surprisingly well. Season them exactly the same way and follow the same cooking process. The texture mimics ground meat closely, and when combined with all the spices and enchilada sauce, you’ll have a satisfying vegetarian version that even meat-eaters will enjoy.
Best Proteins for This Recipe
| Protein | Flavor Profile | Best For |
|---|---|---|
| Ground Chicken | Mild, absorbs seasonings well | Lighter meals, families |
| Ground Beef | Rich, traditional taco flavor | Classic taco lovers |
| Ground Turkey | Mild, very lean | Health-conscious cooks |
| Plant-based Crumbles | Similar to beef when seasoned | Vegetarian diets |
Vegetable, Sauce, and Seasoning Modifications
The beauty of tacos lies in their versatility. Once you master the basic technique, you can customize these crispy chicken tacos in countless ways. The seasonings and sauce components are easy to adjust based on your family’s preferences and what you have available.
If chipotle chili powder is too spicy for some family members, start with half the amount and offer hot sauce on the side. Regular chili powder works too, though you’ll lose that smoky depth. For more heat, add a pinch of cayenne pepper or use hot enchilada sauce instead of mild.
The avocado cilantro sauce is wonderfully adaptable. If you don’t have salsa verde, blend a small can of diced green chiles with a splash of lime juice for a similar tangy effect. Fresh cilantro is traditional, but if someone in your family dislikes it (it is genetic, after all), substitute with fresh parsley or simply leave it out for a milder avocado crema.
Consider adding vegetables to the filling for extra nutrition and texture. Diced bell peppers, zucchini, or mushrooms all sauté beautifully with the onions. Just remember to cook them until any excess moisture evaporates so your filling doesn’t become watery. For more healthy dinner ideas featuring chicken, you might enjoy this balsamic chicken breast recipe that’s equally weeknight-friendly.
Mastering Crispy Chicken Tacos: Advanced Tips and Variations
After making these tacos many times, I’ve gathered some tips that take them from great to absolutely outstanding. These little tricks ensure perfect results every time and give you ideas for keeping the recipe fresh.
Pro Cooking Techniques
- Cheese placement matters: Always place extra cheese directly in the pan before adding the taco. This creates that lacy, crispy shell that makes these tacos special.
- Temperature control: Keep your heat at medium. Too high and the cheese burns before crisping; too low and it spreads too much without getting crunchy.
- Don’t flip too early: Wait until the cheese is fully set and golden before flipping. Patience here rewards you with that perfect crunch.
- Use a wide spatula: A fish spatula or wide turner makes flipping these tacos much easier and prevents the crispy cheese from breaking.
Flavor Variations
Try these creative twists to change up the flavor profile:
- Spicy chipotle version: Add a minced chipotle pepper in adobo sauce to the meat filling for extra smoky heat.
- BBQ chicken tacos: Swap the enchilada sauce for BBQ sauce and add a tablespoon of brown sugar to the meat.
- Mediterranean style: Season the meat with oregano and lemon instead of Mexican spices, and top with feta and tzatziki.
Presentation Tips
Serve these tacos on a large platter with the avocado cilantro sauce in a small bowl for drizzling. Add lime wedges on the side for extra brightness. A sprinkle of fresh cilantro and a few extra jalapeño slices on top makes for a beautiful presentation. According to the National Chicken Council, chicken remains one of the most popular proteins for home cooks, and creative preparations like this help keep meals exciting.
Make-Ahead Options
The meat filling can be made up to 2 days ahead and stored in an airtight container in the refrigerator. The avocado cilantro sauce is best made fresh, but you can prep all the ingredients ahead and blend just before serving. Don’t assemble the tacos until you’re ready to cook them, as the tortillas will get soggy from the filling.
How to Store Crispy Chicken Tacos: Best Practices
Proper storage helps you enjoy leftovers safely and maintain quality. While these tacos are definitely best fresh and crispy, here’s how to store components for later enjoyment.
Refrigeration Guidelines
Store leftover meat filling in an airtight container in the refrigerator for up to 3 days. The avocado cilantro sauce should be stored separately with plastic wrap pressed directly onto its surface to prevent browning. It will keep for 1-2 days. Assembled but uncooked tacos can be refrigerated for up to 24 hours, though the tortillas may soften slightly.
Freezing Options
The meat filling freezes beautifully for up to 3 months. Portion it into freezer bags or containers, label with the date, and thaw overnight in the refrigerator before reheating. I don’t recommend freezing assembled tacos or the avocado sauce, as the textures won’t be the same after thawing.
Reheating for Best Results
To reheat the meat filling, warm it in a skillet over medium heat with a splash of water or broth to prevent drying. For the best taco experience, reheat the filling, then assemble and pan-fry fresh with cheese just before serving. If you have leftover cooked tacos, reheat them in a 350°F oven for about 5 minutes, or in an air fryer at 375°F for 3 minutes to restore some of the crispiness.
According to Harvard Health, avocados provide numerous health benefits including heart-healthy monounsaturated fats and fiber, making this sauce a nutritious addition to your meal.

FAQs: Frequently Asked Questions About Crispy Chicken Tacos
What kind of meat can I use in crispy chicken tacos?
Ground chicken is the star for classic crispy chicken tacos, but you can swap it with ground beef or turkey for variety. Ground chicken cooks quickly and stays juicy when seasoned with taco spices like cumin, chili powder, garlic, and onion. Brown 1 pound of meat in a skillet over medium heat for 8-10 minutes until no pink remains, then drain excess fat. Beef adds a richer flavor, while turkey keeps it lighter. Use what your family likes— all pair well with the crispy cheese shell and fresh toppings. This flexibility makes the recipe family-friendly and easy to adapt. (78 words)
How do you make avocado cilantro sauce for crispy chicken tacos?
Blend 1 ripe avocado, 1/2 cup salsa verde, 1/4 cup fresh cilantro leaves, 2 tablespoons plain yogurt or sour cream, and 1/4 teaspoon salt until smooth, about 30 seconds in a food processor. Add a squeeze of lime juice for brightness if desired. The sauce takes under 5 minutes and adds creamy, tangy contrast to the crunchy tacos. Chill it for 15 minutes to let flavors meld. Store leftovers in an airtight container in the fridge for up to 2 days. Drizzle or dollop on tacos for the full effect. (92 words)
What cheeses work best for the crispy layer on chicken tacos?
Use a mix of melty cheeses like 1/2 cup shredded pepper jack for spice, 1/4 cup Monterey Jack for smoothness, and 1/4 cup cheddar for sharpness. These create a golden, lacy crisp when heated. Shred fresh for even melting—pre-shredded has additives that prevent crisping. Sprinkle about 1/3 cup per taco base. Avoid mozzarella alone as it can get rubbery. This combo gives texture and flavor that holds the taco together perfectly. Prep cheese ahead for quick assembly. (85 words)
How do you cook crispy cheese chicken tacos in a skillet?
Heat a non-stick skillet over medium. Arrange 4-5 jalapeño slices in a line, top with 1/3 cup cheese blend, then place a tortilla filled with seasoned ground chicken, lettuce, and tomatoes on the cheese. Cook 2-3 minutes until cheese bubbles and crisps on the bottom. Use a wide spatula to gently fold the cheese over the taco, forming a shell. Flip and cook 1-2 more minutes until crisp all over. Drain on paper towels. Makes 4 tacos in 15 minutes total. (94 words)
Can I skip the sauce or make crispy chicken tacos ahead of time?
The avocado cilantro sauce ties everything together with creaminess, so it’s best not to skip it—but try Greek yogurt mixed with lime and cilantro as a quick sub. For make-ahead, cook the filling up to 2 days in advance and store in the fridge. Assemble and crisp cheese just before serving to keep it crunchy. Reheat tacos in a 350°F oven for 5 minutes or air fryer at 375°F for 3 minutes. Freezes well for up to 1 month; thaw overnight. Serves 4 easily. (89 words)

Crispy Chicken Tacos
- Total Time: 45 minutes
- Yield: 6 servings
- Diet: High-Protein
Description
🌮 Discover crispy cheese-crusted chicken tacos that deliver restaurant-quality crunch and flavor at home – a game-changer for taco nights!
🥑 Balanced with creamy, zesty avocado cilantro sauce, it’s packed with protein and ready in just 45 minutes for effortless meals.
Ingredients
– 450g (1 lb) ground chicken, beef, or turkey for star protein
– 1 tbsp olive oil for browning the meat
– 1 small diced onion for sweetness and depth
– 1 tbsp chipotle chili powder for smoky heat
– 1 tsp ground cumin for earthy notes
– 1 tsp garlic powder for savory depth
– 1 tsp salt for enhancing flavors
– 120ml (1/2 cup) enchilada sauce for coating the meat
– 340g (12 oz) Mexican cheese blend for crispy shell
– 8-10 jalapeño slices for heat
– 6-8 small flour tortillas for taco base
– 1 ripe avocado for creamy base
– 120ml (1/2 cup) salsa verde for tangy flavor
– 30g (1/2 cup packed) cilantro leaves for bright flavor
– 60ml (1/4 cup) plain yogurt or sour cream for tanginess and creaminess
– Juice of 1 lime for acidity
– 1/2 tsp salt for enhancing flavors
– 1-2 tbsp water for consistency
Instructions
1-Preparing the Meat Filling: Start by heating a large skillet over medium heat. Add the tablespoon of olive oil and let it warm for about 30 seconds. Once the oil shimmers, add your diced onion and cook for 2-3 minutes until it becomes translucent and fragrant. This step builds the flavor foundation for your entire filling. Add the ground chicken (or your chosen protein) to the pan with the onions. Break the meat apart with a wooden spoon or spatula as it cooks, ensuring even browning. Cook for about 8-10 minutes, stirring frequently, until no pink remains and the meat is fully cooked through. If you’re using ground beef, you may want to drain some of the excess fat at this point.
2-Adding Seasonings and Sauce: Once your meat is browned, it’s time to add all those wonderful seasonings. Sprinkle in the chipotle chili powder, ground cumin, garlic powder, and salt. Stir everything together for about a minute, allowing the spices to toast slightly and become fragrant. This step awakens all those aromatic compounds and intensifies the flavors. Pour in the enchilada sauce and stir well to combine. Reduce the heat to medium-low and let the mixture simmer for 5-7 minutes. The sauce will thicken and coat the meat beautifully, creating a rich, flavorful filling that stays juicy inside the tacos. Remove from heat and set aside while you prepare the avocado cilantro sauce.
3-Making the Avocado Cilantro Sauce: While the meat filling simmers, you can work on the sauce. Place all the sauce ingredients into a blender or food processor: the ripe avocado, salsa verde, cilantro leaves, yogurt or sour cream, lime juice, salt, and water. Blend until completely smooth and creamy, about 30-45 seconds. Taste the sauce and adjust the seasoning as needed. If it’s too thick, add more water a tablespoon at a time until you reach your desired consistency. The sauce should be pourable but still thick enough to cling to the tacos. Transfer to a serving bowl and set aside.
4-Assembling the Tacos: Now comes the fun part assembling your tacos. Take each small flour tortilla and spoon a portion of the meat filling down the center. Don’t overstuff them, as you need to fold them tightly. Top each taco with some shredded Mexican cheese blend and a few jalapeño slices if you’re using them. Fold each tortilla in half, pressing down gently but firmly to seal. The cheese inside will help hold everything together as it melts. Set the assembled tacos aside while you prepare your cooking pan.
5-Creating the Crispy Cheese Shell: Here’s where the magic happens. Heat a clean non-stick skillet over medium heat. You want it hot enough to melt and crisp the cheese quickly, but not so hot that it burns. Sprinkle a generous amount of the remaining Mexican cheese blend directly onto the pan in a line slightly longer than your folded taco. Place a folded taco seam-side down on top of the melting cheese. Cook for 2-3 minutes until the cheese beneath creates a golden, lacy, crispy layer. The cheese will spread out slightly and bubble, creating that amazing crunchy shell around the bottom and sides of the taco. Carefully flip the taco using a wide spatula. Cook the other side for another 1-2 minutes until all the cheese is crispy and golden. The exterior should be crunchy while the inside stays warm and melty. Remove from the pan and place on a paper towel-lined plate to drain any excess oil. Repeat with remaining tacos. Serve your crispy chicken tacos warm with generous drizzles of the avocado cilantro sauce. The contrast between the hot, crunchy exterior and the cool, creamy sauce is absolutely sensational.
Notes
🧀 Use a melty Mexican cheese blend like pepper jack and Monterey jack for the crispiest shell.
🌶️ Add extra jalapeños or hot sauce for customizable heat levels.
🚫 Avoid overstuffing tortillas to prevent bursting during frying.
- Prep Time: 20 minutes
- Cook Time: 25 minutes
- Category: Main Course
- Method: Pan-Fry
- Cuisine: Mexican
Nutrition
- Serving Size: 1-2 tacos
- Calories: 737 kcal
- Sugar: 5g
- Sodium: 1200mg
- Fat: 45g
- Saturated Fat: 15g
- Unsaturated Fat: 28g
- Trans Fat: 0g
- Carbohydrates: 45g
- Fiber: 5g
- Protein: 35g
- Cholesterol: 100mg
Keywords: Crispy Cheese Tacos, Chicken Tacos, Avocado Cilantro Sauce, Queso Tacos