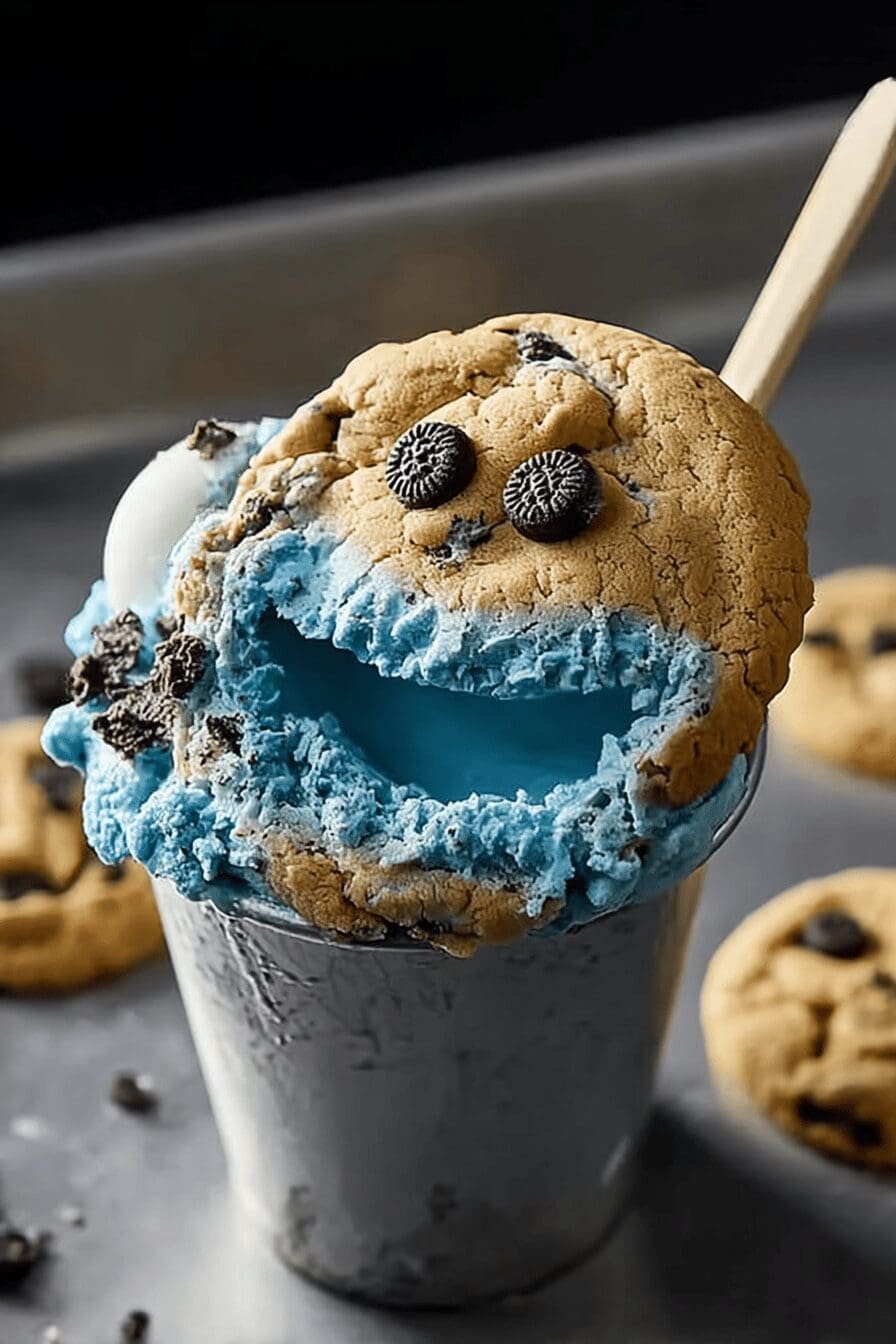
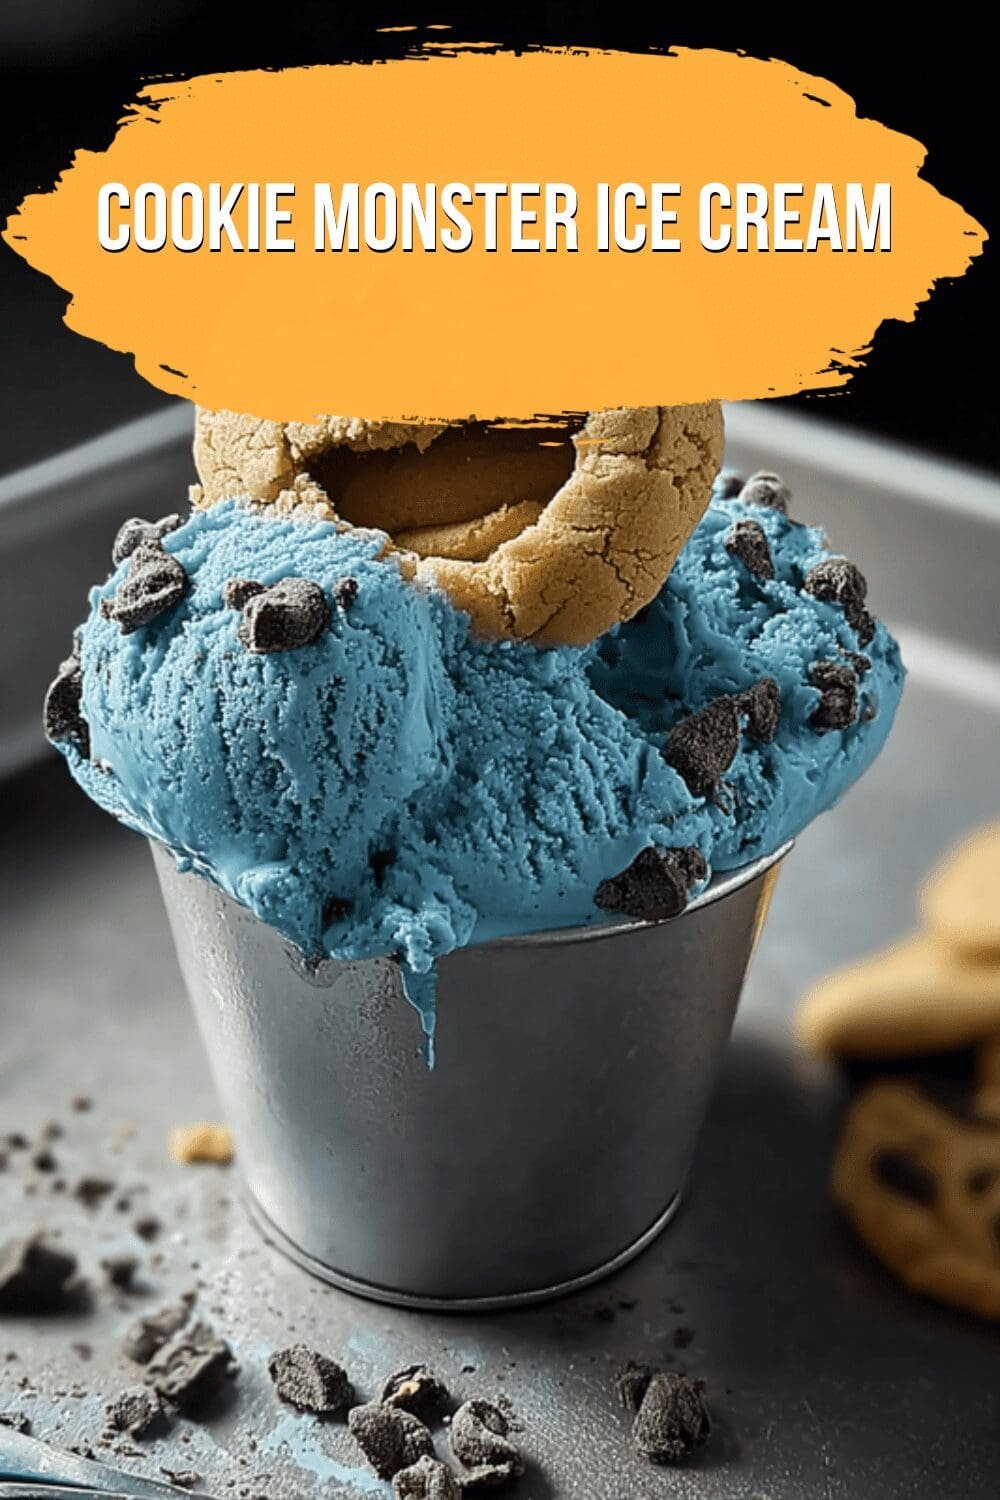
Why You’ll Love This Cookie Monster Ice Cream
This Cookie Monster Ice Cream recipe is a fun and easy way to bring a burst of color and crunch to your dessert table, perfect for home cooks looking for something simple yet exciting. With its no-cook, no-churn method, you can whip up a rich and creamy treat using just a few basic ingredients, making it ideal for busy parents or students who want something homemade without spending hours in the kitchen. Let’s dive into what makes this recipe a hit for everyone from baking enthusiasts to those watching their diet.
First, the ease of preparation stands out. This recipe requires no special equipment beyond a mixer and a freezer. You’ll only need a few minutes to chop the cookies and combine everything, with the rest of the time handled by freezing. It’s all about enjoying a colorful dessert that combines crunchy cookie pieces with a smooth base for a delightful texture that kids and adults alike will love.
Health-wise, it offers some surprising benefits. Made with ingredients like heavy whipping cream and sweetened condensed milk, it provides essential nutrients such as vitamin A, calcium, and iron, which support overall wellness. While it’s indulgent, you can tweak it for lower-calorie versions, appealing to diet-conscious individuals who want a treat without overindulging.
The versatility is another highlight. This Cookie Monster Ice Cream easily adapts to different needs, like using plant-based milk for vegans or gluten-free cookies for those with restrictions. Plus, the distinctive flavor from the blue gel food coloring and vanilla extract creates a vibrant, fun twist that sets it apart, making it a great option for parties or family gatherings.
Key Features That Make It Special
- Minimal prep time: Just 3 minutes for chopping cookies, 5 minutes for whipping cream, and 3 minutes for combining, plus freezing.
- Balanced texture: Tips like cutting cookies into 1/2-inch pieces ensure every bite has the perfect crunch.
- Vibrant color: Gel food coloring keeps the blue shade bold without changing the creamy consistency.
For more ideas on fun desserts, check out our Blueberry Cottage Cheese Ice Cream Recipe for another refreshing twist.
Jump To
- 1. Why You’ll Love This Cookie Monster Ice Cream
- 2. Essential Ingredients for Cookie Monster Ice Cream
- 3. How to Prepare the Perfect Cookie Monster Ice Cream: Step-by-Step Guide
- 4. Dietary Substitutions to Customize Your Cookie Monster Ice Cream
- 5. Mastering Cookie Monster Ice Cream: Advanced Tips and Variations
- 6. How to Store Cookie Monster Ice Cream: Best Practices
- 7. FAQs: Frequently Asked Questions About Cookie Monster Ice Cream
- 8. Cookie Monster Ice Cream
Essential Ingredients for Cookie Monster Ice Cream
Gathering the right ingredients is key to making this Cookie Monster Ice Cream recipe with homemade cookie pieces come out perfectly. This no-cook, no-churn version focuses on simple, accessible items that create a rich and creamy base with plenty of crunch. Below is a detailed list of everything you’ll need, based on the exact recipe requirements.
Main Ingredients
- 2 cups (1 pint) heavy whipping cream – for the creamy base.
- 1 tablespoon vanilla extract – to add depth of flavor.
- 1/2 teaspoon blue gel food coloring – for the vibrant blue color.
- One 14-ounce (approximately 396 grams) can of sweetened condensed milk – to sweeten and thicken the mixture.
- 20 chopped cookies of one type – cut into approximately 1/2-inch pieces for texture.
- 15 chopped cookies of another type – also in 1/2-inch pieces to vary the crunch.
This structured list ensures you have precise measurements for each item, making it easy to prepare without any guesswork. Remember, sticking to these base ingredients helps maintain the optimal texture, though you can experiment with different cookie types for a personal touch.
How to Prepare the Perfect Cookie Monster Ice Cream: Step-by-Step Guide
Creating this Cookie Monster Ice Cream is straightforward and fun, perfect for home cooks who want a homemade treat without much fuss. This no-churn method means you don’t need an ice cream maker, just a bowl and a freezer to get that creamy texture with crunchy cookie pieces. Follow these steps to make your own batch of this colorful dessert.
- First, gather all your ingredients and prepare your workspace to make the process smooth.
- In a mixing bowl, whip the 2 cups of heavy whipping cream, 1 tablespoon of vanilla extract, and 1/2 teaspoon of blue gel food coloring until stiff peaks form, which takes about 5 minutes for a perfect consistency.
- Beat in the one 14-ounce can of sweetened condensed milk on low speed until it’s fully combined with the whipped mixture, taking around 3 minutes to ensure everything blends smoothly.
- Fold in the 20 chopped cookies of one type and 15 chopped cookies of another type gently to distribute the pieces evenly without deflating the cream.
- Transfer the mixture to a loaf pan or similar container, top with additional cookie pieces for extra crunch, cover it, and freeze for at least 6 hours or overnight for the best results.
With this method, you’ll have a rich and creamy ice cream that’s full of flavor in no time. For tips on achieving stiff peaks, remember that the cream should hold its shape, as this ensures the final product isn’t too icy. If you’re interested in more no-bake options, explore our No-Bake Chocolate Cream Pie for another easy recipe.

Dietary Substitutions to Customize Your Cookie Monster Ice Cream
Making this Cookie Monster Ice Cream adaptable means everyone can enjoy it, whether you’re a busy parent or a health-focused food enthusiast. By swapping a few items, you can tailor the recipe to fit various dietary needs while keeping that creamy texture and crunchy cookie pieces intact. These changes are simple and keep the fun alive in your dessert.
For protein and main component alternatives, you could replace the heavy whipping cream with coconut cream for a vegan option. Use plant-based milk if you’re dealing with lactose intolerance, as it blends well with the sweetened condensed milk base.
When it comes to vegetable, sauce, and seasoning modifications, try swapping vanilla extract with almond extract for a new flavor twist. Natural sweeteners like agave can replace parts of the condensed milk, and adding fruits like mashed blueberries could make it fruitier for seasonal variations.
Easy Customizations
- Use gluten-free cookies to keep the crunch without gluten.
- Opt for low-calorie sweeteners if you’re watching sugar intake.
- Experiment with different extracts for unique tastes, ensuring the blue gel food coloring stays for that signature look.
Mastering Cookie Monster Ice Cream: Advanced Tips and Variations
Taking your Cookie Monster Ice Cream to the next level involves some pro cooking techniques that enhance both texture and flavor. For a smoother result, chill the base mixture before freezing, and consider using a compressor for even better consistency. These tips build on the basic recipe to make it even more appealing for baking enthusiasts.
Flavor variations can add excitement, like mixing in crushed peppermint or caramel for a fresh spin on the classic. Presentation is key too; serve it in chilled bowls with garnishes such as whole cookies or sprinkles to wow your guests at family events.
Make-ahead options are great for working professionals. Prepare the whipped cream base and cookie mix separately, then combine them later for convenience. Always use gel food coloring to keep the vibrant blue without affecting the mix’s consistency.
Expert Advice for Better Results
| Technique | Benefit |
|---|---|
| Chill base overnight | Improves texture and reduces ice crystals |
| Cut cookies into 1/2-inch pieces | Ensures balanced crunch in every scoop |
| Add flavor twists | Allows customization for different tastes |
How to Store Cookie Monster Ice Cream: Best Practices
Proper storage keeps your Cookie Monster Ice Cream tasting fresh and scoopable, which is essential for busy families or seniors who like to prepare ahead. Freezing is the main method, as it preserves the creamy texture and crunchy cookie pieces for up to two weeks. Follow these guidelines to maintain quality without any hassle.
For long-term preservation, always use a tightly sealed container to avoid ice crystals forming on the surface. If you need to soften it quickly, let it sit at room temperature for a few minutes rather than reheating, as this ice cream is best enjoyed cold.
Meal prep ideas include freezing in individual portions for easy access, and labeling with dates helps track freshness. Remember the nutritional info per serving: about 487 calories, 51 grams carbohydrates, 6 grams protein, 29 grams fat (with 16 grams saturated fat), 216 mg sodium, and 38 grams sugar, plus small amounts of vitamin C and potassium.
FAQs: Frequently Asked Questions About Cookie Monster Ice Cream
What ingredients do I need to make Cookie Monster Ice Cream at home?
To make Cookie Monster Ice Cream, you typically need vanilla ice cream as a base, blue food coloring to achieve the signature color, crushed chocolate sandwich cookies (like Oreos), and sometimes chocolate chips or cookie dough pieces. You can customize your recipe by adding mix-ins such as rainbow sprinkles or fudge swirls. Using gel food coloring is recommended to avoid altering the ice cream’s texture, as it adds vivid color without extra liquid.
How can I get the bright blue color in Cookie Monster Ice Cream without affecting the taste?
Use gel food coloring instead of liquid food coloring to achieve the bright blue color in Cookie Monster Ice Cream. Gel colorings provide strong pigmentation with minimal moisture, preserving the ice cream’s creamy texture and flavor. Add the gel coloring gradually while mixing the melted vanilla ice cream base until you reach your preferred shade of blue. Avoid artificial dyes if you prefer a natural option, though these may tint the color less vibrantly.
Can Cookie Monster Ice Cream be made without an ice cream maker?
Yes, you can make Cookie Monster Ice Cream without an ice cream maker using a no-churn method. Soften vanilla ice cream slightly, stir in blue gel food coloring and crushed cookies thoroughly, then freeze the mixture in an airtight container for several hours to firm up. This method requires less effort and equipment but still delivers a creamy texture with crunchy cookie pieces.
What types of cookies work best in Cookie Monster Ice Cream?
Chocolate sandwich cookies like Oreos are the classic choice for Cookie Monster Ice Cream because they provide a crunchy texture and rich chocolate flavor that contrasts nicely with the sweet vanilla base. You can also use chocolate chip cookies, cookie dough chunks, or even double-stuffed varieties for extra indulgence. Make sure to crush the cookies into bite-sized pieces to evenly disperse throughout the ice cream.
How should I store Cookie Monster Ice Cream to keep it fresh and scoopable?
Store Cookie Monster Ice Cream in an airtight container in the freezer to prevent ice crystals and freezer burn. Place a piece of parchment or plastic wrap directly on the surface before sealing to minimize exposure to air. For easier scooping, let the ice cream sit at room temperature for 5-10 minutes before serving. Proper storage keeps the texture creamy and the cookie pieces crunchy.

Cookie Monster Ice Cream
- Total Time: 6 hours 10 minutes or overnight
- Yield: 8 servings
- Diet: Vegetarian
Description
🍪 Dive into the fun and vibrant Cookie Monster Ice Cream, a colorful treat loaded with homemade cookie pieces for delightful texture.
🍨 This no-churn recipe is quick and easy, perfect for anyone craving a creamy, sweet dessert with a playful twist.
Ingredients
– 2 cups (1 pint) heavy whipping cream for the creamy base
– 1 tablespoon vanilla extract to add depth of flavor
– 1/2 teaspoon blue gel food coloring for the vibrant blue color
– One 14-ounce (approximately 396 grams) can of sweetened condensed milk to sweeten and thicken the mixture
– 20 chopped cookies of one type cut into approximately 1/2-inch pieces for texture
– 15 chopped cookies of another type also in 1/2-inch pieces to vary the crunch
Instructions
1-First, gather all your ingredients and prepare your workspace to make the process smooth.
2-In a mixing bowl, whip the 2 cups of heavy whipping cream, 1 tablespoon of vanilla extract, and 1/2 teaspoon of blue gel food coloring until stiff peaks form, which takes about 5 minutes for a perfect consistency.
3-Beat in the one 14-ounce can of sweetened condensed milk on low speed until it’s fully combined with the whipped mixture, taking around 3 minutes to ensure everything blends smoothly.
4-Fold in the 20 chopped cookies of one type and 15 chopped cookies of another type gently to distribute the pieces evenly without deflating the cream.
5-Transfer the mixture to a loaf pan or similar container, top with additional cookie pieces for extra crunch, cover it, and freeze for at least 6 hours or overnight for the best results.
Notes
🎨 Use gel food coloring to get a vibrant blue without affecting the ice cream’s texture.
🍪 Chop cookies into roughly ½ inch pieces to balance crunch with creaminess.
❄️ Make sure the whipped cream reaches stiff peaks to maintain the ice cream’s fluffy consistency.
- Prep Time: 10 minutes
- Freezing Time: 6 hours or overnight
- Category: Dessert
- Method: No-Churn
- Cuisine: American
Nutrition
- Serving Size: 1 serving
- Calories: 487 kcal
- Sugar: 38 g
- Sodium: 216 mg
- Fat: 29 g
- Saturated Fat: 16 g
- Unsaturated Fat: 10 g
- Trans Fat: 0 g
- Carbohydrates: 51 g
- Fiber: 1 g
- Protein: 6 g
- Cholesterol: 100 mg
Keywords: Cookie Monster, Ice Cream, Homemade Cookies, No-Churn