Why You’ll Love This Chocolate Vanilla Dream Dessert
Have you ever craved a dessert that perfectly balances rich chocolate with smooth vanilla in a way that feels both comforting and special? This Chocolate Vanilla Dream Dessert has become a staple in my home for years, bringing smiles to faces at family gatherings and casual weeknights alike. The beauty of this dessert lies in its combination of simplicity and sophistication. With preparation time of just 20 minutes and cooking time of only 15 minutes, you can create a magnificent treat that looks and tastes like it required hours of expert preparation. This recipe yields 12-15 servings, making it perfect for parties, holiday celebrations, or simply stocking your refrigerator with a go-to sweet treat throughout the week.I’ve been making this chocolate dessert for every gathering for over a decade, and my friends now request it whenever they come to visit it’s become our signature dessert that brings everyone together.One of the aspects I most appreciate about this recipe is how it showcases the wonderful combination of chocolate and vanilla. The subtle yet delicious chocolate flavor makes it a family favorite, while the smooth vanilla pudding layer adds a creamy contrast that pleases even the pickiest eaters. Unlike some intense chocolate desserts that can overwhelm the palate, this recipe achieves a perfect balance.
Perfect for Every Occasion
Whether you’re hosting a dinner party, bringing a dish to a potluck, or simply treating your family on a Tuesday night, this dessert adapts beautifully to any setting. The elegant layered appearance makes it look fancy enough for special occasions, while the simple preparation makes it accessible for everyday enjoyment.| Preparation Time | Cooking Time | Chilling Time | Servings |
|---|---|---|---|
| 20 minutes | 15 minutes | Until firm | 12-15 servings |
Health Benefits of Dark Chocolate
While desserts should always be enjoyed in moderation, this recipe does incorporate some ingredients that offer nutritional benefits. According to research, dark chocolate contains beneficial compounds that can support heart health and provide antioxidants. For more information on the health benefits of dark chocolate, various studies highlight its potential advantages when consumed as part of a balanced diet.Jump To
- 1. Why You’ll Love This Chocolate Vanilla Dream Dessert
- 2. Essential Ingredients for Chocolate Vanilla Dream Dessert
- 3. How to Prepare the Perfect Chocolate Vanilla Dream Dessert: Step-by-Step Guide
- 4. Dietary Substitutions to Customize Your Chocolate Vanilla Dream Dessert
- 5. Mastering Chocolate Vanilla Dream Dessert: Advanced Tips and Variations
- 6. How to Store Chocolate Vanilla Dream Dessert: Best Practices
- 7. FAQs: Frequently Asked Questions About Chocolate Vanilla Dream Dessert
- 8. Chocolate Vanilla Dream Dessert
Essential Ingredients for Chocolate Vanilla Dream Dessert
Creating the perfect Chocolate Vanilla Dream Dessert begins with gathering quality ingredients. The beauty of this recipe lies in its simple components that come together to create something truly special. Each ingredient plays a specific role in building the layers of flavor and texture that make this dessert so memorable.Crust Ingredients:
- 1 cup all-purpose flour
- 1 cup finely chopped pecans
- 1/2 cup cold butter
Filling Ingredients:
- 8 ounces cream cheese, softened
- 1 cup confectioners’ sugar
- 8 ounces whipped topping, thawed, divided
- 3.4 ounces vanilla-flavored instant pudding mix
- 3.9 ounces chocolate-flavored instant pudding mix
- 3 cups cold whole milk
- 1 chocolate bar, grated
Understanding Ingredient Roles
Each ingredient in this recipe serves a specific purpose that contributes to the final taste and texture: The flour and pecans in the crust create a sturdy yet crumbly base that holds up well to the creamy layers. When pressed into the pan and baked, they form a delightful contrast to the smooth fillings. The butter in the crust binds everything together while adding richness and contributing to that wonderful golden-brown color when baked. In the filling, the cream cheese provides a tangy backdrop that balances the sweetness of the confectioners’ sugar. When beaten with half of the whipped topping, it creates a light, creamy layer that serves as the perfect canvas for the pudding mixture. The combination of vanilla and chocolate pudding mixes creates a distinctive flavor profile that sets this dessert apart. Using both flavors allows for complexity while maintaining the comforting familiarity of classic tastes. The cold milk is essential for activating the pudding mixes and achieving that perfect soft-set consistency. Finally, the remaining whipped topping and grated chocolate bar add visual appeal and a final burst of flavor that makes each bite special. The fluffy whipped topping provides airiness, while the chocolate adds a slightly more intense finish to each serving.Pro Tip: When I first started making this dessert, I was tempted to skip chilling it thoroughly. Don’t make this mistake! The chilling time is essential for the pudding to set properly, ensuring clean slices and the best texture.This Chocolate Vanilla Dream Dessert uses ingredients that are readily available in most grocery stores, making it accessible without requiring specialty items. If you enjoy recipes that feed a crowd with simple ingredients, you might also want to try my million-dollar lasagna, another favorite that’s perfect for gatherings.
How to Prepare the Perfect Chocolate Vanilla Dream Dessert: Step-by-Step Guide
Now that we’ve covered all the ingredients, it’s time to dive into the preparation process. This method will guide you through creating a beautiful and delicious dessert that will impress everyone who tries it. The key to success is following each step carefully and allowing appropriate time for chilling between layers.Creating the Perfect Crust
The foundation of any great layered dessert is its crust, and this one is both simple and delicious: 1. Combine 1 cup all-purpose flour and 1 cup finely chopped pecans in a medium bowl. Mix these dry ingredients thoroughly to ensure even distribution. 2. Cut in 1/2 cup cold butter using a pastry blender or two forks until the mixture resembles fine crumbs. This step is crucial for creating that perfect crumbly texture that will hold together when baked. The butter should be cold to prevent it from melting into the flour too quickly. 3. Press the mixture firmly and evenly into a 13×9-inch baking pan. Creating a uniform thickness across the entire pan ensures even baking and prevents portions of the crust from burning. Use the bottom of a measuring cup or glass to help press the mixture firmly into place. 4. Bake at 350°F (175°C) for 15-20 minutes until golden brown. Keep a close eye on the crust as it bakes, as oven temperatures can vary. The crust should smell fragrant and have a beautiful golden color when done. 5. Cool completely on a wire rack. This step is essential attempting to spread the filling on a warm crust will result in melting and a less-than-ideal texture. I recommend allowing at least 30 minutes for proper cooling.Building the Cream Cheese Layer
With your crust cooled and ready, it’s time to create the first creamy layer: 1. In a large bowl, beat 8 ounces softened cream cheese, 1 cup confectioners’ sugar, and half of the whipped topping (4 ounces) until smooth. For best results, make sure your cream cheese is truly softened to room temperature this prevents lumps in your mixture. 2. Use an electric mixer on medium speed to achieve the smoothest consistency. Scrape down the sides of the bowl occasionally to ensure all ingredients are fully incorporated. 3. Spread the mixture evenly over the cooled crust. An offset spatula works wonderfully for this task, allowing you to create a smooth, level layer. Be gentle to avoid lifting the crust as you spread.Adding the Pudding Layer
The pudding layer is where the chocolate and vanilla flavors really come together: 1. In a separate bowl, whisk both pudding mixes (3.4 ounces vanilla-flavored and 3.9 ounces chocolate-flavored) with 3 cups cold whole milk for 2 minutes until soft-set. Using both flavors together creates that distinctive taste that makes this dessert special. 2. It’s important to whisk continuously during this process to prevent lumps and ensure the pudding mixes dissolve completely. The mixture will begin to thicken as you whisk. 3. Immediately spread the pudding mixture over the cream cheese layer. Work quickly once the pudding reaches soft-set stage, as it will continue to thicken. Again, an offset spatula is your best tool for creating an even layer.Finishing the Dessert
The final steps transform your layered creation into a masterpiece: 1. Chill the dessert until the pudding layer is firm. This typically takes at least 2 hours in the refrigerator, but timing can vary. The pudding should be set to the touch and not jiggle when you gently shake the pan. 2. Once the pudding layer is firm, spread the remaining whipped topping (4 ounces) evenly over the top. This creates a beautiful contrast between the dark pudding and the light topping. 3. Grate 1 chocolate bar over the top for the final touch. Using a vegetable peeler or box grater creates delicate curls or shavings that make the dessert look as good as it tastes. 4. Refrigerate until ready to serve. The dessert can be made a day in advance, and many find that the flavors actually improve after several hours in the refrigerator.My grandmother always said that patience was the secret ingredient in any great dessert. With this recipe, that patience comes during the chilling time. Rushing this step is the one mistake I see most people make when preparing this dessert for the first time.

Dietary Substitutions to Customize Your Chocolate Vanilla Dream Dessert
One of the wonderful aspects of this Chocolate Vanilla Dream Dessert is its adaptability. Whether you’re accommodating dietary restrictions or simply experimenting with new flavors, there are numerous substitutions you can make while maintaining the dessert’s essential character.Protein and Main Component Alternatives
For those avoiding dairy or looking for different protein options, consider these alternatives: • Replace the cream cheese with dairy-free cream cheese alternatives made from almonds, cashews, or coconut. These products have improved significantly in recent years and can provide a similar texture and tangy flavor profile. • Instead of whipped topping, make your own stabilized whipped cream using coconut cream for a dairy-free option. Simply chill a can of full-fat coconut milk overnight, then scoop out the solid cream and whip it with a bit of powdered sugar and vanilla extract. • For the pudding layer, create your own chocolate and vanilla pudding using cornstarch, alternative milks, cocoa powder, and natural sweeteners. This process takes slightly longer than using instant pudding but gives you complete control over the ingredients.Vegetable, Sauce, and Seasoning Modifications
The crust and garnish components can be easily customized to suit different tastes and dietary needs: • Replace the pecans in the crust with almonds, walnuts, or seeds like sunflower or pumpkin seeds for those with nut allergies. For a nut-free option, consider using crushed gluten-free pretzels or rice cereal. • Experiment with adding seasonings to the crust such as cinnamon, nutmeg, or a pinch of sea salt to enhance the flavor complexity. • Infuse the milk for the pudding layer with complementary flavors before making the pudding. Simply warm the milk gently with split vanilla beans, orange zest, or even tea leaves like Earl Grey, then cool completely before using. • For the chocolate garnish, try using different types of chocolate semi-sweet, milk chocolate, or even white chocolate depending on your preference. Each will create a slightly different flavor profile and appearance.Sweetener Adjustments
For those looking to reduce refined sugars, there are several options: • Replace the confectioners’ sugar with a powdered natural sweetener like erythritol or monk fruit sweetener. These provide sweetness with minimal impact on blood sugar levels. • Choose unsweetened plant-based milk alternatives for the pudding layer if using commercial pudding mixes, as these already contain sweeteners. • Reduce the amount of chocolate in both the pudding layer and garnish if you prefer a less sweet dessert. You can compensate by increasing the vanilla flavor or adding complementary ingredients like raspberry puree between layers. Remember that when making substitutions, you may need to adjust quantities slightly to achieve the desired consistency and flavor balance. The beauty of this recipe is its forgiving nature it tends to turn out delicious even with modifications.Mastering Chocolate Vanilla Dream Dessert: Advanced Tips and Variations
Once you’ve mastered the basic recipe, you might want to experiment with more advanced techniques and variations to make this dessert uniquely yours. These tips will help you elevate an already wonderful dessert to something truly spectacular.Pro Cooking Techniques
• For an ultra-smooth cream cheese layer, bring the cream cheese to full room temperature and beat it alone before adding the powdered sugar. This prevents any potential lumps and creates a silkier texture. • When making the pudding layer, temper it by gradually adding the milk while whisking continuously. This technique prevents the pudding mix from clumping and ensures a perfectly smooth consistency without lumps. • To create decorative layers, reserve a small portion of the cream cheese mixture and tint it with food coloring or cocoa powder. Use this to create patterns or designs before adding the pudding layer.Flavor Variations
• Add a tablespoon of instant espresso powder to the chocolate pudding mix to intensify the chocolate flavor and add depth. This doesn’t make the dessert taste like coffee but rather enhances the chocolate notes. • Incorporate citrus zest (orange or lemon) into the cream cheese layer for a bright, fresh contrast to the rich chocolate and vanilla flavors. • For a mint chocolate variation, add a few drops of peppermint extract to the pudding layer and garnish with crushed peppermint candies instead of grated chocolate. • Create a mocha version by adding dissolved instant coffee to both the cream cheese layer and the pudding mixture. The result is a sophisticated dessert that coffee lovers will adore.Presentation Tips
• Use a piping bag to apply the whipped topping instead of spreading it. This creates a more professional appearance and allows for decorative swirls and patterns. • Create a chocolate lattice on top by melting a small amount of chocolate and piping it in a crisscross pattern over the whipped topping. This adds both visual interest and an extra layer of chocolate flavor. • Serve the dessert with complementary accompaniments such as fresh raspberries, strawberries, or a drizzle of raspberry or caramel sauce on the plate. • For individual servings, use cookie cutters to create shapes after chilling, or prepare the dessert in individual serving dishes or glasses for a more upscale presentation.Make-Ahead Options
• Prepare the crust up to two days in advance and store it in an airtight container at room temperature. • The cream cheese layer can be prepared separately and refrigerated for up to 24 hours before spreading onto the crust. • For maximum convenience, prepare the entire dessert up to 24 hours ahead, but wait to add the final whipped topping and chocolate garnish until a few hours before serving to maintain their fresh appearance. • This dessert freezes well for up to one month. Freeze without the whipped topping and garnish, then thaw completely in the refrigerator before adding the final touches before serving.I once prepared this dessert for a cooking competition where time was of the essence. By making the crust and cream cheese layer the day before, I was able to assemble the final dessert quickly and focus on presentation and ended up winning first place!
How to Store Chocolate Vanilla Dream Dessert: Best Practices
Proper storage is essential for maintaining the quality and safety of your Chocolate Vanilla Dream Dessert. Following these guidelines will ensure that every serving tastes as fresh and delicious as when first prepared.Refrigeration Guidelines
Since this dessert contains dairy products and eggs (in the pudding mix), refrigeration is necessary. Store the dessert in an airtight container in the refrigerator for up to 4 days. If your baking pan doesn’t come with a lid, you can cover it tightly with plastic wrap or aluminum foil, or transfer individual portions to airtight containers. When refrigerating, place the dessert on a level shelf away from strong-smelling foods, as the whipped cream layer can absorb odors. For best quality, keep the refrigerator temperature at or below 40°F (4°C).Freezing Instructions
For longer storage, this dessert can be frozen successfully. To freeze, first ensure the dessert is completely set. Then, cut it into individual portions for easier thawing later. Wrap each portion tightly in plastic wrap, followed by a layer of aluminum foil, or place them in freezer-safe containers or bags. Properly stored, the dessert will maintain good quality for up to 3 months in the freezer. Be sure to label each package with the name of the dessert and the date it was frozen.Thawing and Reheating Guidelines
To thaw frozen portions, transfer them to the refrigerator and allow them to thaw slowly for at least 6 hours or overnight. This gradual thawing process helps maintain the texture of the various layers. Unlike some desserts, this Chocolate Vanilla Dream Dessert is best served cold and should not be reheated, as this would melt the whipped topping and affect the texture of the pudding layer. Simply serve it chilled directly from the refrigerator.Meal Prep Considerations
This dessert works wonderfully for meal prep. You can prepare it over the weekend to enjoy throughout the week. For optimal freshness, consider making the dessert without the final whipped topping and grated chocolate garnish until the day you plan to serve it. If you’re preparing this for an event, consider a timeline such as:- Day 1: Prepare and bake the crust
- Day 2: Add the cream cheese layer and pudding layer
- Day 3: Add the whipped topping and chocolate garnish before serving
FAQs: Frequently Asked Questions About Chocolate Vanilla Dream Dessert
What ingredients do I need to make a Chocolate Vanilla Dream Dessert?
To make a Chocolate Vanilla Dream Dessert, you typically need ingredients like heavy cream, cream cheese, sugar, vanilla extract, cocoa powder, and chocolate chips or melted chocolate. Some recipes also include crushed cookies or graham crackers for a base and whipped topping. These ingredients combine to create a layered dessert with creamy vanilla and rich chocolate flavors that’s easy to prepare and perfect for any occasion.
How do I layer the Chocolate Vanilla Dream Dessert for the best flavor?
For the best flavor and presentation, start by spreading a base layer such as crushed cookies or graham crackers in your serving dish. Then alternate layers of vanilla-flavored cream mixture and chocolate-flavored cream or pudding. Repeat the layers, finishing with a topping of chocolate shavings or chips. Chill the dessert for at least 4 hours to allow flavors to meld and the layers to set properly.
Can I make the Chocolate Vanilla Dream Dessert ahead of time?
Yes, you can prepare the Chocolate Vanilla Dream Dessert up to 24 hours in advance. After assembling the layers, cover it tightly with plastic wrap or a lid and refrigerate. Making it ahead helps the dessert set and enhances the flavors, making it a convenient choice for parties or gatherings.
Is there a gluten-free version of Chocolate Vanilla Dream Dessert?
Absolutely. To make a gluten-free Chocolate Vanilla Dream Dessert, substitute traditional graham crackers or cookies with gluten-free alternatives, such as gluten-free cookie crumbs or crushed nuts. Ensure all other ingredients, like chocolate and pudding mixes, are labeled gluten-free to avoid cross-contamination.
How can I adjust the sweetness of my Chocolate Vanilla Dream Dessert?
To control sweetness, adjust the amount of sugar or sweetened ingredients like chocolate chips and pudding mix. You can reduce sugar gradually to suit your taste, or use unsweetened cocoa powder and dark chocolate for a less sweet, richer chocolate layer. Balancing the vanilla and chocolate layers allows you to create a dessert tailored to your preferred sweetness level.
Chocolate Vanilla Dream Dessert
- Total Time: Chilling time plus 35 minutes
- Yield: 12–15 servings 1x
- Diet: Vegetarian
Description
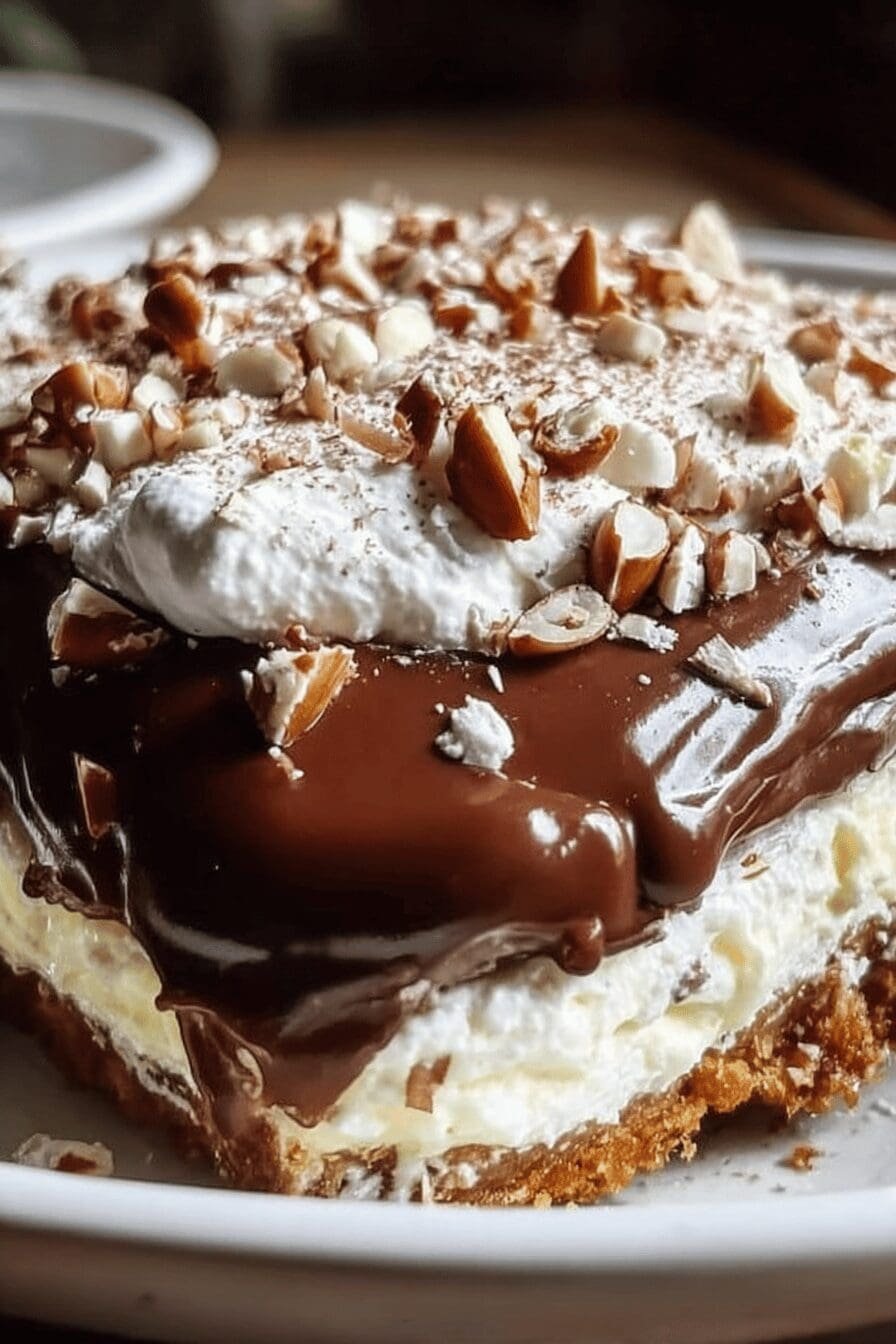
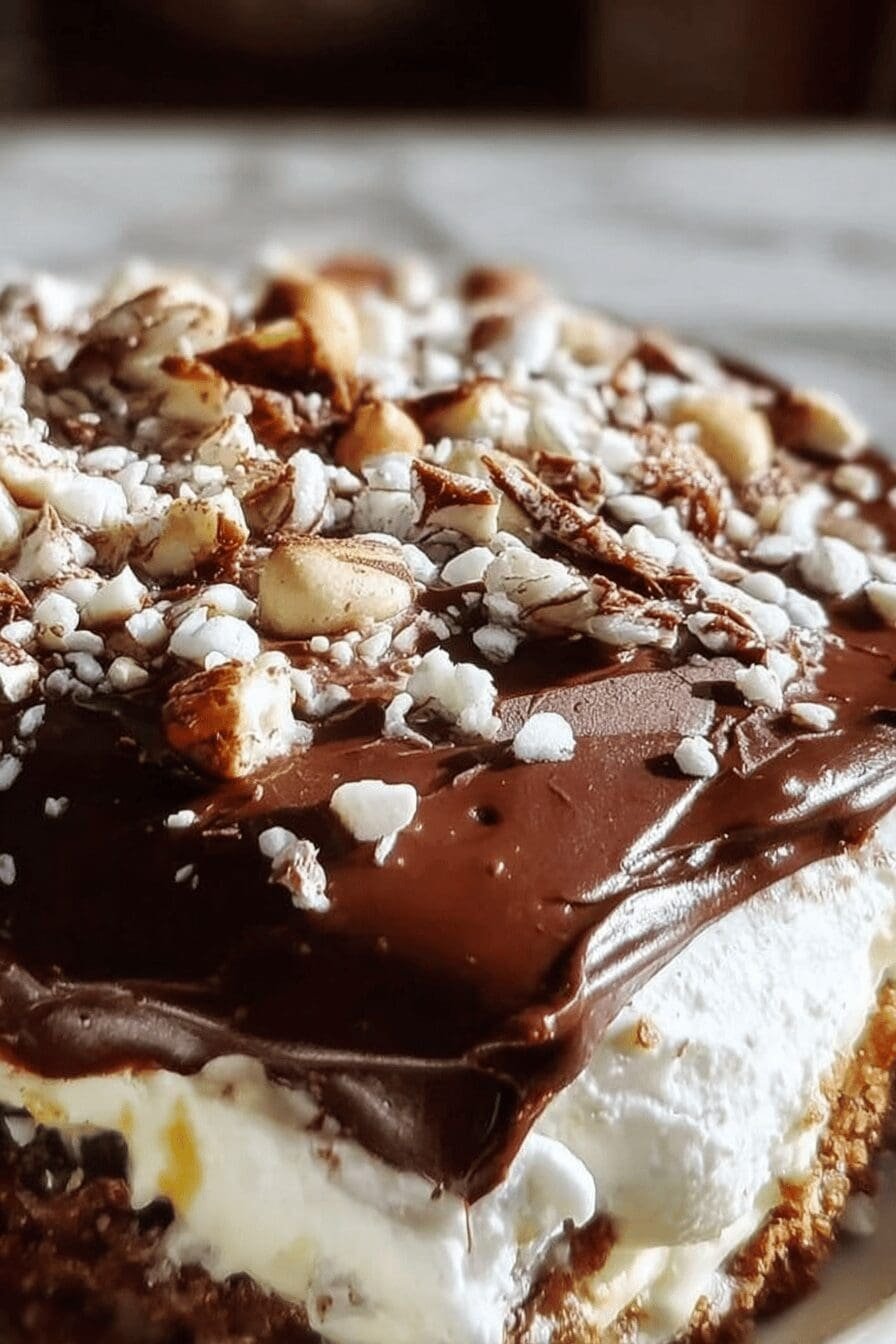
🍫 Indulge in a rich and creamy chocolate dessert perfect for satisfying your sweet tooth.
🍰 This recipe combines a crunchy pecan crust with smooth cream cheese and pudding layers for a delightful treat.
Ingredients
1 cup all-purpose flour
1 cup finely chopped pecans
1/2 cup cold butter
8 ounces cream cheese, softened
1 cup confectioners’ sugar
8 ounces whipped topping, thawed, divided
3.4 ounces vanilla-flavored instant pudding mix
3.9 ounces chocolate-flavored instant pudding mix
3 cups cold whole milk
1 chocolate bar, grated
Instructions
1- Combine 1 cup all-purpose flour and 1 cup finely chopped pecans in a medium bowl. Mix these dry ingredients thoroughly to ensure even distribution.
2- Cut in 1/2 cup cold butter using a pastry blender or two forks until the mixture resembles fine crumbs. This step is crucial for creating that perfect crumbly texture that will hold together when baked. The butter should be cold to prevent it from melting into the flour too quickly.
3- Press the mixture firmly and evenly into a 13×9-inch baking pan. Creating a uniform thickness across the entire pan ensures even baking and prevents portions of the crust from burning. Use the bottom of a measuring cup or glass to help press the mixture firmly into place.
4- Bake at 350°F (175°C) for 15-20 minutes until golden brown. Keep a close eye on the crust as it bakes, as oven temperatures can vary. The crust should smell fragrant and have a beautiful golden color when done.
5- Cool completely on a wire rack. This step is essential attempting to spread the filling on a warm crust will result in melting and a less-than-ideal texture. I recommend allowing at least 30 minutes for proper cooling.
6- In a large bowl, beat 8 ounces softened cream cheese, 1 cup confectioners’ sugar, and half of the whipped topping (4 ounces) until smooth. For best results, make sure your cream cheese is truly softened to room temperature this prevents lumps in your mixture.
7- Use an electric mixer on medium speed to achieve the smoothest consistency. Scrape down the sides of the bowl occasionally to ensure all ingredients are fully incorporated.
8- Spread the mixture evenly over the cooled crust. An offset spatula works wonderfully for this task, allowing you to create a smooth, level layer. Be gentle to avoid lifting the crust as you spread.
9- In a separate bowl, whisk both pudding mixes (3.4 ounces vanilla-flavored and 3.9 ounces chocolate-flavored) with 3 cups cold whole milk for 2 minutes until soft-set. Using both flavors together creates that distinctive taste that makes this dessert special.
10- It’s important to whisk continuously during this process to prevent lumps and ensure the pudding mixes dissolve completely. The mixture will begin to thicken as you whisk.
11- Immediately spread the pudding mixture over the cream cheese layer. Work quickly once the pudding reaches soft-set stage, as it will continue to thicken. Again, an offset spatula is your best tool for creating an even layer.
12- Chill the dessert until the pudding layer is firm. This typically takes at least 2 hours in the refrigerator, but timing can vary. The pudding should be set to the touch and not jiggle when you gently shake the pan.
13- Once the pudding layer is firm, spread the remaining whipped topping (4 ounces) evenly over the top. This creates a beautiful contrast between the dark pudding and the light topping.
14- Grate 1 chocolate bar over the top for the final touch. Using a vegetable peeler or box grater creates delicate curls or shavings that make the dessert look as good as it tastes.
15- Refrigerate until ready to serve. The dessert can be made a day in advance, and many find that the flavors actually improve after several hours in the refrigerator.
Notes
🍴 The dessert features a subtle yet delicious chocolate flavor, making it a family favorite.
❄️ Ensure the dessert is chilled until firm for optimal texture.
🥜 Finely chopped pecans in the crust provide a pleasing crunch.
- Prep Time: 20 minutes
- Chilling Time: Until firm
- Cook Time: 15 minutes
- Category: Dessert
- Method: Baking and chilling
- Cuisine: American
Nutrition
- Serving Size: 1 piece
- Calories: 360
- Sugar: 23g
- Sodium: 333mg
- Fat: 22g
- Saturated Fat: 12g
- Unsaturated Fat: 10g estimated
- Trans Fat: 0g
- Carbohydrates: 36g
- Fiber: 1g
- Protein: 5g
- Cholesterol: 40mg
Keywords: Chocolate dessert, Creamy dessert, Pecan crust, Instant pudding