Why You’ll Love This Chocolate Truffles
The preparation of chocolate truffles is simple and rewarding, perfect for anyone new to baking or seeking quick indulgent desserts. This recipe focuses on core ingredients like high-quality chocolate to deliver homemade chocolate truffles that are creamy and rich. You’ll appreciate how these treats combine ease with delightful flavors, making them a go-to for busy days.
Start with the ease of preparation this chocolate truffles recipe uses minimal tools and steps, ideal for home cooks like busy parents or students. It requires just a few basic items and finishes in about 2 hours and 30 minutes, mostly spent chilling in the fridge. That means you can whip up a batch of rich chocolate truffles without needing any actual cooking time.
Health benefits come from using antioxidant-rich dark chocolate, which supports overall wellness while offering a guilt-free treat. Options like adding full-fat canned coconut milk make it adaptable for diet-conscious folks, keeping the creamy texture intact. Enjoy chocolate truffles that balance indulgence and nutrition in every bite.
The versatility of this recipe allows for easy tweaks, such as vegan substitutions to suit different dietary needs. It’s adaptable for gluten-free preferences by choosing certified options for ingredients. This makes homemade chocolate truffles a flexible choice for everyone from food enthusiasts to seniors looking for simple recipes for rich and creamy chocolate truffles.
The distinctive flavor of these chocolate truffles comes from quality semi-sweet or bittersweet chocolate, creating an intense cocoa taste with subtle enhancements. For more excitement, try adding extracts or liqueurs for variations like a hint of vanilla or other flavors. It’s these elements that make how to make rich and creamy chocolate truffles so memorable and fun.
Jump To
- 1. Why You’ll Love This Chocolate Truffles
- 2. Essential Ingredients for Chocolate Truffles
- 3. How to Prepare the Perfect Chocolate Truffles: Step-by-Step Guide
- 4. Dietary Substitutions to Customize Your Chocolate Truffles
- 5. Mastering Chocolate Truffles: Advanced Tips and Variations
- 6. How to Store Chocolate Truffles: Best Practices
- 7. FAQs: Frequently Asked Questions About Chocolate Truffles
- 8. Chocolate Truffles
Essential Ingredients for Chocolate Truffles
To create the perfect batch of chocolate truffles, start with high-quality ingredients that ensure a smooth and creamy result. This section lists everything you need, based on precise measurements from the recipe. Let’s break it down into a structured list for easy shopping and preparation.
- Two 4-ounce bars (approximately 113 grams each) of quality semi-sweet or bittersweet chocolate, finely chopped
- 2/3 cup (about 160 ml) of heavy cream
- 1 tablespoon (about 14 grams) of unsalted butter, softened (optional)
- 1/2 teaspoon of pure vanilla extract (optional)
These ingredients form the base of your homemade chocolate truffles recipe, focusing on rich chocolate truffles that melt smoothly. For special dietary options, consider vegan swaps like full-fat canned coconut milk instead of heavy cream to keep things creamy without dairy.
When making recipe for homemade chocolate truffles, always opt for finely chopped chocolate to help it melt evenly. This not only improves texture but also makes the process smoother for busy home cooks. Remember, toppings like unsweetened cocoa powder or crushed nuts can be added later for extra flair, but they’re not in the main ingredient list.
| Ingredient | Quantity | Notes |
|---|---|---|
| Quality semi-sweet or bittersweet chocolate | Two 4-ounce bars (about 226 grams total) | Finely chop for better melting; key for rich chocolate truffles |
| Heavy cream | 2/3 cup (160 ml) | Heat until simmering; reduce to 1/2 cup if using milk chocolate |
| Unsalted butter (optional) | 1 tablespoon (14 grams) | Softened for added richness |
| Pure vanilla extract (optional) | 1/2 teaspoon | Stir in for enhanced flavor |
This table helps visualize the quantities, making it simple to follow for baking enthusiasts. Always use fresh ingredients to achieve the best results in your creamy chocolate truffles.
How to Prepare the Perfect Chocolate Truffles: Step-by-Step Guide
Gathering Your Ingredients
First, gather and measure all ingredients, ensuring you have two 4-ounce bars of quality chocolate finely chopped. This step sets up a smooth process for making homemade chocolate truffles. Prepare your workspace to keep things organized and fun, just like in a simple kitchen routine.
Chop the dark chocolate finely and place it in a heat-proof bowl, as this helps it melt evenly. Remember to heat the heavy cream until it simmers, then pour it over the chocolate. Let the mixture sit for 5 minutes to soften the chocolate before stirring.
Mixing and Chilling the Ganache
After pouring the hot cream over the chocolate, stir slowly until the mixture is smooth and melted. Optionally add the softened butter and vanilla extract at this stage for extra richness in your rich chocolate truffles. Cover the ganache with cling film and refrigerate it for 1-2 hours until firm, which is key for shaping.
Once the mixture firms up, scoop it into 2 teaspoon-sized portions. If it’s too sticky, refrigerate briefly to make rolling easier, ensuring your recipe for homemade chocolate truffles turns out perfectly. For variations like triple chocolate treats, you can adapt this base easily.
Shaping and Coating
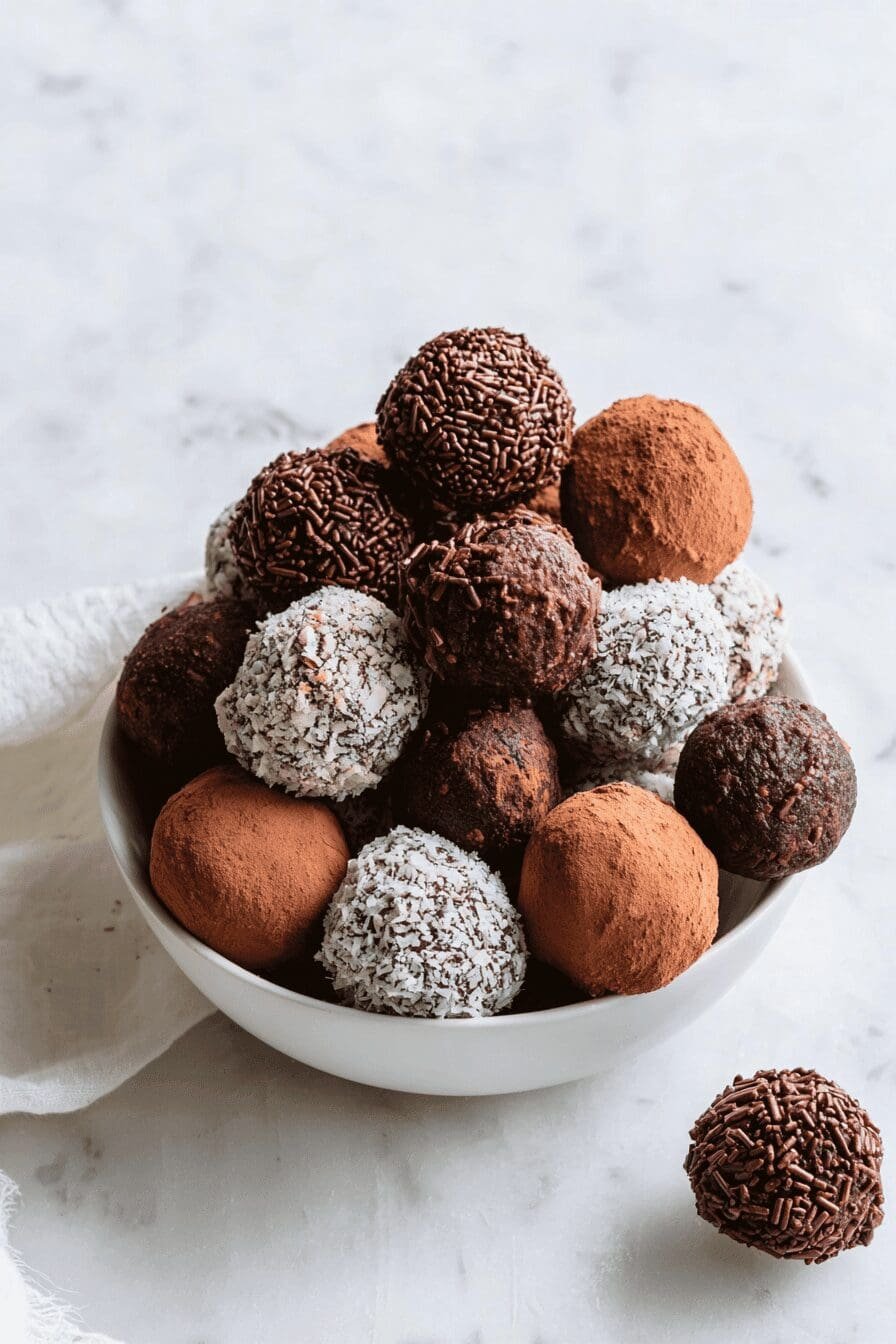
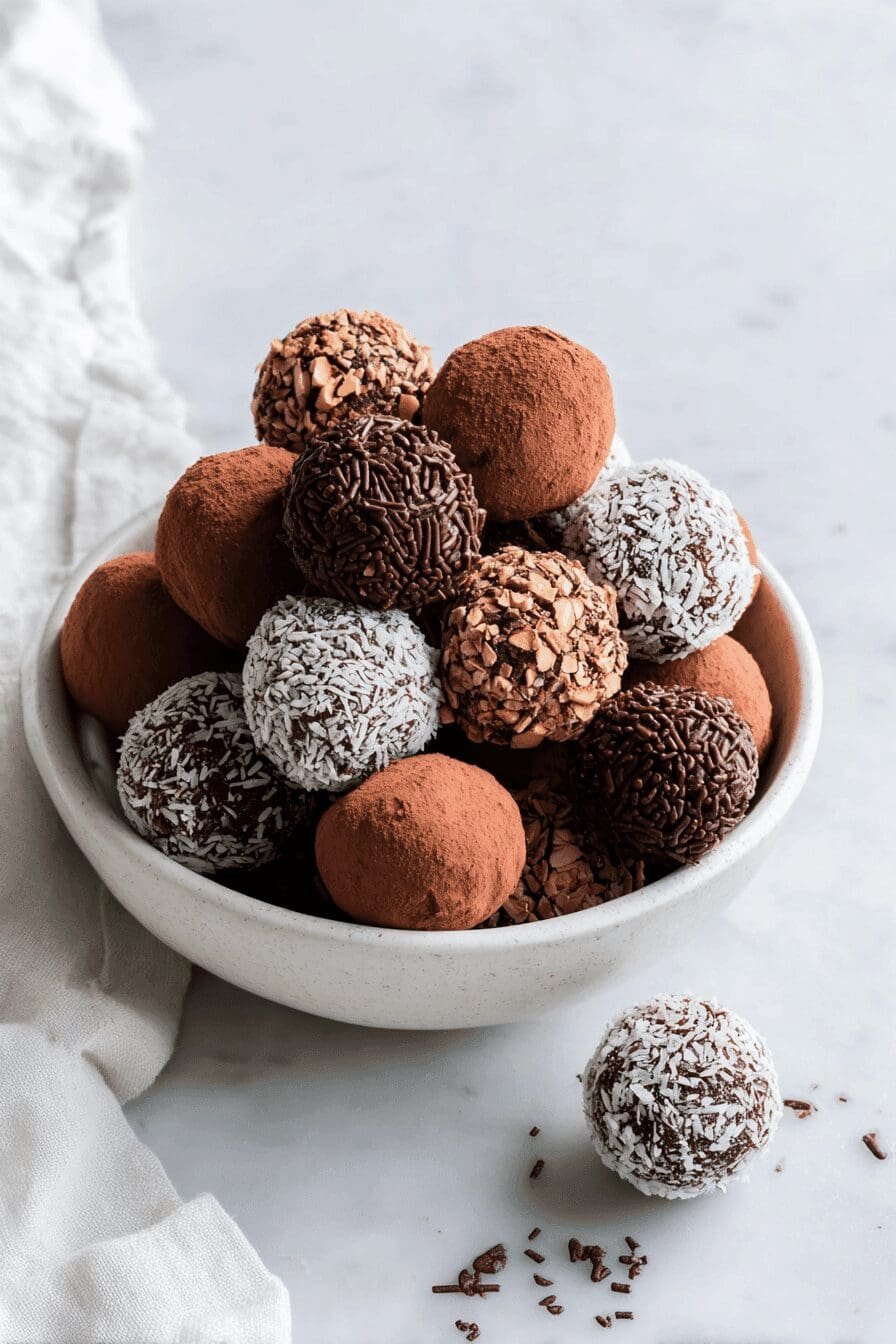
Roll the scooped portions into balls using your hands, then coat them with options like unsweetened cocoa powder or sprinkles. This step adds the final touch to your creamy chocolate truffles, making them visually appealing. Refrigerate the coated truffles briefly to set before serving at room temperature.
For adaptations, substitute heavy cream with full-fat canned coconut milk for a non-dairy version of how to make rich and creamy chocolate truffles. Total time is about 2 hours and 30 minutes, with tips like using a shallow dish for faster chilling. Follow these steps to enjoy delicious results every time.
Chopping chocolate finely is a game-changer for smoother melting heat the cream just until simmering to avoid any lumps in your ganache.

Dietary Substitutions to Customize Your Chocolate Truffles
Customizing your chocolate truffles lets you adapt the recipe to fit various needs, keeping it simple for home cooks. Start with protein and main component alternatives to make rich chocolate truffles more inclusive. For instance, replace heavy cream with coconut cream for a dairy-free option that maintains the creamy texture.
- Use plant-based butter substitutes to keep the richness without animal products in your homemade chocolate truffles recipe.
- Incorporate nut butters for added protein and flavor, enhancing the overall experience of creamy chocolate truffles.
- Swap traditional heavy cream with almond milk for a lighter version, ideal for those watching calories.
When it comes to vegetable, sauce, and seasoning modifications, get creative with your recipe for homemade chocolate truffles. Try swapping cocoa powder for spices like cinnamon to add a unique twist. Adding extracts such as mint can change things up for seasonal fun, making how to make rich and creamy chocolate truffles even more exciting.
For low-sugar diets, use alternative sweeteners like maple syrup for a natural touch. For more inspiration, check out this chocolate peanut butter poke cake which shares similar customization ideas. These changes ensure everyone can enjoy their truffles without compromising taste.
Mastering Chocolate Truffles: Advanced Tips and Variations
Pro Techniques for Better Results
Tempering chocolate before mixing can improve the texture of your chocolate truffles, leading to smoother and shinier finishes. This technique is great for elevating your homemade skills when making rich chocolate truffles. Focus on chopping chocolate finely to ensure even melting, a key tip for perfect ganache.
Heating cream until just simmering prevents separation, making your recipe for homemade chocolate truffles foolproof. Using a shallow dish speeds up the chilling process, so your mixture firms up quickly. For those exploring flavors, adding extracts or liqueurs brings new excitement to creamy chocolate truffles.
Flavor and Presentation Ideas
Experiment with flavor variations like sea salt or espresso powder in the ganache for a sophisticated twist on how to make rich and creamy chocolate truffles. Presentation tips include dusting with edible gold powder or using chopped pistachios for visual appeal. Make-ahead options let you prepare ganache days in advance, shaping truffles right before serving.
Store your truffles properly to keep them fresh, as covered in the next section. These advanced methods make baking more enjoyable for enthusiasts, helping you create standout treats every time. Remember, adding small touches can turn basic chocolate truffles into something special.
How to Store Chocolate Truffles: Best Practices
Proper storage keeps your chocolate truffles fresh and delicious, extending their enjoyment. Store finished truffles in an airtight container at room temperature for 3-4 days, or in the refrigerator for up to 2 weeks as per the recipe details. This method helps maintain the rich and creamy texture you worked hard to achieve.
- Refrigerate truffles to preserve flavor, especially for longer periods.
- Freeze them by wrapping individually and placing in a sealed container for up to three months.
- Thaw frozen truffles in the fridge overnight to keep their shape intact.
For meal prep, make large batches and freeze portions to have homemade chocolate truffles ready anytime. This approach works well for busy professionals or families, ensuring you always have a treat on hand. Follow these tips to enjoy your recipe for homemade chocolate truffles at their best.
FAQs: Frequently Asked Questions About Chocolate Truffles
Why won’t my chocolate melt properly when making truffles?
Chocolate may not melt properly if the pieces are too large or if the cream isn’t hot enough. Chop the chocolate into very small, uniform pieces for faster melting. Heat the cream until it’s just simmering, then pour it over the chopped chocolate. If it still doesn’t melt, place your bowl over a pot of simmering water and stir gently until smooth. Avoid overheating, as this can cause the chocolate to seize or separate.
How can I fix ganache that won’t thicken enough for truffles?
Use good quality chocolate—not chocolate chips—and heavy cream to make ganache. After combining, pour the mixture into a shallow dish and refrigerate it; this helps it thicken faster. Stir occasionally to check consistency. If it remains too soft, refrigerate longer before shaping your truffles. Over-thickening can be reversed slightly by warming gently, so watch closely.
What causes a greasy or separated truffle mixture, and how do I prevent it?
A greasy or separated truffle mixture usually means the heavy cream was too hot when combined with chocolate. To prevent this, heat the cream until it’s just simmering, not boiling, before pouring over the chocolate. Stir slowly and gently to combine. Cooling the ganache in the fridge before shaping can also help maintain smooth consistency without separation.
My truffle mixture feels too sticky to roll—what should I do?
Sticky truffle mixtures are common with creamy recipes. To make rolling easier, scoop the mixture into small mounds on a parchment-lined tray and chill in the refrigerator for 20-30 minutes. This firms it up and reduces stickiness, making it easier to handle. Use a small spoon or scoop, and cool your hands briefly if necessary to prevent melting while rolling.
How do I get toppings like cocoa powder or nuts to stick well to my truffles?
If your rolled truffles are too dry for toppings to adhere, gently mash each truffle between your palms to soften the surface and bring out some stickiness. Immediately roll the coated truffle in your chosen topping for better adherence. For heavier coatings, slightly chill the truffles first, then add toppings quickly to prevent them from drying out before coating.
Chocolate Truffles
- Total Time: 2 hours 30 minutes
- Yield: 20 to 24 truffles
Description
🍫 Homemade Chocolate Truffles Recipe delivers rich and creamy treats made with high-quality chocolate for indulgent moments.
🍬 Simple ingredients and easy steps make this a perfect dessert to impress and satisfy your sweet tooth.
Ingredients
– Two 4-ounce bars (about 226 grams total) quality semi-sweet or bittersweet chocolate finely chop for better melting; key for rich chocolate truffles
– 2/3 cup (160 ml) heavy cream heat until simmering; reduce to 1/2 cup if using milk chocolate
– 1 tablespoon (14 grams) unsalted butter softened for added richness
– 1/2 teaspoon pure vanilla extract stir in for enhanced flavor
Instructions
1-Gathering Your Ingredients: First, gather and measure all ingredients, ensuring you have two 4-ounce bars of quality chocolate finely chopped. This step sets up a smooth process for making homemade chocolate truffles. Prepare your workspace to keep things organized and fun, just like in a simple kitchen routine.
2-Gathering Your Ingredients: Chop the dark chocolate finely and place it in a heat-proof bowl, as this helps it melt evenly. Remember to heat the heavy cream until it simmers, then pour it over the chocolate. Let the mixture sit for 5 minutes to soften the chocolate before stirring.
3-Mixing and Chilling the Ganache: After pouring the hot cream over the chocolate, stir slowly until the mixture is smooth and melted. Optionally add the softened butter and vanilla extract at this stage for extra richness in your rich chocolate truffles. Cover the ganache with cling film and refrigerate it for 1-2 hours until firm, which is key for shaping.
4-Mixing and Chilling the Ganache: Once the mixture firms up, scoop it into 2 teaspoon-sized portions. If it’s too sticky, refrigerate briefly to make rolling easier, ensuring your recipe for homemade chocolate truffles turns out perfectly. For variations like triple chocolate treats, you can adapt this base easily.
5-Shaping and Coating: Roll the scooped portions into balls using your hands, then coat them with options like unsweetened cocoa powder or sprinkles. This step adds the final touch to your creamy chocolate truffles, making them visually appealing. Refrigerate the coated truffles briefly to set before serving at room temperature.
6-Shaping and Coating: For adaptations, substitute heavy cream with full-fat canned coconut milk for a non-dairy version of how to make rich and creamy chocolate truffles. Total time is about 2 hours and 30 minutes, with tips like using a shallow dish for faster chilling. Follow these steps to enjoy delicious results every time.
Notes
🔪 Chop chocolate finely for smoother melting.
♨️ Heat cream until just simmering to avoid burning.
🍽️ Use a shallow dish to chill the mixture faster.
- Prep Time: 10 minutes
- Chilling time: 2 hours 20 minutes
- Cook Time: 0 minutes
- Category: Dessert
- Method: No-cook, chilling
- Cuisine: French-inspired
Nutrition
- Serving Size: 1 truffle
Keywords: chocolate truffles, homemade truffles, creamy chocolate, rich dessert