Description
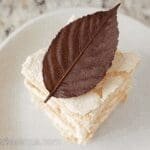
🍫 Edible Chocolate Leaves offer a creative way to add elegant, natural-looking decorations to your desserts using simple ingredients.
🍂 This fun and easy recipe captures autumn hues and textures, perfect for enhancing the visual appeal of fall-themed baking and celebrations.
Ingredients
– 200g Dark chocolate This brings the rich flavor and those helpful antioxidants
– 2 tbsp Coconut oil It adds healthy fats and helps with a smooth texture
– 1 cup Almond flour Gives a nutty taste and keeps it gluten-free
– 3 tbsp Maple syrup A natural way to sweeten things up just right
– 1/4 tsp Sea salt Brings out the depth of the chocolate flavor
– Chocolate candy melts Used for coating the leaves, so melt it carefully for the best results
– Clean and dry leaves such as dahlia leaves Choose ones that are firm and glossy with prominent veins
– Edible shimmer luster dust in autumn shades (gold, orange, yellow, brown) Adds a fun, colorful sparkle to your finished leaves
Instructions
1-Let’s dive into making your chocolate leaf, and it’s easier than you think. First, gather all your ingredients, including any swaps for dietary needs like vegan versions. This sets you up for success right from the start, just like I do when I’m in the kitchen with my family.
2-Next, start by selecting leaves with prominent veins that are firm and glossy, making sure they’re not too thin or brittle. Wash them thoroughly in soapy water, rinse well, and dry them completely to avoid any moisture issues. Arrange the leaves upside down on parchment paper placed on a baking sheet.
3-Now, melt the chocolate candy melts in the microwave at 50% power in 30-second intervals. Stir frequently until it’s smooth and fully melted, but don’t let it overheat. Once ready, use a clean brush to apply a generous, even layer of the melted chocolate on the back of each leaf, covering up to the edges while keeping it thin to prevent breakage.
4-After that, mix the dark chocolate and coconut oil in a heatproof bowl over simmering water until smooth and glossy. Stir in the almond flour, maple syrup, and sea salt to make a consistent batter. Pour this mixture onto a lined baking tray, spreading it into a thin layer that resembles a leaf shape.
5-Place the chocolate-coated leaves in the refrigerator to set briefly until firm. Once they’re ready, carefully peel the leaves away to reveal the chocolate shapes, then use a brush to add edible shimmer luster dust in those autumn colors for a decorative touch. Finally, refrigerate your main mixture for at least 2 hours until it’s solid, then break it into leaf-like shards.
Notes
🍃 Choose firmer leaves with distinct veins for better imprint and durability.
💧 Ensure leaves are completely dry as moisture can prevent chocolate from adhering properly.
🔥 Melt chocolate carefully using intervals to avoid overheating and maintain smooth texture.
- Prep Time: 15 minutes
- Category: Decoration, Dessert Garnish
- Method: Melting, Coating, Setting
- Cuisine: International
Nutrition
- Serving Size: 1 chocolate leaf
Keywords: Edible Chocolate Leaves,Chocolate Decorations,Fall Dessert Garnish,Creative Baking