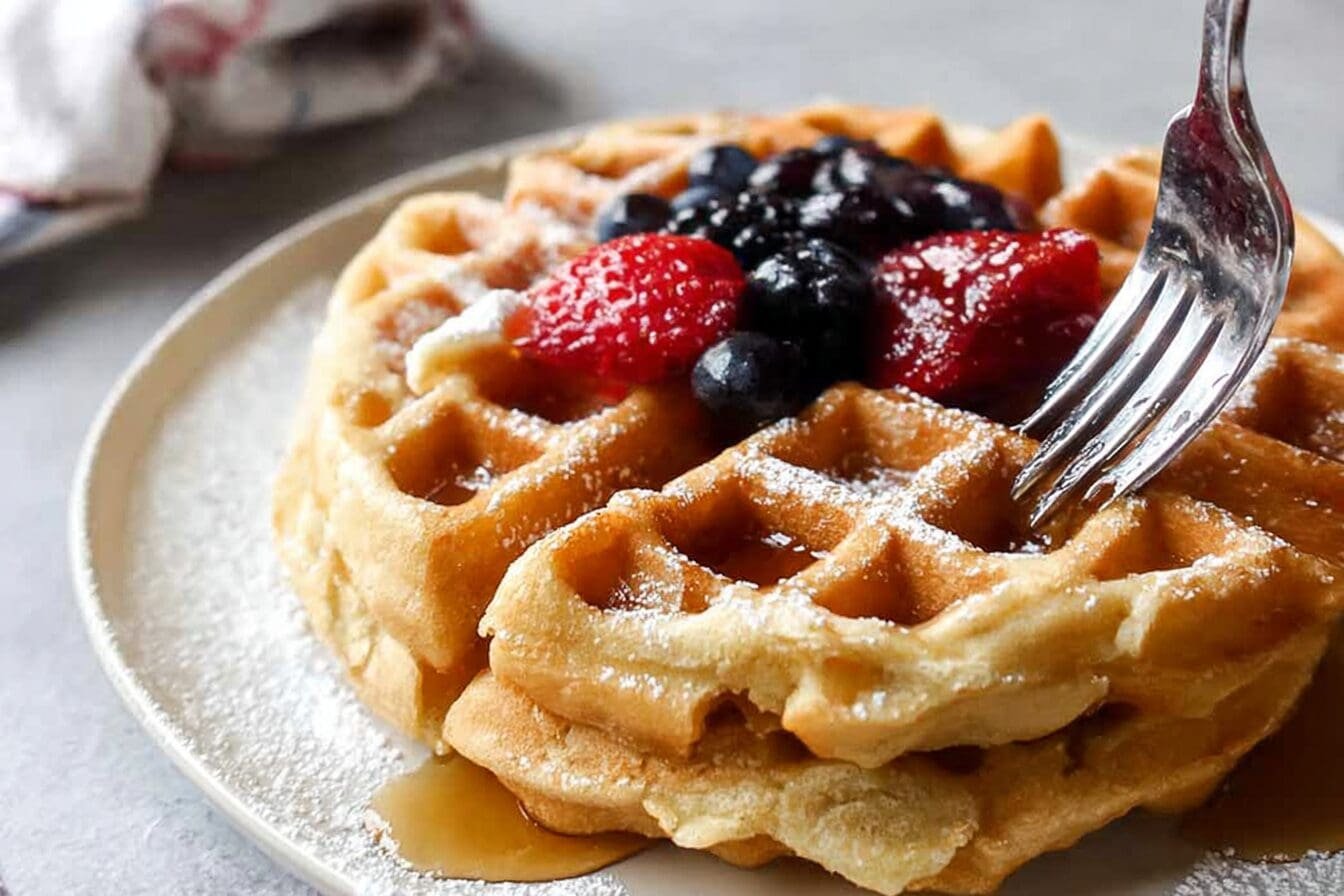
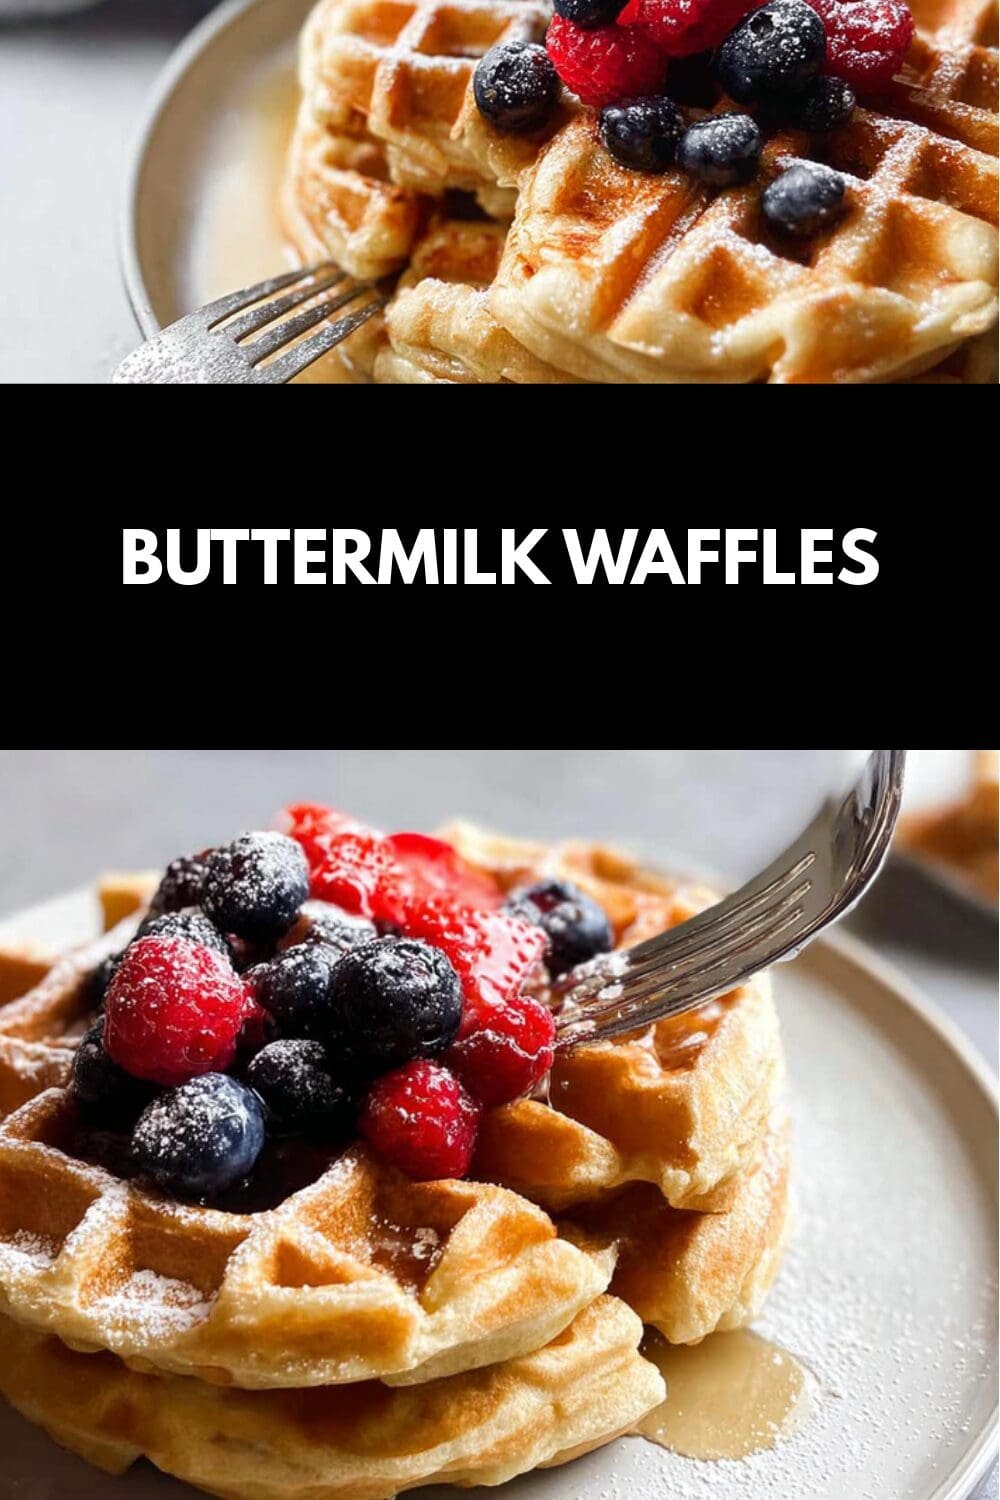
Why You’ll Love This Buttermilk Waffles
Imagine starting your day with waffles that are light, fluffy, and packed with that perfect tangy flavor from buttermilk! These homemade buttermilk waffles are a game-changer for anyone who loves breakfast, offering a crispy outside and a soft inside that makes every bite feel special. They’re super easy to whip up, which is great for busy mornings when you need something quick yet delicious.
One of the best parts about this recipe is how it brings people together around the table. Whether you’re a parent rushing to get kids off to school or a student looking for a simple meal, these waffles fit right in. Let’s dive into why this recipe stands out and why it might become your new favorite for breakfast waffles.
- Ease of preparation: You can make these buttermilk waffles in just 20 minutes total, with only 10 minutes of prep time. That means less time in the kitchen and more time enjoying your meal, making it ideal for busy parents and working professionals who want a hassle-free breakfast.
- Health benefits: Each serving packs in nutrients like 331 calories, 8 grams of protein, and essential vitamins such as 525 IU of vitamin A and 182 milligrams of calcium. Buttermilk adds a boost of potassium at 341 milligrams per serving, plus it’s linked to better digestion, as highlighted in a guide to the health benefits of buttermilk. This makes it a smart choice for diet-conscious folks and seniors looking for balanced meals.
- Versatility: These waffles work for any occasion, from a quick weekday breakfast to a fun weekend treat. You can top them with fresh berries, syrup, or even savory options, appealing to food enthusiasts and travelers who love experimenting. Plus, they’re adaptable for different dietary needs, which we’ll cover later.
- Distinctive flavor: The mix of buttermilk, vanilla, and a hint of sugar creates a tangy yet sweet taste that’s hard to beat. It’s not just another waffle recipe; it’s one that delivers fluffy waffles with a crispy edge, perfect for family gatherings or solo mornings, satisfying baking enthusiasts and newlyweds alike.
This recipe for buttermilk waffles is all about joy and simplicity, turning ordinary ingredients into something extraordinary. With its blend of ease and flavor, you’ll find yourself making it over and over, especially if you’re into crispy waffles or fluffy waffle recipes. Now, let’s gather what you need to get started!
Jump To
- 1. Why You’ll Love This Buttermilk Waffles
- 2. Essential Ingredients for Buttermilk Waffles
- 3. How to Prepare the Perfect Buttermilk Waffles: Step-by-Step Guide
- 4. Dietary Substitutions to Customize Your Buttermilk Waffles
- 5. Mastering Buttermilk Waffles: Advanced Tips and Variations
- 6. How to Store Buttermilk Waffles: Best Practices
- 7. FAQs: Frequently Asked Questions About Buttermilk Waffles
- 8. Buttermilk Waffles
Essential Ingredients for Buttermilk Waffles
Creating the perfect buttermilk waffles starts with high-quality ingredients that deliver that signature light and fluffy texture. Each one plays a key role, from the flour that gives structure to the buttermilk that adds tang and tenderness. I’ll walk you through the list so you can see exactly what makes this easy waffle recipe shine.
For special dietary options, you can swap ingredients to make it vegan, gluten-free, or low-calorie. For instance, use almond milk with a bit of vinegar for vegan buttermilk, or opt for gluten-free flour to keep things inclusive. Let’s look at the full list to ensure you have everything ready.
- 2 cups all-purpose flour This forms the base and gives the waffles their structure for that fluffy inside.
- 2 tablespoons sugar Adds a touch of sweetness and helps with browning on the outside.
- 2 teaspoons baking powder Helps the waffles rise and become light and airy.
- 1 teaspoon baking soda Reacts with the buttermilk for extra lift and tanginess.
- ½ teaspoon salt Balances the flavors and enhances the overall taste.
- 2 cups warm buttermilk Provides moisture and that classic tangy flavor, also tenderizing the batter.
- ⅓ cup melted butter Adds richness and helps create the crispy exterior; for a low-calorie version, substitute with applesauce.
- 2 eggs Bind the ingredients and add to the fluffiness; for egg-free options, try flax eggs.
- 1 teaspoon vanilla extract Infuses a warm, sweet note that elevates the whole recipe.
- Optional toppings: Fresh berries For a burst of color and vitamins.
- Optional toppings: Powdered sugar A light dusting for extra sweetness.
- Optional toppings: Syrup To drizzle on top for that classic waffle finish.
With these ingredients, you’re set for the best buttermilk waffle recipe from scratch. For more breakfast inspiration, check out our blueberry cottage cheese breakfast bake for another easy morning option.
How to Prepare the Perfect Buttermilk Waffles: Step-by-Step Guide
Gathering and Mixing the Ingredients
First things first, let’s get those ingredients ready for your homemade buttermilk waffles! Start by pulling out a large bowl for the dry ingredients and another for the wet ones. This step ensures everything mixes smoothly without overworking the batter, which is key for keeping your waffles fluffy.
In one bowl, whisk together the 2 cups all-purpose flour, 2 tablespoons sugar, 2 teaspoons baking powder, 1 teaspoon baking soda, and ½ teaspoon salt. This dry mix creates the foundation that makes your waffles rise perfectly. In a separate bowl, whisk the 2 cups warm buttermilk with the ⅓ cup melted butter, keeping things warm to activate the baking soda effectively.
Once that’s done, add the 2 eggs to the wet mixture and stir until combined for about a minute. Then, gently mix the wet and dry ingredients together, whisking just until blended but leaving some lumps that’s the secret to avoiding tough waffles. Finally, fold in the 1 teaspoon vanilla extract for that extra flavor pop.
Resting and Cooking the Batter
After mixing, let the batter rest for 10 minutes; this helps the flour hydrate and improves browning. For the best results with breakfast waffles, preheat your waffle iron to a medium-high setting, around 375°F, and give it a light greasing with oil or cooking spray to prevent sticking.
Pour about ⅓ to ½ cup of batter onto the center of the iron, making sure it spreads to about ½ inch from the edge. Close the lid and cook for 3-5 minutes, or until the waffles turn golden and the steam stops escaping that’s your cue they’re done. If you’re aiming for crispy waffles, resist the urge to peek too early!
Serve right away with toppings like fresh berries, powdered sugar, and syrup for a delightful finish. This step-by-step for how to make buttermilk waffles takes just 10 minutes of prep and 10 minutes of cooking, totaling 20 minutes. For more waffle ideas, explore our ham and cheese hash brown casserole, which pairs wonderfully for a hearty breakfast.
Tips for Perfect Results
While cooking, keep an eye on the temperature to ensure even cooking too hot and they’ll burn, too cool and they’ll be soggy. Nutritional info per serving includes 331 calories and 40 grams of carbs, so it’s a balanced option for your morning. Remember, following these steps leads to light and crispy buttermilk waffles every time!

Dietary Substitutions to Customize Your Buttermilk Waffles
Protein and Main Component Alternatives
Adapting this buttermilk waffles recipe for different needs is simple and fun! If you’re looking to boost protein, swap the all-purpose flour with a mix that includes almond or oat flour, which adds nutrients while keeping things gluten-free. For those watching calories, use Greek yogurt instead of buttermilk to cut down on fat without losing that tangy kick.
Another great swap is replacing eggs with mashed bananas or flaxseed for a vegan version, helping maintain the fluffy texture. These changes make the recipe accessible for diet-conscious individuals and busy parents who need quick, healthy options.
Vegetable, Sauce, and Seasoning Modifications
Add veggies like spinach or zucchini to the batter for a nutritious twist, turning your waffles into a savory meal. For sauces, try yogurt instead of syrup to keep it light, and experiment with seasonings like cinnamon or nutmeg for flavor variations. These tweaks ensure your buttermilk waffles suit everyone, from food enthusiasts to travelers seeking fresh ideas.
According to calorie information for waffles, these modifications can reduce sugar intake, making it ideal for healthy eating. Get creative and make this waffle recipe your own with these easy changes!
Mastering Buttermilk Waffles: Advanced Tips and Variations
Pro Cooking Techniques and Make-Ahead Options
Taking your buttermilk waffles to the next level is easier than you think! To achieve that crispy outside, always fully preheat your waffle iron and lightly grease it for perfect edges. Avoid over-mixing the batter to keep the texture tender, and let it rest for 10 minutes as it helps with browning.
For make-ahead magic, prepare the batter the night before and store it in the fridge just stir gently before using. You can also keep cooked waffles warm in a 225°F oven on a rack, so they’re crisp when served. These tips ensure success for anyone, from baking enthusiasts to seniors.
Flavor Variations and Presentation Tips
Experiment with flavors by adding chocolate chips or nuts for a fun twist on this classic buttermilk waffles recipe. Presentation is key stack them high with fresh toppings and a sprinkle of powdered sugar for a wow factor. These variations keep things exciting for newlyweds and working professionals alike.
As noted, learn about the health benefits of buttermilk from reliable sources to inspire more creative ideas. With these advanced tips, you’ll master fluffy waffles in no time!
How to Store Buttermilk Waffles: Best Practices
Storing your buttermilk waffles keeps them fresh and ready for later! Let them cool completely before packing to avoid sogginess, then place in an airtight container in the fridge for up to 4 days. For freezing, wrap each one individually and store for 2-3 months it’s perfect for meal prep.
To reheat, use a toaster or oven at 350°F for a few minutes to regain that crispy texture. These methods make it easy for busy parents and students to enjoy homemade waffles anytime, keeping breakfast waffles simple and delicious.
FAQs: Frequently Asked Questions About Buttermilk Waffles
Can you make buttermilk waffle batter the night before?
Yes, buttermilk waffle batter can be prepared ahead of time. Mix the batter the night before and store it covered in the refrigerator. The buttermilk will continue to develop flavor overnight. Before using, let the batter sit at room temperature for about 30 minutes, then give it a gentle stir. The batter may thicken in the fridge, so you might need to add a tablespoon or two of buttermilk to reach the right consistency before cooking.
How do you store leftover buttermilk waffles?
To store leftover buttermilk waffles, first allow them to cool completely. For short-term storage, place them in an airtight container and refrigerate for up to 4 days. For longer storage, wrap each waffle individually in plastic wrap or aluminum foil, then place them in a freezer-safe bag or container. Frozen buttermilk waffles will maintain quality for 2-3 months. Reheat in a toaster, oven, or waffle iron until warmed through and crispy.
What makes buttermilk waffles different from regular waffles?
Buttermilk waffles have a distinct tangy flavor and fluffier texture compared to regular waffles. The acidity in buttermilk reacts with baking soda to create extra lift, resulting in a lighter interior. Buttermilk also tenderizes the gluten in the flour, making the waffles more delicate. These waffles typically develop a crispier exterior and richer flavor profile than those made with regular milk. The slight acidity balances perfectly with sweet toppings like maple syrup and fresh fruit.
Why are my buttermilk waffles not crispy?
Several factors can prevent buttermilk waffles from becoming crispy. First, ensure your waffle iron is fully preheated before adding batter. Undercooking is a common issue—wait until steam stops escaping before opening. Too much liquid in the batter can also prevent crisping; the batter should be thick but pourable. Finally, avoid stacking waffles immediately after cooking, as trapped steam creates sogginess. Instead, place them in a single layer on a baking sheet in a warm oven (200°F) until ready to serve.
Can you freeze buttermilk waffles?
Yes, buttermilk waffles freeze exceptionally well, making them perfect for make-ahead breakfasts. Let the waffles cool completely, then wrap each one individually in plastic wrap or aluminum foil. Place the wrapped waffles in a freezer-safe bag or container, removing as much air as possible. They’ll stay fresh for 2-3 months in the freezer. To reheat, there’s no need to thaw—simply place them in a toaster, toaster oven, or regular oven at 350°F for 5-10 minutes until heated through and crispy.

Buttermilk Waffles
- Total Time: 20 minutes
- Yield: 4 servings
- Diet: Vegetarian
Description
🧇 This Buttermilk Waffle Recipe delivers waffles with a crispy outside and a light, fluffy inside for a perfect breakfast treat.
🍓 The batter rests to hydrate the flour, ensuring tender texture and beautiful browning every time you cook.
Ingredients
– 2 cups all-purpose flour This forms the base and gives the waffles their structure for that fluffy inside.
– 2 tablespoons sugar Adds a touch of sweetness and helps with browning on the outside.
– 2 teaspoons baking powder Helps the waffles rise and become light and airy.
– 1 teaspoon baking soda Reacts with the buttermilk for extra lift and tanginess.
– ½ teaspoon salt Balances the flavors and enhances the overall taste.
– 2 cups warm buttermilk Provides moisture and that classic tangy flavor, also tenderizing the batter.
– ⅓ cup melted butter Adds richness and helps create the crispy exterior; for a low-calorie version, substitute with applesauce.
– 2 eggs Bind the ingredients and add to the fluffiness; for egg-free options, try flax eggs.
– 1 teaspoon vanilla extract Infuses a warm, sweet note that elevates the whole recipe.
– Fresh berries For a burst of color and vitamins.
– Powdered sugar A light dusting for extra sweetness.
– Syrup To drizzle on top for that classic waffle finish.
Instructions
1-Gathering and Mixing the Ingredients: First things first, let’s get those ingredients ready for your homemade buttermilk waffles! Start by pulling out a large bowl for the dry ingredients and another for the wet ones. This step ensures everything mixes smoothly without overworking the batter, which is key for keeping your waffles fluffy.
2-Gathering and Mixing the Ingredients: In one bowl, whisk together the 2 cups all-purpose flour, 2 tablespoons sugar, 2 teaspoons baking powder, 1 teaspoon baking soda, and ½ teaspoon salt. This dry mix creates the foundation that makes your waffles rise perfectly. In a separate bowl, whisk the 2 cups warm buttermilk with the ⅓ cup melted butter, keeping things warm to activate the baking soda effectively.
3-Gathering and Mixing the Ingredients: Once that’s done, add the 2 eggs to the wet mixture and stir until combined for about a minute. Then, gently mix the wet and dry ingredients together, whisking just until blended but leaving some lumps that’s the secret to avoiding tough waffles. Finally, fold in the 1 teaspoon vanilla extract for that extra flavor pop.
4-Resting and Cooking the Batter: After mixing, let the batter rest for 10 minutes; this helps the flour hydrate and improves browning. For the best results with breakfast waffles, preheat your waffle iron to a medium-high setting, around 375°F, and give it a light greasing with oil or cooking spray to prevent sticking.
5-Resting and Cooking the Batter: Pour about ⅓ to ½ cup of batter onto the center of the iron, making sure it spreads to about ½ inch from the edge. Close the lid and cook for 3-5 minutes, or until the waffles turn golden and the steam stops escaping that’s your cue they’re done. If you’re aiming for crispy waffles, resist the urge to peek too early!
6-Resting and Cooking the Batter: Serve right away with toppings like fresh berries, powdered sugar, and syrup for a delightful finish. This step-by-step for how to make buttermilk waffles takes just 10 minutes of prep and 10 minutes of cooking, totaling 20 minutes. For more waffle ideas, explore our ham and cheese hash brown casserole, which pairs wonderfully for a hearty breakfast.
7-Tips for Perfect Results: While cooking, keep an eye on the temperature to ensure even cooking too hot and they’ll burn, too cool and they’ll be soggy. Nutritional info per serving includes 331 calories and 40 grams of carbs, so it’s a balanced option for your morning. Remember, following these steps leads to light and crispy buttermilk waffles every time!
Notes
🥄 Avoid over-mixing batter; whisk until just combined to keep waffles tender.
⏲️ Rest batter for 10 minutes to hydrate flour, improving texture and browning.
🔥 Fully preheat and lightly grease waffle iron to achieve crispy edges.
- Prep Time: 10 minutes
- Resting Time: 10 minutes
- Cook Time: 10 minutes
- Category: Breakfast
- Method: Waffle Iron Cooking
- Cuisine: American
Nutrition
- Serving Size: 1 waffle
- Calories: 331
- Sugar: 8g
- Sodium: 600mg
- Fat: 14g
- Saturated Fat: 8g
- Carbohydrates: 40g
- Fiber: 1g
- Protein: 8g
- Cholesterol: 90mg
Keywords: Buttermilk Waffle, Crispy Waffle, Fluffy Waffle, Breakfast Recipe